Renoise
Basics
Section titled “Basics”- Beginner’s Tutorial Part 1 - Getting Started
- Track: a single column of notes (which could be played by different instruments but are typically devoted to a single instrument each for the sake of effects)
- Pattern: a set of tracks. Each pattern gets its own number in the sequences.
- Sequence: a set of patterns in a row
- Beginner’s Tutorial Part 2 - Building a Beat
- Add a sample by double-clicking it in the Samples browser at the bottom right
- Press escape to enter note-input mode (you’ll see a red border around the pattern editor)
- Press keyboard keys as though they’re piano keys to input a note, then use arrow keys to move around
- After adding a note, the step length (the number just below the pattern editor) is used to determine how far down the cursor goes. E.g. if you want a note on every beat, set the step length to 4 and then hold down the note you want to input.
- You can quickly change this with ⌘+number
- After adding a note, the step length (the number just below the pattern editor) is used to determine how far down the cursor goes. E.g. if you want a note on every beat, set the step length to 4 and then hold down the note you want to input.
- Tab and shift+tab switch between tracks
- Home and end go to the top and bottom of a track
- F9 - F12 go 0%, 25%, 50%, and 75% of the way through a track
- It’s good to rename your tracks to represent the instrument
- Beginner’s Tutorial Part 3 - Track Effects
- Mute or solo a track by left- or right-clicking the “PLAY” just under the track name
- Add effects using the effect browser at the bottom left (the icon for it is three squares arranged in a row)
- The checkbox to the left of an effect’s name lets you turn it on or off
- Sound goes from the sample → pre-mixer → effects from left to right → post-mixer. All of these things are in the the same bottom bar.
- Beginner’s Tutorial Part 4 - Automation
- To the right of the effects button (the three squares arranged in a row) is an icon with 4 vertices and lines connecting them. That’s the automation panel, and you can use it to control any of the parameters for effects you’ve configured in that track.
- You can also right-click any effect’s parameter to insert a command in the right columns in the track. This only allows one command per line, so it’s more limited than the graphical automation panel.
- Beginner’s Tutorial Part 5 - Sequencing
- You can clone sequences right in the editor using the button below the ➕
- This assigns a new pattern number, meaning modifications to one do not affect the other
- If you don’t want a new pattern number, just click the arrows on either side of the number
- This assigns a new pattern number, meaning modifications to one do not affect the other
- You can name sequences in the sequence editor (typically by expanding the sequence editor to make the inputs visible)
- You can add section headers by clicking the button above the ➖
- Clicking the “P ↔ M” button at the upper right of the sequence editor will let you see the matrix, where it becomes pretty easy to copy entire tracks between patterns.
- Add a new note column by clicking the ➕ just underneath a track name on the left. This is good for inputting intervals/chords.
- If notes are cutting each other off, you may need to go to the Sampler tab → change NNA (“New Note Action”) to “Note-Off” rather than “Cut”
- You can hover over the dropdown itself to see a tooltip of what it means.
- If notes are cutting each other off, you may need to go to the Sampler tab → change NNA (“New Note Action”) to “Note-Off” rather than “Cut”
- Use the “A ↔ E” button at the upper right of the track editor to be able to modify an entire selection quickly, e.g. to transpose all selected notes at once.
- You can clone sequences right in the editor using the button below the ➕
- An Introduction to Instruments
- Instruments in Renoise are samples, plugins, or MIDI.
- In Renoise, you can only have one instrument open at a time. In Redux, you can have any number of instruments.
- Instruments can have any number of samples but only one plugin at a time.
- Instruments can use phrases, which play pre-made sequences of notes and effects
- Installing libraries/presets (reference)
- On macOS, I just double-clicked a
.xrnlfile and it got installed to~/Documents/Renoise.- If, instead of installing that, it adds a single instrument to Renoise in your current song, then you can just drag and drop the whole folder to your “Installed Libraries” directory (i.e.
~/Documents/Renoise).
- If, instead of installing that, it adds a single instrument to Renoise in your current song, then you can just drag and drop the whole folder to your “Installed Libraries” directory (i.e.
- In Renoise, to use the libraries, the typical directory is up one level from the default library location. Click the icon that looks like a person all the way on the right and then click “Installed Libraries”.
- .sfz files are keyzone files. If they come with a library, you typically only want to open those. They control how samples are played across a range of notes and velocities (e.g. so that the same sample isn’t just pitch-shifted to any note).
- On macOS, I just double-clicked a
Usage notes
Section titled “Usage notes”- Tracker columns
- You’ll see something like this:
C#5 01 60 D7 Z10 ZT80C#5is the note and octave01is the instrument used60is the volumeD7is the delayZ10: local FXZT80: master FX
- You’ll see something like this:
- Effect commands (reference)
- In the FX column of a track, you can type various commands. You would input these in Edit mode by just typing something like “G10” (to glide up by a whole semitone).
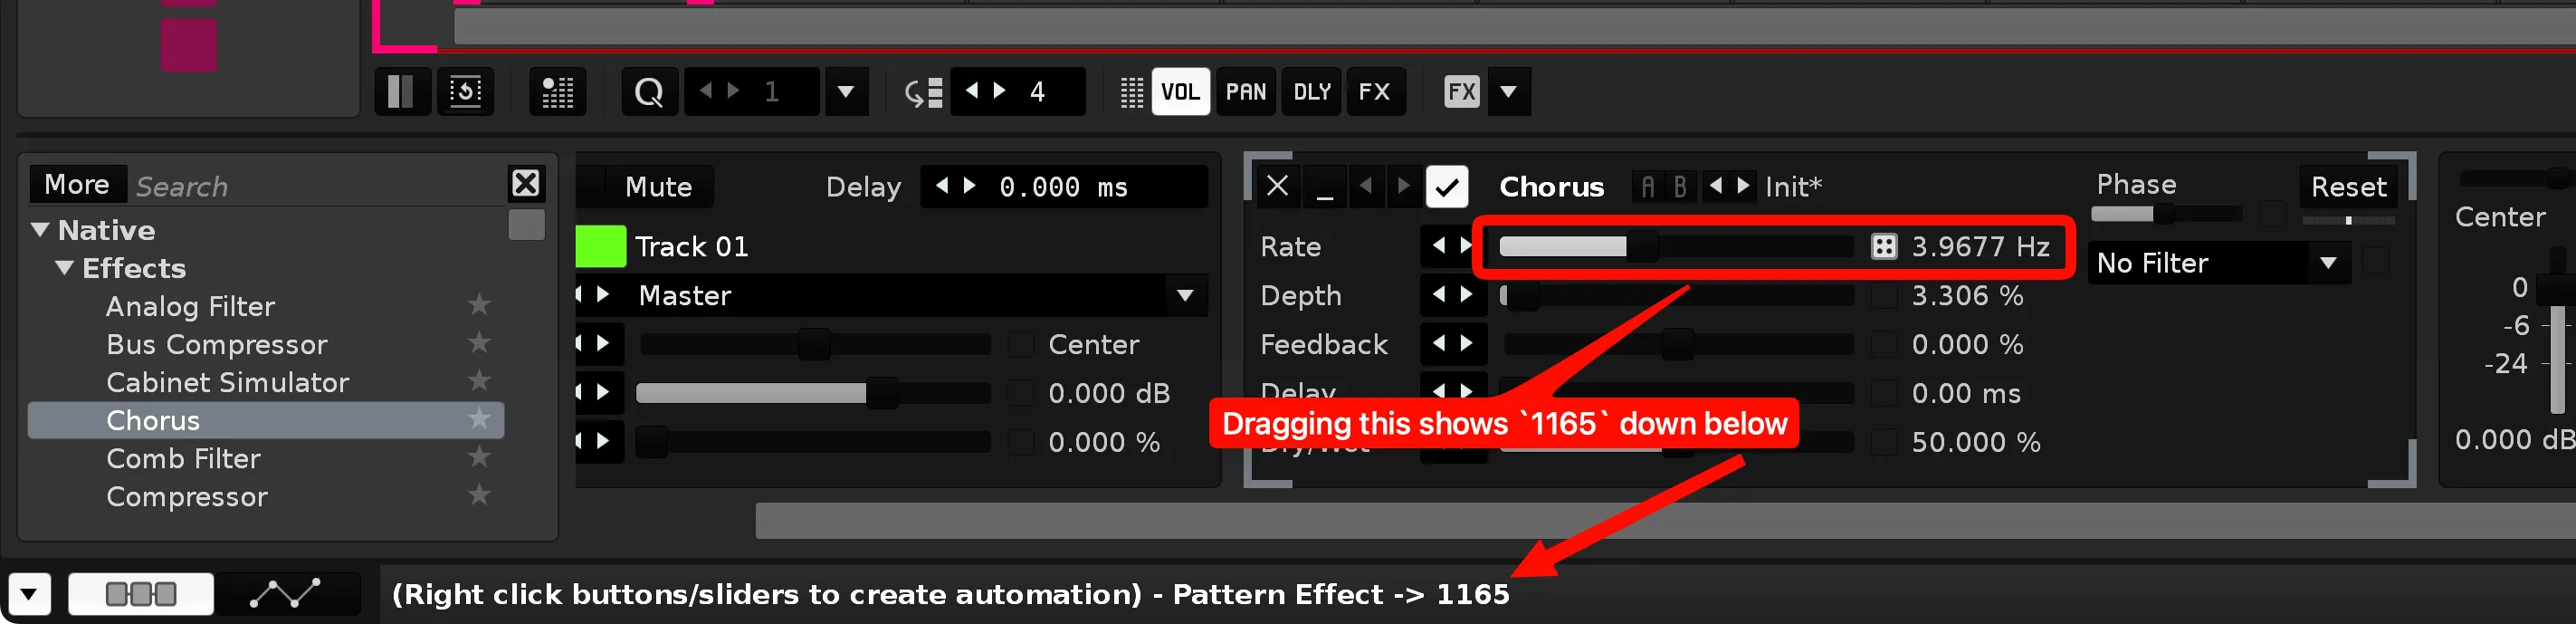
- You can also change any track effects using effect commands within a row of the track. This takes the form
xyzz.xis the track device index, starting at 0. So if you only add a Distortion effect to the track, then you would setxto1.yis the parameter within that effect that you want to change.zzis the value to change it to.- You don’t need to guess at all with this stuff. Simply change an effect value in the track and the bottom of the window will tell you what the
xyzzcode would be for that change:
- You don’t need to guess at all with this stuff. Simply change an effect value in the track and the bottom of the window will tell you what the
- Meta effects
- “Send” effect
- This lets you send a track to an effects track. I think you would use this when you want multiple tracks to use the same effects, e.g. you may want several drums to go through the same reverb without having to duplicate the effects.
- To make an effects track, I think you have to scroll the pattern to the right side and insert a track at the end. I think their insertion location determines whether you can send to them.
- You can have multiple “send” effects on the same track
- This lets you send a track to an effects track. I think you would use this when you want multiple tracks to use the same effects, e.g. you may want several drums to go through the same reverb without having to duplicate the effects.
- Hydra (reference)
- Lets you send an input value to many different destinations
- “Send” effect
- Anacrusis
- Simply shorten the length of the first pattern in the sequence using the numerical input (which starts at 64) at the upper left of the pattern
- Sequencer
- Scroll to edit a particular pattern
- Keyboard
- Play from cursor: shift+space
- Select entire track: home → shift+end
- If you just want to clear an entire track: shift+F3
- Clear row in track: shift+delete
- While in edit mode:
- Shift+A: insert note OFF
- You can type a number to change the delay column (with it selected). A value of 0 is no delay.
- Play a single line of notes at the cursor: enter
- Space will stop the notes from playing if there was no “off” command reached
Troubleshooting
Section titled “Troubleshooting”Renoise won’t start on macOS
Section titled “Renoise won’t start on macOS”It kept hanging on the start-up screen, and launching /Applications/Renoise.app/Contents/MacOS/Renoise via the terminal didn’t show anything obvious. The solution was:
sudo killall -9 coreaudiod
But then my Proxy Audio Device didn’t work until I unplugged my physical audio interface and plugged it back in.