SNS
Created: 2019-03-04 10:25:50 -0800 Modified: 2019-08-19 15:42:56 -0700
Basics for push notifications (reference, NodeJS API Docs)
Section titled “Basics for push notifications (reference, NodeJS API Docs)”First of all, keep in mind that SNS can be used as a pubsub via the publish/subscribe APIs, sending text messages, etc., but this section only talks about push notifications.
- Pricing/cost (reference)
- As far as I can tell, you’re not charged for endpoints that are just sitting around in SNS (i.e. you’re not sending notifications to them). I also don’t know if anything’s responsible for ever cleaning those up.
- SNS is an abstraction layer over each individual service, e.g. SNS will still contact Apple or Google to send messages to the individual devices.
- AWS also provides a service called PinPoint. The big difference is this quote: “Pinpoint includes dashboards that show real-time analytics; the ability to create targeted campaigns based on external data; an A/B testing tool for different messages; and more.”
- In order for you to call createPlatformEndpoint, you need to have a valid device token. This will eventually get verified with the respective cloud platform, e.g. Google/Apple, but it doesn’t happen at the time of createPlatformEndpoint (I know this because I specified “bar” as a token and it successfully created it). This means that while users can guess device IDs, they can’t guess those tokens, so you can verify that a user owns a device simply by a successful return from createPlatformEndpoint.
- What this means is that you should probably never make device IDs into a primary key in your database (although they can be part of a composite primary key), that way a user can’t have a valid token but a made-up ID. Another reason for why this is a good decision is because device IDs don’t have to be unique across platforms; there’s nothing stopping, say, Facebook from making a phone whose IDs resemble that of Google’s.
- There’s still potentially a reason for you to track device IDs, which is that for legitimate users, the device IDs will still serve as a way to quickly update settings.
- What this means is that you should probably never make device IDs into a primary key in your database (although they can be part of a composite primary key), that way a user can’t have a valid token but a made-up ID. Another reason for why this is a good decision is because device IDs don’t have to be unique across platforms; there’s nothing stopping, say, Facebook from making a phone whose IDs resemble that of Google’s.
- Each individual service like Apple Push Notification Service (APNS) or Google Cloud Messaging (GCM) has its own credentials provided to you when you make an app (see createPlatformApplication docs and the corresponding attributes, which include the platform’s credentials). AWS needs these in order to be able to send messages on your behalf.
- Note that you just need to make the app, you don’t need to get the app accepted onto the store. For iOS, you also need a physical device, but Android allows usage of the emulator.
- Android also requires that you make the application in Firebase (which is pretty straightforward but might require a package ID from the app) (reference). Note that an Android native application is not the same as a Firebase application; it’s the Firebase application that’s needed for the sake of getting an API key to plug into SNS. If you’ve made the Firebase application and need the key, here’s how you get it.
- iOS requires that you get the push notification key from here. This is not exactly iTunes Connect, but the AWS docs do mention iTunes Connect. This takes the form of a file that’s given to you when you create the certificate. You do need to have a paid developer account for this to work ($100/year).
- When SNS does finally send a message, it does so using a device’s “device ID” or “registration ID”, which is a unique identifier for a device/app combination. There are a bunch of different terms for this, so it may not actually be a “device ID” per se, e.g. on Android, it’s a token that FCM gives you.
- If an endpoint subscribes to an event, then you need to publish the event with all accepted platform-specific message formats (reference - see “Messages to an App on Multiple Platforms” section).
- It’s definitely faster/easier as a developer using SNS to publish generic messages rather than personalized ones. A generic message simply involves publishing to a topic, but a personalized message involves one of two things:
- Having the server construct each message individually (for which Lambda is a good candidate so that you’re not consuming your web server’s resources)
- Having the client fetch data to fill in a template, e.g. “Congratulations, reward!”
- Publishing a single topic and having it go to multiple users involves the following steps:
- Call createTopic
- Call subscribe on behalf of the user with the “application” Endpoint. This lets you specify the device/app token.
- Call publish with the TopicArn as opposed to the TargetArn.
- Make sure to call unsubscribe when a user deletes their account or no longer wants a notification. Note that deleting the endpoint in SNS does not automatically unsubscribe you from all topics (reference).
- Amazon has a term called “token feedback” where you’ll be alerted if a token expired or is invalid. However, it wasn’t clear to me at first that Google/Apple/whoever is not proactively telling Amazon about these events. Instead, when you try publishing using a device ID through SNS, those platforms will respond saying what state the token is in, then it’s your job as a developer to recreate the token. This process is described via the pseudo code here.
- Not that it matters, but I have to assume that each notification platform probably has logic to remove expired tokens on their own. The reason it doesn’t matter is because the only important part is that it’s not your responsibility to worry about the notification platform; you only need to be concerned with your own database and possibly the endpoints that SNS is tracking (and even then, it’s not like you’re charged for having expired/invalid endpoints in SNS). There’s just no motivation to have unused endpoints in SNS.
- If you are concerned about this, then you would involve your own database layer. For example, if you’re using MySQL, you’d do something like this:
- start transaction
- delete user from your database
- tell SNS to delete the user
- end transaction
- ↑ That way, you can’t be out-of-sync with SNS
- …and if you’re using something like DynamoDB, you’d just tell it to update a record and then delete from SNS (since it’s fully managed).
- If you are concerned about this, then you would involve your own database layer. For example, if you’re using MySQL, you’d do something like this:
- The token can be invalidated by something like reinstalling the app, but your back-end won’t be notified about a user uninstalling/reinstalling. Instead, the app itself (whether on Android or iOS) will have some event that gets triggered when the token is available or is refreshed and that will have to tell your back-end. Thus, you typically don’t need to handle failed notifications (as long as they’re unimportant) since you would need the device token in order to recover from that situation.
- iOS has didRegisterForRemoteNotificationsWithDeviceToken (reference)
- Android has onNewToken and onTokenRefresh (reference)
- Note that regardless of your platform, subscriptions are done based on EndpointArns, so as long as you update your endpoint’s attributes, the ARN won’t change, so you don’t need to modify subscriptions.
- Not that it matters, but I have to assume that each notification platform probably has logic to remove expired tokens on their own. The reason it doesn’t matter is because the only important part is that it’s not your responsibility to worry about the notification platform; you only need to be concerned with your own database and possibly the endpoints that SNS is tracking (and even then, it’s not like you’re charged for having expired/invalid endpoints in SNS). There’s just no motivation to have unused endpoints in SNS.
- I didn’t confirm this myself yet, but if you’re curious about the total number of notifications that you’ve sent, you can look in CloudWatch (the metric will be exposed automatically).
- This isn’t an exact metric and I didn’t measure this myself, but sending about a million notifications takes on the order of minutes (as opposed to hours/days/weeks).
- If you want to get logs in CloudWatch for successful/failed deliveries, you can always update SNS at any time to enable this (in the console, it’s SNS → Dashboard → Click the number under “Platform applications” → Edit one of your applications → Scroll down to “Delivery status logging” → pick whether you want to use existing roles or create new ones (note: you probably want to use the existing one, then you don’t actually need to type anything in the boxes below if you already had one set up)). It will also create the log group for you (it looks like this: “sns/us-west-2/212785478310/app/APNS_SANDBOX/apns_application_bot_land”), although that doesn’t seem to happen until an event is supposed to get logged.
Writing a testbed Android application
Section titled “Writing a testbed Android application”This details how to make an Android app just to receive notifications from SNS. This covers everything from the beginning and eventually just logs to the console the notification’s text. It is not great code.
- Make Firebase app (reference)
- Get the Firebase API key (reference)
- Make an Android app. I just made a basic app from their wizard.
- In Android Studio, choose Tools → Firebase → Cloud Messaging
- This sets up OAUTH
- Choose your existing Firebase project from earlier
- Make a new service (this is step 3 in the wizard). Note that for some weird reason, the “File” menu originally just showed about 6 options, none of which were “Service”. Later, when I went back to it, it showed TONS of options and let me complete the task.
- Modify the code that they give you for this step
- I defined “TAG” to be “Adam13531”
- I modified the manifest, but there was already a section for my service, so I just had to add the <intent> section.
- I got rid of the scheduleJob code that wasn’t defined since I’m just testing.
- This is the code I ended up with:
- Modify the code that they give you for this step
var TAG = "Adam13531";
class FirebaseMessagingServiceTest : FirebaseMessagingService() {
    override fun onNewToken(token: String?) {        Log.d(TAG, "Refreshed token: " + token!!)    }
override fun onMessageReceived(remoteMessage: RemoteMessage?) { Log.d(TAG, "From: " + remoteMessage!!.from!!) if (remoteMessage.data.size > 0) { Log.d(TAG, "Message data payload: " + remoteMessage.data) } if (remoteMessage.notification != null) { Log.d(TAG, "Message Notification Body: " + remoteMessage.notification!!.body!!) } }}- At this point, Firebase wouldn’t call onNewToken for me, so I tried adding logging to see if it got the token.
FirebaseInstanceId.getInstance().instanceId    .addOnCompleteListener(OnCompleteListener { task ->        if (!task.isSuccessful) {            Log.w("Adam13531", "getInstanceId failed", task.exception)            return@OnCompleteListener        }
val token = task.result?.token Log.d("Adam13531", token) })- This gave me an error - “Default FirebaseApp is not initialized in this process”
- This was all done on 3/6/2019, and it turns out this was due to a recent issue with a Gradle update (reference), so I needed to modify build.gradle to point to 3.2.0 instead of 3.3.0:
classpath 'com.android.tools.build:gradle:3.2.0'-
Note: by doing this, you’ll almost immediately get a pop-up saying that you should upgrade Gradle because it detects a new version.
-
After making the service, you can test with Firebase rather than having to test with AWS. I didn’t even try this though.
-
Make SNS application via AWS console. This takes the Firebase API key.
-
Make an endpoint via SNS with the Firebase token that you logged from the Android app.
-
Publish to that endpoint using the AWS console. You should see the notification in the Android Studio console.
Troubleshooting (for the testbed Android application)
Section titled “Troubleshooting (for the testbed Android application)”“The app gradle file must have a dependency on com.google.firebase:firebase-core for Firebase services to work as intended.”
Section titled ““The app gradle file must have a dependency on com.google.firebase:firebase-core for Firebase services to work as intended.””I’m pretty sure this is just because I don’t actually need the Analytics services, so the wizard never added the core for me. According to https://firebase.google.com/docs/android/setup, I can add firebase-core manually, but then I get a different error.
Setting up an Apple (APN service) application
Section titled “Setting up an Apple (APN service) application”(NOTE TO SELF: never remove this section here since other notes link to it. Instead, just link from here to the new section if this ever gets moved)
This process describes how to get an application set up in SNS for iOS devices.
When you go through the AWS Console, you’ll see UI like this:
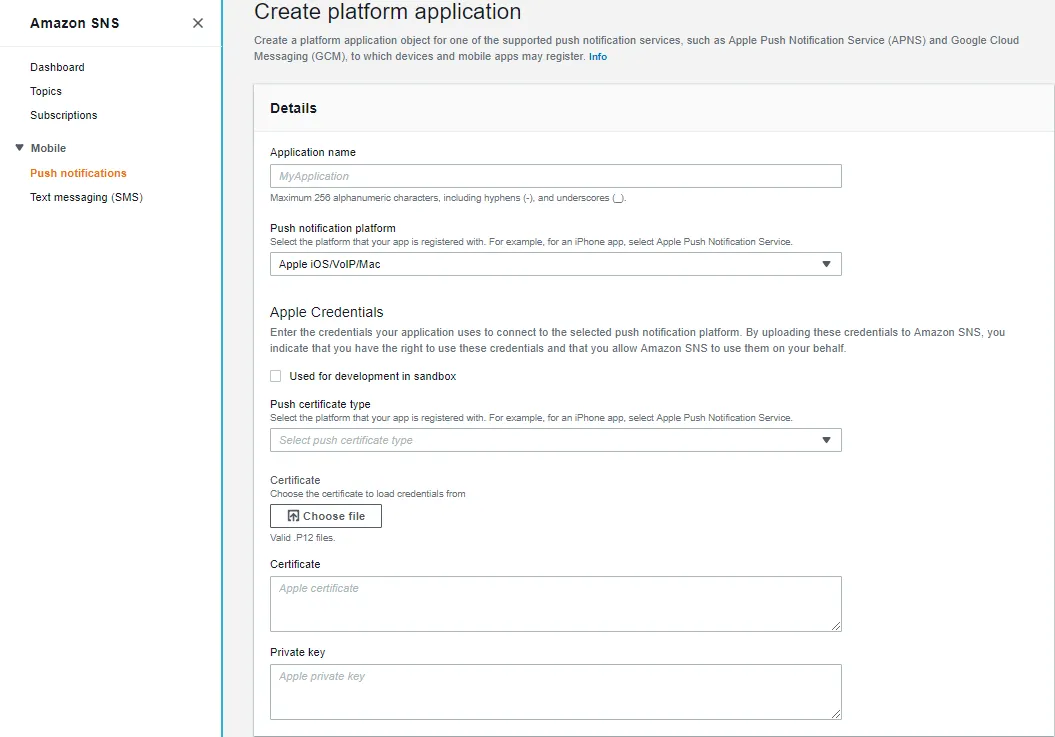
This indicates that you need a P12 file. I had no idea how to get one of these until finding the corresponding Apple page and this blog post on how to generate a certificate from Windows.
- Make an app via Identifiers → App IDs on this page (click the ➕ button at the top). This is needed so that you can make a certificate (since it needs to be tied to an app).
- I just named it “TestNotifications” and gave it an ID of “com.botland.testnotification”.
- Make sure to check the “Push notifications” checkbox.
- On that same page, go to Certificates → All and click the ➕ button at the top.
- Pick what kind of certificate you need. I chose Development → Sandbox since I’m just testing.
- Update: it looks like there’s now the choice of “Apple Push Notification service SSL (Sandbox & Production)” which may be a better choice. There’s also one that’s specific to Sandbox, but I don’t see why you’d use that.
- Pick the app that you made in a previous step.
- It tells you to create a CSR file and gives you instructions on Mac. If you have a Mac, you should probably just follow those instructions. Otherwise, follow these instructions for Windows. I’ll write what I did here:
- (note: I already had openssl on my computer, but if you don’t have it, go get it)
- Create a private key
- openssl genrsa -out new-ios-app.key 2048
- (this may say “unable to write ‘random state’”, which I think is fine, but if you don’t want to see that, I think you have to be an administrator when you run the command)
- Create a certificate signing request
- openssl req -new -sha256 -key new-ios-app.key -out new-ios-app.csr
- I typed these details into my certificate
- Pick what kind of certificate you need. I chose Development → Sandbox since I’m just testing.
You are about to be asked to enter information that will be incorporated
into your certificate request.
What you are about to enter is what is called a Distinguished Name or a DN.
There are quite a few fields but you can leave some blank
For some fields there will be a default value,
If you enter ’.’, the field will be left blank.
Country Name (2 letter code) [AU]:US
State or Province Name (full name) [Some-State]:Washington
Locality Name (eg, city) []:
Organization Name (eg, company) [Internet Widgits Pty Ltd]:Xtonomous LLC
Organizational Unit Name (eg, section) []:
Common Name (e.g. server FQDN or YOUR name) []:Bot Land
Email Address []:adam@bot.land
Please enter the following ‘extra’ attributes
to be sent with your certificate request
A challenge password []:hunter2 (← obviously replace with a better password. Also, FYI, this will show in plaintext as you type it in (at least on Windows))
An optional company name []: Xtonomous LLC
- Upload that CSR to Apple (see the parent step to this one). You get a “.cer” file out of that (which you can always download later if you ever need it). Now we need to get this into a format that Amazon wants.
- Turn the .cer file into a .pfx file (semi-related: the pfx file is also used by Xcode)
- openssl pkcs12 -export -out new-ios-app.pfx -inkey new-ios-app.key -in aps_development.cer
- ↑ Note: this will probably fail. Read below.
- At this point, I got a local error: “unable to load certificates”. The instructions mention what to do in this case, so I’ll include that here too.
- Convert the CER downloaded from Apple to a PEM
- openssl x509 -inform der -in aps_development.cer -out new-ios-app.pem
- Combine the private key and the .pem file into a .pfx
- openssl pkcs12 -export -out new-ios-app.pfx -inkey new-ios-app.key -in new-ios-app.pem
- Convert the CER downloaded from Apple to a PEM
- At this point, I could upload the .pfx file directly to Amazon via the console, type in my “certificate password” into the input and click “Load credentials from file”. This will automatically populate the Certificate and Private Key sections. Also, if you made a sandbox certificate, then check the “sandbox” checkbox
- Save your public and private keys somewhere safe. I just took the entirety of the folder I had (the .cer, .csr, .key, .pem, and .pfx). The .cer can be obtained from Apple later, but the others can’t be.
- Later on, I wanted to use Terraform to set up the application, so I needed the private key and certificate. Note that you can keep the “---begin---” and “---end---” tags when submitting the credentials. I can get both from the PFX in the same command: “openssl pkcs12 -in new-ios-app.pfx -nodes -clcerts” (reference). You could also take these out of Amazon’s console UI after typing in your password.
- Note that Terraform can make the SNS application for you, so you don’t need to have created it via AWS’s console.
Sending a notification from NodeJS to an iPhone (reference)
Section titled “Sending a notification from NodeJS to an iPhone (reference)”This wasn’t all that obvious to figure out because of the message format. Here’s what ended up working for me (keep reading for how this JSON string was formed):
aws sns publish --target-arn arn:aws:sns:us-west-2:ACCOUNT_ID:endpoint/APNS_SANDBOX/apns_application_bot_land/UUID --message '{"default":"hello default","APNS":"{\aps\:{\alert\:{\body\:\{\\msg\\:\\hello APNS\\}\},\mutable-content\:1}}","APNS_SANDBOX":"{\aps\:{\alert\:{\body\:\{\\msg\\:\\hello APNS_SANDBOX\\}\},\mutable-content\:1}}"}' --message-structure jsonNote: ACCOUNT_ID and UUID above are taken directly from AWS as part of the ARN. I didn’t want to include those since they’re personalized to the specific device that you registered, but I think the format can be good for reference.
As for forming the string itself, I wrote a program here to demonstrate what it looks like:
const obj = {  default: "hello world",  APNS: JSON.stringify({    aps: {      alert: {        // We can eventually put other keys in here, but for now, let's just        // include the basics.        body: JSON.stringify({ msg: "hello HiDeoo" })      },      "mutable-content": 1    }  }),  APNS_SANDBOX: JSON.stringify({    aps: {      alert: {        // We can eventually put other keys in here, but for now, let's just        // include the basics.        body: JSON.stringify({ msg: "hello HiDeoo" })      },      "mutable-content": 1    }  })};
// What prints from this line corresponds to the "Message" param (reference)console.log(JSON.stringify(obj));
There are three stringify calls here and they’re all necessary from what my tests showed:
- The one at the APNS / APNS_SANDBOX level: this is needed because each individual platform message has to be a string
- The “body” part - this also has to be a string, although Amazon won’t complain; I think it just doesn’t deliver the message.
- The one in “console.log”. This is because the docs say that the Message param has to be a string.
Other notes:
- “default” isn’t needed if you know which platform you’re publishing to
- APNS_SANDBOX is needed only if the ARN was made for APNS_SANDBOX. If you want to cover all of your bases, just send both APNS and APNS_SANDBOX. It’s bandwidth consumed internally to AWS, so you’re not being charged for it.
Troubleshooting
Section titled “Troubleshooting”AWS never seems to return an error message
Section titled “AWS never seems to return an error message”This almost certainly wasn’t an AWS problem, but I ran into an issue where my application’s API for calling into AWS just never returned anything and never errored. It seems to have resolved itself. The only thing that I’d changed in between the errors and the resolutions were creating endpoints and subscriptions for existing applications in SNS.
Error creating SNS platform application: InvalidParameter: Invalid parameter: PlatformPrincipal not valid (reference)
Section titled “Error creating SNS platform application: InvalidParameter: Invalid parameter: PlatformPrincipal not valid (reference)”This happened to me when trying to set up the APNS_SANDBOX platform application. It was only happening through Terraform that I got this, not through the AWS console. I also didn’t get the error when trying from the command line (reference).
The problem turned out to be my own fault. I have a process that converts “n” characters into real newlines, but I wasn’t doing it for the sandbox parameters, just the non-sandbox ones (note: the reason I had to convert “n” characters in the first place was because CircleCI only lets you have a single-line string, not a multi-line one, so I had a shell script add the multiple lines back in).