Mailchimp
Created: 2020-05-06 15:05:15 -0700 Modified: 2021-07-18 18:04:43 -0700
Basics
Section titled “Basics”- API docs
- Make sure to check for HTTP status code 204 (“no content”) since it indicates that you shouldn’t try parsing the response for JSON
- Throttling
- API - you’re throttled when you exceed 10 simultaneous connections
- Sign-ups - you can’t sign up for email lists too frequently or you get an error saying “EMAIL has signed up to a lot of lists very recently; we’re not allowing more signups for now” (reference), so be ready to test with multiple email addresses.
- Terminology
- List/audience: this is what you send emails to. The free tier only lets you have a single list.
- Merge fields: these are typically fields like “First name” and “Last name” that you can refer to by variable when sending an email. You can add your own custom fields via the dashboard → Audience → Settings → Audience fields and |MERGE| tags.
- Basic setup
- Verify your domain by clicking the link in your email
- Set up DKIM and SPF settings through here: https://us18.admin.mailchimp.com/account/domains/
Getting started with the API
Section titled “Getting started with the API”- Through their UI
- I made an API key
- I deleted the default audience so that I could rename it since customers see it.
- At that point, I could query my list. Each API key has a region at the end, e.g. “us-15”. In PostMan, I set up something really simple:
- GET https://us15.api.mailchimp.com/3.0/lists/
- Authorization → Basic Auth
- Username: a
- Password: your API key
- Hit “Send”
- I set up a webhook directly through the UI (reference)
- When you make a webhook, it tries connecting to the webhook immediately.
- They are retried at increasing intervals for 75 minutes. If they consistently fail, Mailchimp may just drop or disable them.
- Security: they suggest putting a password directly into the callback URL:

Testing webhooks
Section titled “Testing webhooks”- Testing webhooks
- For local testing, I think it’s easiest to use ngrok since it takes maybe 45 seconds to set up from start to finish (then just run “ngrok http 80” or whichever port you’re using). Then, you just make a new webhook with the callback URL that you want (or modify the existing one). You don’t even have to forward ports.
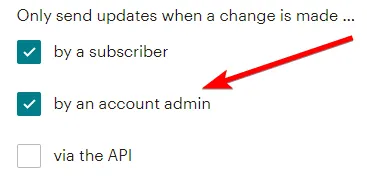
- Anything you do in the dashboard UI on Mailchimp itself is considered to be an action “by an account admin”, so it’s really easy to test webhooks by just triggering particular events from the “Audience” tab’s “actions” dropdown, and it doesn’t cost anything.
-
Chances are that you want this set anyway so that your system is kept in-sync with Mailchimp regardless of whether you or the user triggered it. I don’t choose “via the API” since my servers are the only ones that call the API, although it may be nice to have in case your server dies right in between calling into Mailchimp and handling the rest of the event.
-
Once you have a webhook in production, it’s a little bit harder to test locally since you don’t want to mess up your production environment (e.g. if you changed your production webhook to point at your local computer, then you may lose important events that were meant for your production servers/databases). Some ideas:
- Add another webhook and point it at your local machine
- This will cause your production webhook to get hit too, so be very careful about what you’re testing.
- Make a second Mailchimp account altogether
- Add another webhook and point it at your local machine
Sample call with NodeJS and node-fetch
Section titled “Sample call with NodeJS and node-fetch”Just copy/pasting some code to give an idea of how to structure this. It tries adding a user to a list, but it’ll fail if they already exist.
async function subscribeToMailingListOnMailchimp(emailAddress) {  const apiKey = process.env.api_key;  const region = "us18";  const listId = "abcdefghij";  const encodedAuth = Buffer.from(`a:${apiKey}`).toString("base64");
  const body = {    email_address: emailAddress,    status: "subscribed",    tags: ["hi", "there"],  };  console.log("body: " + JSON.stringify(body));
  try {    const res = await fetch(      `https://${region}.api.mailchimp.com/3.0/lists/${listId}/members`,      {        method: "POST",        headers: new fetch.Headers({          Authorization: `Basic ${encodedAuth}`,          "Content-Type": "application/json",        }),        body: JSON.stringify(body),      }    );    const json = await res.json();
    if (!json.id) {      // Handle error    }
    return json;  } catch (error) {    // Handle error  }}
Troubleshooting
Section titled “Troubleshooting”EMAIL_ADDRESS was permanently deleted and cannot be re-imported. The contact must re-subscribe to get back on the list.
Section titled “EMAIL_ADDRESS was permanently deleted and cannot be re-imported. The contact must re-subscribe to get back on the list.”I hit this error when I manually deleted a contact from their contact page on the dashboard:
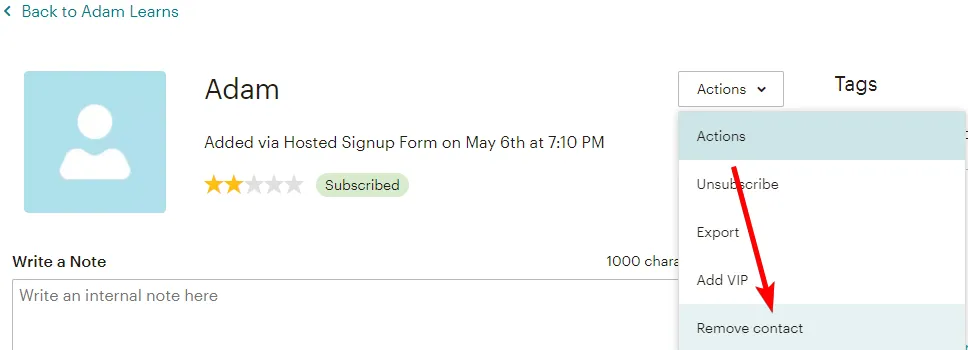
…however, it will also happen if you permanently delete the user via the API.
There is no way to add the email again via the API. You have to either delete the audience entirely or have the user sign up via a sign-up form (reference). The latter is very easy:
- Dashboard → Audience → Signup forms → Form builder → Select
- Paste the eepurl.com URL into your browser
- Sign up
Workarounds from the API
From an API perspective, this should be exceedingly rare just thanks to user behavior. Permanently deleting data should only be done for GDPR reasons (reference), and most of the time, those people aren’t going to come back to your service and also want to receive emails.
The only programmatic workaround I found was the following: when deleting the user, change their email address to a temporary email address and then delete the temporary one.
This workaround causes two issues:
- You can’t change the email address of someone whose status is anything other than “subscribed”
- This means, for example, that if the user unsubscribed from the email list or was archived, that when you try to change their email address, you’ll get an error. It’s easy enough to subscribe them first, but that means you’re doing the polar opposite of what the user wants (which is for Mailchimp to forget them completely). So if your server handling this were to crash right after subscribing them, then now they’re on a list they never wanted to be on.
- You wouldn’t be able to easily delete them from the dashboard
- As an admin, if you ever wanted to delete a user from the dashboard, you’d have to first change their email address.
…so you may think, “isn’t it better to work around this at creation time rather than deletion time?”, and you’d be right if that actually worked, but Mailchimp remembers all deleted email addresses and will never let you do something like this:
- Try to create a user
- On failure, detect the permanent-deletion error by checking for “EMAIL was permanently deleted and cannot be re-imported. The contact must re-subscribe to get back on the list.”
- Create a user with a temporary email address
- Change that temporary email to the user’s desired address
You get an error saying “EMAIL was previously removed from this audience. To rejoin, they’ll need to sign up using a Mailchimp form.”
Alternatively, you could just redirect the user to a sign-up form and make them sign up that way.