S3 - CloudFront
Created: 2016-02-17 11:25:06 -0800 Modified: 2019-09-08 17:24:43 -0700
- If you host something internally on S3, that will cost money for storage. However, internal bandwidth is free.
- You can download a file manager like DragonDisk for free to make it easier to navigate through your folders.
- If you want to enable logging, edit your distribution, enable logging, specify an S3 bucket name, then go create the bucket (it doesn’t create one for you when you’re just editing a distribution; maybe it makes it for you when it’s a brand new distribution).
- Note that I think this may have to be done in the N. Virginia region (reference). I also set a prefix even though it said it was optional when I was running into problems with logs not being collected.
- You should probably also set a lifecycle policy so that logs don’t collect infinitely:
- S3 → bucket → Management → Lifecycle → Add lifecycle rule → On the Expiration step, choose “Current version” and “Previous versions” and set them to expire after like 5 days
Hosting a static page
Section titled “Hosting a static page”- Through the AWS console, go to S3.
- Create a bucket if you don’t already have one (the name has to be globally unique, so something like “test” will be taken).
- Go to Properties —> Static Website Hosting
- Enable website hosting
- Index Document: index.html
- Click the blue “Upload” button at the upper left
- Drag some files onto the page
- After they’ve uploaded, right-click them and choose “Make public”. Now, you should be able to go to the URL they gave you to load index.html.
Replication
Section titled “Replication”To enable cross-region replication, you can go to “Cross-Region Replication” and click “enable”. This should likely be done for your HTML files. If your assets exist elsewhere, then they’re probably on Cloudfront and they have their own replication going on. Note that any cross-region replication is over a WAN so you are paying for transfer.
CloudFront
Section titled “CloudFront”Setting up
Section titled “Setting up”- Create a Distribution
- Source it from S3. You don’t have to modify very many fields here. I just changed the obvious ones without really looking anything up and it ended up working fine. A couple of notes:
- You’re probably going to want to point a domain at this, so make sure to specify an alternate domain name while creating the distribution, otherwise you have to wait for it to update later (which isn’t a huge deal, it just takes like 10 minutes).
- You probably also want a default root object of “index.html” or something.
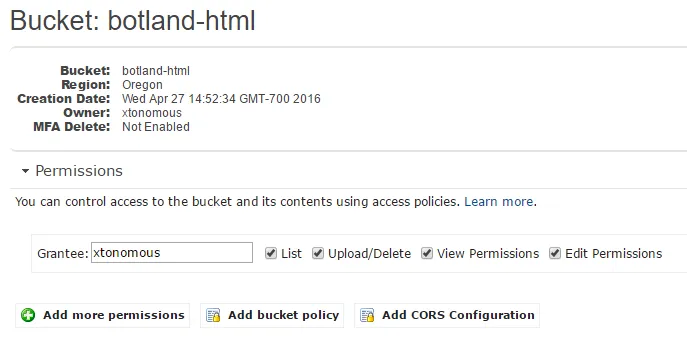
- After finishing the creation, if you intend for this distribution to be public, then you should probably change permissions on the S3 bucket itself so that Everyone has the “LIST” permission (and possibly even the “view permissions” permission), that way you can manually upload files to S3 and they’ll automatically be pulled into CloudFront.
- Source it from S3. You don’t have to modify very many fields here. I just changed the obvious ones without really looking anything up and it ended up working fine. A couple of notes:
- Point Route53 at it
- First, make sure you put an alternate domain name (“CNAME”) in the distribution settings in CloudFront. If not, go add it.
- Wait for the CloudFront distribution to have a status of “deployed” (which you can see in the CloudFront dashboard). This takes >10 minutes (maybe like 13 when I did it on 11/2/2017).
- Just add a CNAME record from “your.domain.com” to the CloudFront URL that looks like this:
du9o9z88zk0b2.cloudfront.net (make sure to choose “alias: yes”)
Note: if the hosted zone is the same as the domain you’re trying to configure for, use an A record instead of a CNAME record. Make sure it’s still an alias.
Default root object
Section titled “Default root object”If you want to automatically go to “index.html”, just edit your CloudFront distribution and set the Default Root Object to “index.html”.
Caching
Section titled “Caching”CloudFront tries to aggressively cache everything which is how it achieves the performance that it offers. This makes it hard to “fix” resources, for example if an image is bad and you need to update it. It provides an interface for invalidating objects in the cache, but this takes something like ~5 minutes. Ideally, you would version all of your files and just pull from whatever version is most up-to-date.
If you’re testing browser-side caching (either via AppCache or Service Workers), Chrome has an option to disable the cache when DevTools is open. You can find it in the settings or in the Network tab:
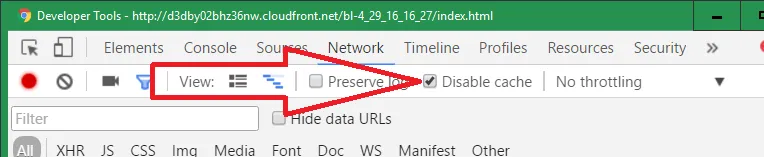
When the cache is enabled, you’ll see a very low amount of bytes transferred at the bottom of the network pane.
Invalidating the cache
Section titled “Invalidating the cache”Invalidating the cache can be done directly on the AWS Management Console - you can just go to a distribution and choose the “invalidations” tab. They can also be done via the createInvalidation API.
They tend to work pretty quickly: 5-15 minutes (sometimes as low as ~2 minutes though).
I ran into a bunch of issues around invalidating my single HTML file in CloudFront. I tried specifying “index.html” and it complained about an “invalid invalidation path”, so I tried prepending a forward slash: “/index.html”. This “worked” in that CloudFront didn’t error and claims that the invalidation was successful in the Management Console, but it would apparently only invalidate it for people who load the application through “play.bot.land/index.html” specifically.
Apparently the “right” way to do it would be to invalidate both ”/” and “/index.html”, but that is two requests, and cache invalidations are only free up to 1k/month, then they cost something like ½¢ per request after that. We can lump both requests into a ”/*” which will match both of those (and obviously more if you had more than just “index.html”).
Conclusion: in my particular case, just invalidate by ”/*“.
[this is from around September 12th, 2017]
HiDeoo: Adam13531 Actually called on phone our AWS guy as it was bothering me and he owes me some, for him, a proper configuration invalidating only / index.html should work as expected but he linked me to this as he thinks it’s just an AWS temporary issue on unique invalidation (check the date, also more people are reporting that on Twitter) ^^ https://forums.aws.amazon.com/thread.jspa?messageID=804352󄘀
Compression/gzipping (reference)
Section titled “Compression/gzipping (reference)”CloudFront will automatically compress files for you if it’s the right content type (e.g. JavaScript, HTML, CSS, etc.) and the right size (1kb to 10 MB). However, you need this option set. “You can enable this feature in a minute! Simply open up the CloudFront Console, locate your distribution, and set Compress Objects Automatically to Yes in the Behavior options”.
Then, when you try to request a resource that fits the criteria (i.e. correct type, correct size), you should see a response header of “Content-Encoding→gzip” which indicates that the file was compressed. This may take time for this option to take effect. I waited at least a day before testing it, so I don’t know if it takes a few minutes or a few hours.
CloudFront does not compress png or webm (reference). I imagine this is a combination of a bunch of things:
- You can compress an image beforehand using something like pngquant. Even with that, lossless compression via gzipping does seem to shave ~2% off the filesize, but I guess you’d find a different image format if you really wanted.
- These kinds of resources probably usually cache very well. For example, in Bot Land, you only need to download the audio files when you first visit the page or when they change on the server. Every other time, you’ll fetch them from your disk cache.
Compressing via the API
Section titled “Compressing via the API”As of 6/7/2018, I don’t see an option to allow compression in the UI any longer, so here are the steps to set it via API:
- Log into the UI console to find the ID of the CloudFront distribution you want to update.
- Call getDistributionConfig with the “Id” specified. Here’s the NodeJS code:
const AWS = require(“aws-sdk”);
const cloudFront = new AWS.CloudFront();
const params = {
Id: “ID_GOES_HERE”
};
cloudFront.getDistributionConfig(params, (error, data) => {
if (error) {
console.error(error);
}
console.log(“data: ” + JSON.stringify(data));
});
- You’ll get a giant object back from this. You have to make these changes:
- Rename the “ETag” property to “IfMatch”. This is required by the API so that you don’t goof up I guess.
- Add an “Id” field back in.
- Set “compress” to true.
- Pass the modified object back through updateDistribution. The code is practically identical to the last call, but the params are the object you modified, and the API is named updateDistribution.
I was hosting my HTML file on S3 and trying to load assets from CloudFront.
In S3 for my botland-assets bucket, I needed to add a CORS configuration:
The default one that comes up is already configured to allow GET requests from anywhere.
Just having done the step above, I redeployed my files to CloudFront (so that I didn’t have to wait for any propagation) and everything loaded. However, I also whitelisted the “Origin” header on CloudFront according to the advice here to prepare for HTTP vs. HTTPS origins in the future.
To point your DNS at a static page hosted on S3, follow these instructions. If you’re hosting on CloudFront, then you don’t technically have to name your bucket after your domain, but if you’re hosting on S3, then you do.