MySQL
Created: 2015-12-14 21:38:58 -0800 Modified: 2021-08-28 15:25:49 -0700
12/14/2015
PRONUNCIATION: apparently the official pronunciation is “My S Q L”, not “My Sequel”.
Setup/basic usage:
- After installing on Windows, add “C:Program FilesMySQLMySQL Server 5.7bin\ to the PATH so that you get access to mysql.exe.
- WARNING: some IDIOT had the idea to name a folder “C:Program Files (x86)MySQLMySQL Fabric 1.5 & MySQL Utilities 1.5Doctrine extensions for PHP, so every time you do something like “PATH %PATH%;” on Windows, it will try executing MySQL and say that it isn’t found. I just removed this from my PATH entirely (it was there twice for some reason), but I suppose you could also just add quotes.
- On Linux, you install it with “sudo apt-get install mysql-server”.
- On Linux, connect for the first time with “sudo mysql”, otherwise you’ll get password errors (and ctrl+D exits).
- On Windows, your configuration file will be in %programdata%MySQLMySQL Server 5.7my.ini. Just add anything that you want to that. On Linux, it will be in /etc/mysql/my.cnf, but you can override settings via ~/.my.cnf I believe.
- After making modifications, restart the server (e.g. “systemctl restart mysql” on Linux)
- mysql -u root -p
- Then type in your password.
- Make a new database
- CREATE DATABASE test_db;
- For numerical values, you’ll see something like “INT(11)” or “BIGINT(20)“. The word tells you how much space is used for storage (reference) and the number tells you the display width (reference).
- Create a table
- From scratch: CREATE TABLE hardware_unlock_history(user_id INT);
- From an existing table:
- SHOW CREATE TABLE hardware_unlock_history;
- You’ll get two columns as a result: one has the name of the table, and the other has the SQL statement used to create that table. You can just copy/paste the SQL into another database.
- You can show it with
- SHOW DATABASES;
- To find the version of MySQL that you’re using (reference)
- SELECT @@version;
- Select relative dates
- SELECT * FROM users WHERE last_login_date > UTC_TIMESTAMP() - INTERVAL 1 DAY;
- (see the note below about using “NOW()”)
- Use “BETWEEN” to make queries a bit easier to write:
- SELECT * FROM users WHERE some_date > now() - interval 14 day AND some_date < now() - interval 7 day;
- SELECT * FROM users WHERE some_date BETWEEN now() - interval 14 day and now() - interval 7 day;
- SELECT * FROM users WHERE last_login_date > UTC_TIMESTAMP() - INTERVAL 1 DAY;
- Select into a file:
- SELECT journal INTO OUTFILE ´journal.txt´ FROM replays;
- I got an error about the server disallowing it, tried a workaround from SO, then just switched to MySQL Workbench
- SELECT journal INTO OUTFILE ´journal.txt´ FROM replays;
- Use the database
- USE test_db;
- Show tables in the database:
- SHOW tables;
- Make a new schema
- CREATE SCHEMA IF NOT EXISTS test_db;
- To find the schema of a table:
- DESC table_name; (short for “DESCRIBE table_name;”)
- Check the existence of a row
- SELECT 1 FROM users WHERE id = 5;
- Note: the result will always be 1 if the row exists
- Select a bunch of rows at once
- SELECT id, name FROM users WHERE name IN (‘Adam’, ‘Adam2’);
- Get rows similar in value to another row (reference)
- SELECT id, skill FROM users ORDER BY ABS(skill - 500) ASC LIMIT 10;
- Note that this sorts by absolute value difference the way I have it written, so the resulting table will look like this:
- SELECT id, skill FROM users ORDER BY ABS(skill - 500) ASC LIMIT 10;
+-----+--------+
| id | skill |
+-----+--------+
| 500 | 500.00 | <— difference of 0 (i.e. best result if comparing skills for matchmaking)
| 499 | 499.00 | <— diff of 1
| 501 | 501.00 |
| 498 | 498.00 | <— diff of 2
| 502 | 502.00 |
| 497 | 497.00 | <— diff of 3
| 503 | 503.00 |
| 496 | 496.00 |
| 504 | 504.00 |
| 495 | 495.00 |
+-----+--------+
- Use TEXT instead of VARCHAR unless you want to limit the size of the data.
- In general, do not use root. Make a different user for each layer of access. Users belong to all of MySQL and they need to be added to schemas.
- Keep in mind, in this command:
- CREATE USER ‘TomAto’@‘localhost’ IDENTIFIED BY ‘password’;
- Keep in mind, in this command:
The “@localhost” signifies the connecting machine, meaning I would only be able to connect while on the same machine as the database. If I tried connecting remotely, it wouldn’t work. I could specify ”@%” there so that I could connect from anywhere.
-
Also, you don’t necessarily have to run this specific command in order to create a user. The “GRANT” command will create the user if it doesn’t exist
- GRANT ALL PRIVILEGES ON test_db.* TO ‘TomAto’@‘localhost’ IDENTIFIED BY ‘password’;
-
To return results from two completely separate tables (i.e. no foreign key to link them), you can use UNION. If you put a “limit” at the end of this query, then you’ll limit the number of union’d rows, and the rows get put in the order ALL_RESULTS_FROM_SELECT_1, ALL_RESULTS_FROM_SELECT_2, so you’ll likely only end up getting results from the first select statement. Also, the types that you’re doing a UNION on need to be the same (e.g. you can’t select the id of a user and the creation_date of a product), and the number of columns in each SELECT need to be the same.
-
To list all users, do this:
- use mysql;
- select User from user;
-
After making a user, you need to give them access.
- GRANT ALL PRIVILEGES ON test_db.* TO ‘TomAto’@‘localhost’;
This grants TomAto access to all tables in test_db.
- Prefer DATETIME over DATE.
- In order for foreign keys to work, you first need to have the table in which the column is a primary key, so you MAY want to first create all your tables then prepare a script for the creation of foreign keys.
- ALTER TABLE Orders ADD CONSTRAINT fk_PerOrders FOREIGN KEY (P_Id) REFERENCES Persons (P_Id)
- EveryJuan: @Adam13531, Here is another gotcha, we actually don’t use any foreign keys because we don’t actually ever drop data, we have another field as a boolean which determines if it was deleted, we use it for archiving, then we do all the foreign key semantics in node
- Serializing data, e.g. an inventory, and storing it in a column can be a good idea if you don’t need to query the data. It can be fine to store as JSON in cases like that.
- The JSON functions in MySQL are not really supposed to be used in production. I think it’s just for obtaining NoSQL functionality from a SQL database. I.e. if you find yourself using these functions, you should probably format your data into proper relational tables.
- MySQL Workbench is great for viewing/editing quickly without having to type in queries manually (which can be a pain on Windows when there’s no autocomplete in CMD). To view tables quickly, use the Schemas view, choose <Your Database Name> —> Tables —> hover over any table and click the grid icon on the right. Then, to make edits, simply change any fields you want and click the Apply button at the lower right of the results pane. If you don’t want confirmations every time, you can change the setting here: “Edit->preferences->SQL Queries: Confirm Data changes”
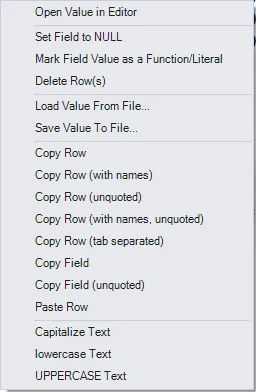
- To null out a column, right-click without having given the input the focus and you’ll get a menu like this
- To null out a column, right-click without having given the input the focus and you’ll get a menu like this
Auto-updating timestamps (reference)
Section titled “Auto-updating timestamps (reference)”I’ve gotten suggestions from people that every single row in a database should have two values:
- created_at
- updated_at
Both of these can be initialized by default, and updated_at can be updated automatically by following the notes at the reference link.
Math.min and Math.max (reference)
Section titled “Math.min and Math.max (reference)”These are just called GREATEST and LEAST and seem to take any number of arguments.
select GREATEST(5,3,6,2);
6
Getting the number of rows when using “count” and “group by”
Section titled “Getting the number of rows when using “count” and “group by””I had a table called “matches” in Bot Land which logged who played against whom. Each row had an attacker_id representing the user that started the match, so the table may look like this:
| id | attacker_id | …other columns… |
|---|---|---|
| 1 | 1 | … |
| 2 | 1 | … |
| 3 | 2 | … |
I.e. the same user could appear multiple times. I wanted to get the total number of unique attackers (so 2 in the above case).
This turned out to be very simple:
SELECT count(DISTINCT attacker_id) FROM matches;
Originally, I had this longer way of doing things which also worked:
SELECT count(1) FROM (SELECT DISTINCT attacker_id FROM matches WHERE end_time IS NOT NULL) AS derived;
COALESCE (i.e. default values when null) (reference)
Section titled “COALESCE (i.e. default values when null) (reference)”This returns the first non-null value in a list, so you can do something like this:
Suppose you have a table that has a “rating” column, and this can be null. You want to update the “rating” column to add 5. You can use this query:
UPDATE users SET rating = COALESCE(rating, 0) + 5;I ran into a case where I wanted to UPSERT, and when running the INSERT side of things, set the value to “newValue”, and in UPDATE, set it to the LEAST of the existing and new values. Here’s how I did it:
UPDATE users set rating = LEAST(COALESCE(rating, newValue), newValue);
JSON (Official reference, common usage reference)
Section titled “JSON (Official reference, common usage reference)”“JSON” is the type just like how “INT” is a type. Simple usage:
CREATE TABLE json_test(numbers JSON);
INSERT INTO json_test VALUES (JSON_ARRAY(1, 2, 3));
INSERT INTO json_test VALUES (‘[1, 2]’);
Note: in Knex, when inserting array data into a JSON column, call “JSON.stringify()” on it first.
UPDATE: actually, it seems that the reason that was happening is because Knex falls back to using a text column when “JSON” is unsupported (reference). That turned out to be the case in my application; it fell back to a “text” column (which I found out by doing “show create table sometable_name”) and I think _that’s why I need to JSON.stringify the rows that I try inserting. I’m not sure how it would work if JSON was directly supported.
Joining on a composite key
Section titled “Joining on a composite key”Just use “and” or “or”:
select * from devices join notification_settings on notification_settings.device_id = devices.device_id and notification_settings.user_id = devices.user_id;Left join
Section titled “Left join”SELECT stuff_to_selectFROM ALEFT JOIN B ON A.Key = B.Key;This will return all of the records in the left table (table A) regardless of whether any of those records have a match in the right table (table B). It will also return any matching records from the right table.
Note that the “left” table is designated as such because it’s on the left side of the word “join” in the query: “FROM A LEFT JOIN B”; it does not have to do with the equality statement of “A.Key = B.Key” (that can be in any order).
In MySQL, a left join is the same as a left outer join (reference).
Example scenario of left join
Section titled “Example scenario of left join”In Bot Land, I have a “season_standings” table that looks sort of like this:
user_idseason_idfinal_league_idIt represents the final league (e.g. “gold III”) that a user made it to in a particular season. If a user didn’t play for that season, they will have a final_league_id of null.
Reaching a league confers a reward at the end of a season, but I may not always want “gold III” to give $50. Thus, I have some abstraction tables, one of which is something like the “leagues” table shown here:
idrewardNow, let’s say a user logs in for the first time in a few seasons and I want to send them their season history. If our tables look like this…
season_standings
| user_id | season_id | final_league_id |
|---|---|---|
| 1 | 1 | 1 |
| 1 | 2 | 5 |
| 1 | 3 | null |
| 1 | 4 | null |
| 1 | 5 | null |
leagues
| id | reward |
|---|---|
| 1 | 100 |
| 5 | 500 |
…then we would want a statement to get this result:
| season_id | final_league_id | reward |
|---|---|---|
| 1 | 1 | 100 |
| 2 | 5 | 500 |
| 3 | null | null |
| 4 | null | null |
| 5 | null | null |
This way, they can tell that they have data for seasons 3-5 but that there was no actual reward. This is where a left join comes in handy:
SELECT season_standings.season_id, season_standings.final_league_id, leagues.rewardFROM season_standingsLEFT JOIN leagues ON leagues.id = season_standings.final_league_idWHERE user_id = 1;Because it’s a left join and the “season_standings” table comes before the “join”, we’ll get every row from that table regardless of whether a corresponding “leagues” row can be found. This means that a final_league_id of null still gives us a reward, but because there is no null league, we get a null reward.
Right join
Section titled “Right join”A right join does not provide functionality that a left join cannot provide (so long as you reverse the table order) (reference).
A view is like a virtual table.
Here’s an example that IAMABananaAMAA sent for protecting against leaking private info while streaming by making a view of “users” that only allows selecting ID and name:
# Assume `botland`.`users` has: `id`, `username`, `password`, `email` (and password/email are unencrypted, identifiable information) CREATE USER 'remote'@'%' IDENTIFIED BY 'remote'; # Create a new account with your specifications (local/remote/etc) CREATE VIEW protected_users AS SELECT id, username FROM users; # Create a new view (view == table copy with specified columns). You can do anything as your SELECT here, so JOINing, WHERE, etc GRANT SELECT ON botland.protected_users TO 'remote'@'%'; # Grant permissions to your new account # Now you can pretend `protected_users` is a table that only has access to `id` and `username`. So hypothetically if you do get breached, the account wouldn't have access to the `password` or `email` columns anywaysFrom <https://bpaste.net/raw/84a84df5af4f>
Outputting a SQL command directly to a file (reference)
Section titled “Outputting a SQL command directly to a file (reference)”mysql -user user -pass pass -e”COMMAND TO RUN;” > file.txt
For example:
mysql -D botland -u root —password=password —default-character-set=utf8mb4 -e”SELECT name from users;” > a.txt
Global variables
Section titled “Global variables”To see the current value of a particular variable:
SHOW GLOBAL VARIABLES LIKE ‘innodb_%prefix%‘;
Collations and charsets (reference)
Section titled “Collations and charsets (reference)”Character sets determine which characters are valid in your database (e.g. UTF8 vs. UTF8MB4), and collations are just a way of comparing them (e.g. for sorting).
There’s a character set for a database and also one for a connection. For example, if your database is utf8mb4 and you have emojis stored somewhere but your connection is, say, cp850, you will see ”???”:
mysql> SHOW VARIABLES LIKE ‘%character_set%’;
+--------------------------+---------------------------------------------------------+
| Variable_name | Value |
+--------------------------+---------------------------------------------------------+
| character_set_client | cp850 |
| character_set_connection | cp850 |
| character_set_database | utf8mb4 |
| character_set_filesystem | binary |
| character_set_results | cp850 |
| character_set_server | utf8 |
| character_set_system | utf8 |
| character_sets_dir | C:Program FilesMySQLMySQL Server 5.7sharecharsets\ |
+--------------------------+---------------------------------------------------------+
mysql> select name from scripts;
+------+
| name |
+------+
| ???? |
+------+
mysql> charset utf8mb4
Charset changed
mysql> select name from scripts;
+------------------+
| name |
+------------------+
| 🎁🎁🎁🎁 |
+------------------+
The above only changes your charset for that particular connection. You can specify this at startup with “—default-character-set”:
mysql -D mydb -u user —password=password —default-character-set=utf8mb4
Note that I still cannot figure out how to get MySQL Workbench to display this correctly. It doesn’t work with Chinese characters either, which makes me think it’s just a mostly-ASCII Windows control that’s being used or something.
Viewing current character set or collations
Section titled “Viewing current character set or collations”Database level:
SELECT @@character_set_database, @@collation_database;
“ci” === “case insensitive”, e.g. utf8_general_ci
Table-level collations:
SHOW TABLE STATUS from botland;
Column-level collations:
SHOW FULL COLUMNS FROM users;
Choosing a character set
Section titled “Choosing a character set”The future of character sets and collations is apparently this:
DEFAULT CHARACTER SET utf8mb4
DEFAULT COLLATE utf8mb4_unicode_ci
This allows for up to 4 bytes for unicode characters so that you can support something like emojis. For all “normal” characters, it will still take the usual 3 bytes.
12:22 Kfirba2: @Adam13531 1 IMPORTANT thing to note here is that your INDEXED columns under utf8mb4 charset CAN NOT exceed 191 characters UNLESS you enable innodb_large_prefix
12:27 syntonic8: I had an issue with this too. I upgraded MySQL and it turned this flag on. If you’re using a new(est) version I believe it’s on by default
12:27 syntonic8: Yeah version >= 5.7.7 is on by default
To check if it’s on, you can do this:
SHOW GLOBAL VARIABLES LIKE ‘innodb_%prefix%’;
To create a database with this, use the following command:
CREATE DATABASE IF NOT EXISTS test_collation DEFAULT CHARACTER SET utf8mb4 DEFAULT COLLATE utf8mb4_unicode_ci;
I did a bunch of tests to see what would happen when you change character sets from utf8 to utf8mb4, and I couldn’t find any errors. It seems that VARCHAR(X) will always be able to store X characters regardless of changing character sets. Here’s some test SQL, but keep in mind that you can’t just test all of this in CMD Prompt because it shows ”?” in the database.
CREATE DATABASE IF NOT EXISTS test_collation DEFAULT CHARACTER SET utf8mb4 DEFAULT COLLATE utf8mb4_unicode_ci;
USE test_collation;
CREATE TABLE test_varchar(str VARCHAR(255));
DESCRIBE test_varchar;
INSERT INTO test_varchar VALUES (’🎮🎮🎮🎮🎮🎮🎮🎮🎮🎮🎮🎮🎮🎮🎮🎮🎮🎮🎮🎮🎮🎮🎮🎮🎮🎮🎮🎮🎮🎮🎮🎮🎮🎮🎮🎮🎮🎮🎮🎮🎮🎮🎮🎮🎮🎮🎮🎮🎮🎮🎮🎮🎮🎮🎮🎮🎮🎮🎮🎮🎮🎮🎮🎮🎮🎮🎮🎮🎮🎮🎮🎮🎮🎮🎮🎮🎮🎮🎮🎮🎮🎮🎮🎮🎮🎮🎮🎮🎮🎮🎮🎮🎮🎮🎮🎮🎮🎮🎮🎮🎮🎮🎮🎮🎮🎮🎮🎮🎮🎮🎮🎮🎮🎮🎮🎮🎮🎮🎮🎮🎮🎮🎮🎮🎮🎮🎮🎮🎮🎮🎮🎮🎮🎮🎮🎮🎮🎮🎮🎮🎮🎮🎮🎮🎮🎮🎮🎮🎮🎮🎮🎮🎮🎮🎮🎮🎮🎮🎮🎮🎮🎮🎮🎮🎮🎮🎮🎮🎮🎮🎮🎮🎮🎮🎮🎮🎮🎮🎮🎮🎮🎮🎮🎮🎮🎮🎮🎮🎮🎮🎮🎮🎮🎮🎮🎮🎮🎮🎮🎮🎮🎮🎮🎮🎮🎮🎮🎮🎮🎮🎮🎮🎮🎮🎮🎮🎮🎮🎮🎮🎮🎮🎮🎮🎮🎮🎮🎮🎮🎮🎮🎮🎮🎮🎮🎮🎮🎮🎮🎮🎮🎮🎮🎮🎮🎮🎮🎮🎮🎮🎮🎮🎮🎮’);
ALTER TABLE test_varchar CONVERT TO CHARACTER SET utf8 COLLATE utf8_general_ci;
If you wanted to create the database as UTF8 first, you could do this:
CREATE DATABASE IF NOT EXISTS test_collation4 DEFAULT CHARACTER SET utf8 DEFAULT COLLATE utf8_general_ci;
Bottom line: none of this makes any sense and I’m probably just testing this wrong thanks to charset-connection.
Based on what Chrizzmeister said, if you have a table with character set utf8 and a column with VARCHAR(255), you’ll be able to save 255 utf8 characters (which makes sense). However, if you change the character set to utf8mb4, then that same column can only fit at most 191 characters since they can take up to 4 bytes (because the maximum key length if 767 bytes, so that allows 255 3-byte characters or 191 4-byte characters).
Note that VARCHAR is still telling you the number of characters you can store, not bytes, and that by default, just specifying “VARCHAR” alone will be 191 characters in utf8mb.
Looked into more information about this (reference).
InnoDBencodes fixed-length fields greater than or equal to 768 bytes in length as variable-length fields, which can be stored off-page. For example, aCHAR(255)column can exceed 768 bytes if the maximum byte length of the character set is greater than 3, as it is withutf8mb4.
“NOW()” will return the current timestamp in the server’s timezone, but you likely shouldn’t store timezone-based data in the database. For example, in Bot Land, I store the creation_date of users in UTC. I am in PST/PDT which is 8 or 9 hours behind UTC, so if I create a user and run “select * from users where creation_date < NOW()” then I won’t get the new user in the results.
Instead, either use UTC_TIMESTAMP() or call “SET time_zone = timezone;”, which will change NOW(), CURTIME(), etc. but won’t change DATE, TIME, etc.
Full instructions on how to set timezone:
- Make sure you have super privilege (e.g. log in as root)
- If you want to check your current offset:
- SELECT @@global.time_zone;
- Change the timezone to UTC:
- SET GLOBAL time_zone = ‘+00:00’;
- Restart any sessions you have (e.g. command-line, Metabase, MySQL Workbench)
Alternatively, if you don’t want to set the timezone globally, you can do so just for the session or via my.cnf:
HiDeoo: Adam13531 On your prod server if you don’t want to use the query to set the timezone, here’s the config option to set it in my.cnf https://dev.mysql.com/doc/refman/5.5/en/server-system-variables.html#sysvar_time_zone (you can even set it as a CLI argument with —default-time-zone)
Installation on Linux
Section titled “Installation on Linux”- Note: mysql-client is no longer a package to be installed; use mariadb-client.
- Updated installation steps (reference, reference2)
sudo apt-get install software-properties-common dirmngrsudo apt-key adv --recv-keys --keyserver keyserver.ubuntu.com 0xF1656F24C74CD1D8sudo add-apt-repository 'deb [arch=amd64,i386,ppc64el] http://ftp.utexas.edu/mariadb/repo/10.2/debian stretch main'sudo apt-get updatesudo apt-get install -y mariadb-server mariadb-clientIf you just try running “mariadb”, you’ll get an access-denied error. You can run it as root, but you should instead run the setup:
sudo mysql_secure_installation
After this, maybe ignore all the stuff below and just try “mysql -u root -ppassword” (assuming your password is indeed “password”).
CREATE USER ‘adam’@’%’ IDENTIFIED BY ‘password’;
GRANT ALL PRIVILEGES ON . TO ‘adam’@’%’;
select User, Host from mysql.user;
↑ That’s just to make sure that you configured your user correctly.
To be able to scroll up, I had to use screen.
Installsudo apt-get install -y mysql-serverYou have to manually type a database root password in the installation.UPDATE: as of Debian 9, operating system credentials are used by MySQL server to authenticate.
- Configure MySQL to be accessible on all addresses
- sudo vim /etc/mysql/my.cnf
- Find “bind-address” and change it to “0.0.0.0”, e.g. bind-address = 0.0.0.0
- If it doesn’t exist, you need to add it under “[server]” (which you should also create if it doesn’t exist)
[server]
bind-address = 0.0.0.0
- Restart MySQL service
- sudo service mysql restart
- If you haven’t created a user, then create one. Note: the ’%’ lets you access the database from any host.
- sudo mysql
- CREATE USER ‘adam’@’%’ IDENTIFIED BY ‘password’;
- GRANT ALL PRIVILEGES ON test_db.* TO ‘TomAto’@‘localhost’;
- For newer versions of MySQL, you may get ER_NOT_SUPPORTED_AUTH_MODE in which case you have to run this
- ALTER USER ‘root’@’%’ IDENTIFIED WITH mysql_native_password BY ‘password’;
- (you need to do that with any user you plan on connecting with, e.g. ALTER USER ‘adam’@’%’ IDENTIFIED WITH mysql_native_password BY ‘password’; )
- This won’t work before MariaDB 10.2 apparently. There are three workarounds
- [I NEVER GOT THIS TO WORK] Using a plugin (reference).
- Make sure you type “use mysql;” before running this command:
- update user set authentication_string=password(‘password’), plugin=‘mysql_native_password’ where user=‘Adam’;
- Make sure you type “use mysql;” before running this command:
- Install MariaDB via Docker. It apparently doesn’t have that problem there.
- Installing MySQL: I just installed mysql-server 5.7 (reference). Just keep in mind that it’ll seem like you get an infinite loop of configuration options because you’re supposed to choose “Ok” in the first list (NOT the second “Ok”). Debian instructions follow:
- [I NEVER GOT THIS TO WORK] Using a plugin (reference).
wget https://dev.mysql.com/get/mysql-apt-config_0.8.9-1_all.debsudo dpkg -i mysql-apt-config_0.8.9-1_all.debsudo apt-get updatesudo apt-get install mysql-community-server- If you have created a user, then you need to make sure the host is set correctly.
- Manual, easy way:
- GRANT ALL PRIVILEGES ON test_db.* TO ‘TomAto’@‘localhost’ IDENTIFIED BY ‘password’;
- Note: this flushes privileges on its own.
- Note: without typing “IDENTIFIED BY”, you’ll have no password set, but only on whichever host you specified. MySQL lets you set up users/passwords per-host, so you could have a weak password when on localhost and a strong password outside of it if you wanted.
- Manual, hard way:
- mysql -u root -p
- use mysql;
- UPDATE user SET host=’%’ WHERE user=‘TomAto’ AND host=‘192.168.1.17’;
- FLUSH privileges;
- Without flushing privileges, you’ll get an error message about: Host ‘192.168.1.17’ is not allowed to connect to this MySQL server
- Manual, easy way:
Executing arbitrary commands from the command line
Section titled “Executing arbitrary commands from the command line”Just use “-e” and surround your command in quotation marks.
mysql -D botland -u root --password=password -e "DROP DATABASE IF EXISTS %localDbName%;"mysql -D botland -u root --password=password -e "CREATE DATABASE %localDbName%;"mysql -D botland -u root --password=password -e "GRANT ALL PRIVILEGES ON %localDbName%.\* TO 'Adam'@'localhost';"Saving/restoring a MySQL database (reference)
Section titled “Saving/restoring a MySQL database (reference)”(keywords: export / import)
- Note: mysqldump is needed to back up the database and I don’t know whether it comes from mysql-server or mysql-client.
- Backup: mysqldump -u root -p[root_password] [database_name] > dumpfilename.sql
- E.g. mysqldump -u root -ppassword botland > dumpfilename.sql
- Restore: mysql -u root -p[root_password] [database_name] < dumpfilename.sql
- Note: you may find it better to do this to ensure you don’t have any tables that shouldn’t be there:
- DROP DATABASE [database_name];
- CREATE DATABASE [database_name];
- For Bot Land:
- DROP DATABASE botland; CREATE DATABASE botland;
- mysql -u root -ppassword botland < dumpfilename.sql
- Note: you may find it better to do this to ensure you don’t have any tables that shouldn’t be there:
Example with Bot Land:
On Overseer: probably “delete from replays;” so that we don’t get a bunch of journals that we don’t care about
On Overseer: mysqldump -u root -h db.bot.land -p botland > dumpfilename.sql
On local machine: scp -i D:CodeJavaScriptlearningawsFirstkeypair.pem admin@50.112.22.133:/home/admin/dumpfilename.sql ./
On local MySQL: CREATE DATABASE botland2;
On local command line: mysql -u root —password=password botland2 < dumpfilename.sql
Saving/restoring a single MySQL table
Section titled “Saving/restoring a single MySQL table”I did this using MySQL Workbench.
Saving
- Click the “Export recordset to an external file” button
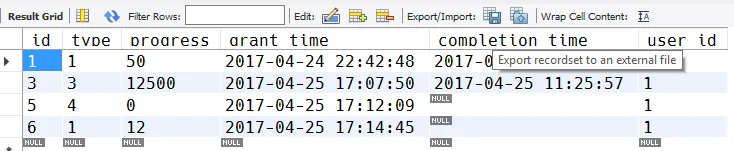
- Export to a “.sql” file
Restoring
- mysql -u root —password=password -D botland < file.sql
Basic commands
Section titled “Basic commands”- Go look at the PostgreSQL note. If anything differs, I will list it here.
- Drop/delete a user: DROP USER ‘Adam’@‘localhost’;
- Selecting when tables have tons of columns - just replace the semicolon at the end of a SELECT statement with “G”.
- SELECT * FROM userG
- Selecting columns concatenated together: use CONCAT
- SELECT concat(name, ’ (’, id, ’)’) AS full_user FROM users;
- Altering a table:
- Add a column:
- ALTER TABLE users ADD COLUMN num_unopened_salvage INT UNSIGNED NOT NULL DEFAULT 5;
- ALTER TABLE users ADD COLUMN copy_of_last_attacked_defense text DEFAULT NULL;
- Remove a column
- ALTER TABLE users DROP COLUMN testeroni;
- You may need to remove any foreign key constraints on this first (the name of the foreign key can be found via “SHOW CREATE TABLE users”) (reference)
- ALTER TABLE mytable DROP FOREIGN KEY mytable_ibfk_1 ;
- You may need to remove any foreign key constraints on this first (the name of the foreign key can be found via “SHOW CREATE TABLE users”) (reference)
- ALTER TABLE users DROP COLUMN testeroni;
- Change type of a column
- ALTER TABLE defense_copies MODIFY journal LONGTEXT;
- Change name of column (keyword: “rename”) (reference)
- ALTER TABLE
xyzCHANGEoldnamenewnameINT UNSIGNED NOT NULL DEFAULT 0;- Note: the type, “not null” (if you want that), and the default (if you want one) are all required since these properties aren’t merged! I.e. there’s no way to just rename a column; you have to specify everything about that column.
- ALTER TABLE
- Drop the table
- DROP TABLE users;
- Changing character set and collation
- ALTER TABLE Tablename CONVERT TO CHARACTER SET utf8mb4 COLLATE utf8mb4_bin;
- Combining multiple ALTER statements - just use a comma (reference):
- ALTER TABLE product_skus ADD
idINT UNSIGNED AUTO_INCREMENT, ADD INDEX index_id (id);
- ALTER TABLE product_skus ADD
- Add a column:
- JOIN syntax
SELECT matches.attacker_id,matches.start_time,attacker.name AS attacker,defender.name AS defenderFROM `ongoing_matches`INNER JOIN `matches` ON `ongoing_matches`.`match_id` = `matches`.`id`INNER JOIN `users` AS attacker ON `matches`.`attacker_id` = `attacker`.`id`INNER JOIN `users` AS defender ON `matches`.`defender_id` = `defender`.`id`;- Replacing substring/text in the database. For example, I had to replace the word “towers” with “chips” in a JSON blob, so I ran this query:
- UPDATE users SET serialized_defense = REPLACE(serialized_defense, ‘towers’, ‘chips’)
- Searching based on substrings
- SELECT * FROM users WHERE name LIKE ‘startswith%’;
- SELECT * FROM users WHERE name LIKE ‘%endswith’;
- SELECT * FROM users WHERE name LIKE ‘%substring%’;
- SELECT * FROM users WHERE name LIKE ‘%containsbackslash\_%’;
- ^You need to write a backslash four times to have it resolve to a single backslash (reference)
- Getting the number of rows in a table
- SELECT COUNT(*) FROM users;
- HAVING
- This is basically a WHERE clause that works after the group has done its job.
- Example
SELECT users.name,count(*) AS cntFROM `users`INNER JOIN `bot_bays` ON `bot_bays`.`user_id` = `users`.`id`GROUP BY users.id HAVING cnt > 2ORDER BY cnt DESC;- You can use variables to make some queries easier:
- SET @amount = 5; SELECT * FROM users WHERE money > @amount;
- Find non-distinct/non-unique rows in a database
This query finds all users who have the same name:
SELECT id,name,COUNT(name) AS the_countFROM usersGROUP BY name HAVING the_count > 1;Case statements (reference)
Section titled “Case statements (reference)”If you ever have something like a “status” column that’s saved as an integer but represents something like “offline”/“online”, you could use a “case” statement:
SELECT user_id,CASEWHEN status = 0 THEN 'offline'WHEN status = 1 THEN 'online'ELSE 'unrecognized'END AS status_nameFROM users;Alternatively, if you really just have a couple of values, SUBSTRING_INDEX may be better:
SELECT SUBSTRING_INDEX(‘offline,online’, ’,’, status) from users;
Truncating vs. deleting
Section titled “Truncating vs. deleting”Suppose you have two tables:
replays
id
journal
matches
id
replay_id (where this is set up with CONSTRAINT matches_replay_id_foreign FOREIGN KEY (replay_id) REFERENCES replays (id) ON DELETE SET NULL)
These are set up so that deleting a replay will null out the “replay_id” in “matches”. However, if you try truncating the entire “replays” table, then you’ll get this error:
ERROR 1701 (42000): Cannot truncate a table referenced in a foreign key constraint (botland.matches, CONSTRAINT matches_replay_id_foreign FOREIGN KEY (replay_id) REFERENCES botland.replays (id))
There are two ways you can deal with this (where one is clearly better):
- [bad] Disable foreign key constraint checks or delete that particular foreign key constraint, perform your truncation, then reinitialize the FK. This is bad because you will lose data integrity while the FKs are absent. For example, if you did that with the tables above, then the replay_id in “matches” would never get nulled out.
- [good] “DELETE FROM replays;” - this is good because it abides by all of your constraints and maintains the next primary key value.
Procedures (reference)
Section titled “Procedures (reference)”Simple procedure with one argument:
DELIMITER //
CREATE PROCEDURE getActiveUsers (IN numDays INT)
BEGIN
SELECT name,
last_login_date
FROM users
WHERE last_login_date > NOW() - INTERVAL numDays DAY;
END //
DELIMITER ;
Note: the DELIMITER statements change what string is used at the end of a line from a semicolon; you need this when you use multiple SQL statements in a procedure so that the parser doesn’t end at the first semicolon it sees (which would be after the “WHERE” clause above). This is a feature of the MySQL client, not the server as far as I understand, so this doesn’t work from something like knex or my-cli.
Calling the procedure:
CALL getActiveUsers(2);
Updating the procedure:
To update a procedure, I think you have to just drop it first and then update it.
DROP procedure IF EXISTS getActiveUsers;
Unique keys (reference)
Section titled “Unique keys (reference)”Just a note that unique keys are automatically indexed (reference).
AUTO_INCREMENT
Section titled “AUTO_INCREMENT”There were some gotchas here that I wanted to capture:
> ALTER TABLE product_skus ADD `id` INT UNSIGNED AUTO_INCREMENT;(1075, 'Incorrect table definition; there can be only one auto column and it must be defined as a key')I didn’t know what this meant until reading this SO post; you just need a unique constraint or index on the column. You can combine multiple “ALTER” statements with commas:
Index:
ALTER TABLE skus ADD id INT UNSIGNED AUTO_INCREMENT, ADD INDEX skus_index_id (id);
Unique constraint:
ALTER TABLE skus ADD id INT UNSIGNED AUTO_INCREMENT, ADD CONSTRAINT skus_unique_id UNIQUE(id);
These are sort of the same since unique constraints are indexes (reference). However, there’s at least one edge case where functionality differs:
Suppose you have this table:
+--------+-----+| sku | id |+--------+-----+| PENCIL | 1 |+--------+-----+If you do…
UPDATE skus SET id = 2 WHERE id = 1;
This will work in both cases, and you’ll now have this table:
+--------+-----+| sku | id |+--------+-----+| PENCIL | 2 |+--------+-----+However, if you then do…
INSERT INTO skus (sku) VALUES (“PEN”);
Just having an index will result in this table:
+--------+-----+| sku | id |+--------+-----+| PENCIL | 2 || PEN | 2 |+--------+-----+…whereas having a unique constraint will result in
(1062, "Duplicate entry '2' for key 'skus_unique_id'")I think most use cases would want a unique constraint rather than an index.
Primary keys
Section titled “Primary keys”Don’t use IP addresses as primary keys! Your primary keys should almost always be incrementing integers or UUIDs.
You can have a primary key that consists of multiple other keys (AKA a primary composite key or primary compound key) (reference). If you do this, you don’t necessarily need an autoincrementing “id” field for your table, but it can be helpful for manually deleting entries. If you do decide to have an autoincrementing “id” field, then you very likely shouldn’t index it since that will end up taking much more space than just the 4-8 bytes that the integer itself needs.
Note that composite indexes can be used as long as you’re selecting based on the first N columns, where N is any number up to the number of columns used in the composite index. E.g. if you have an index on “user_id” and then “item_id” and search just using “user_id”, it will use the index.
According to this StackOverflow post, primary keys are always indexed.
Misc notes
Section titled “Misc notes”Pagination
Section titled “Pagination”Read this: http://use-the-index-luke.com/no-offset
TL;DR: don’t use OFFSET. Prefer something like this:
SELECT …
FROM …
WHERE …
AND id < ?last_seen_id
ORDER BY id DESC
FETCH FIRST 10 ROWS ONLY
Transactions, locks, and isolation
Section titled “Transactions, locks, and isolation”Isolation Level - https://dev.mysql.com/doc/refman/5.5/en/set-transaction.html - note, you don’t need to change this by default according to GsarGaming: “No you dont [need to modify the transaction isolation level]. Leave it at defaut. It is by default ACID.” EveryJuan supports this by saying “The default isolation level is REPEATABLE READ, which requires a transaction commit for the lock to be broken, so you were right overall”.
According to this, “The possibility of deadlocks is not affected by the isolation level, because the isolation level changes the behavior of read operations, while deadlocks occur because of write operations.”
You can set isolation levels per-transaction with this line:
SET TRANSACTION ISOLATION LEVEL READ COMMITTED;
Note that MySQL only allows you to set it for the next transaction (reference).
SELECT … FOR UPDATE (reference)
In short, this will lock the row so that nothing else can modify it. For more details, read the reference. What this means is that suppose you have this flow:
Transaction 1:
- SELECT FOR UPDATE * FROM users WHERE id = 1;
- <delay of 50 hours>
- <do something with the user>
- <commit or rollback transaction>
Transaction 2 (which runs AFTER the “SELECT” above but BEFORE the delay is finished)
- UPDATE users SET inventory = ‘blah’ WHERE id = 1;
- <commit or rollback>
Transaction 2 will wait for 50 hours before completing, the only caveat being that a timeout will likely stop it from finishing the whole 50-hour delay. The reason Transaction 2 waits is because there is no deadlock, otherwise it would error out immediately and need to be rerun at some point.
Furthermore, let’s say you issued a plain old UPDATE outside of a transaction, e.g. “UPDATE users SET inventory = ‘blah’ WHERE id = 1;“. That would respect the lock and wait until Transaction 1 is finished.
However, a “SELECT _ FROM USERS;” or “SELECT _ FROM USERS WHERE id = 1;” would work immediately. These are the consistent reads that the documentation refers to when it says “Consistent reads ignore any locks set on the records that exist in the read view.”.
Do note, “SELECT * FROM USERS WHERE id = 1 LOCK IN SHARE MODE;” would wait for the lock to be freed.
Other notes about SELECT … FOR UPDATE:
- It is ONLY for transactions. It is not an error to put “SELECT * FROM users FOR UPDATE;”, but it doesn’t do anything.
SELECT … LOCK IN SHARE MODE
As mentioned above, this will try to acquire a lock that prevents updates (but allows reads still). I don’t think I’ve run into a scenario where I’ve organically wanted to use this, but I imagine the scenario would be something like this contrived transaction:
- Read ‘money’ from the ‘users’ table (use LOCK IN SHARE MODE)
- Read ‘inventory_size_remaining’ from the ‘items’ table (use LOCK IN SHARE MODE)
This would let you know if you have enough money and inventory space to buy an item, but it wouldn’t actually update anything. Note: when you actually go to buy an item, it would need to lock the appropriate rows FOR UPDATE.
Locks are acquired explicitly with “SELECT” when using “SELECT … FOR UPDATE” or “SELECT … LOCK IN SHARE MODE”. However, they’re implicitly obtained in “UPDATE … WHERE …” and “DELETE FROM … WHERE …” statements. This means that you’re actually getting a lock if you do this:
START TRANSACTION;
INSERT INTO users(name) VALUES(‘Adam’); # Lock is obtained (reference)
INSERT INTO items(name) VALUES(‘Starter Sword’); # Lock is obtained
COMMIT;
However, I think that it doesn’t really matter whether you got a lock or not above since it’s a transaction, so it’s treated as an atomic unit.
Locks on insert (with nonexistent rows) (reference)
Section titled “Locks on insert (with nonexistent rows) (reference)”As the last section mentioned, a lock is implicitly obtained on insert. However, there was a pattern that I ran into that produced a very subtle problem. I’ll demonstrate with some pseudo code below that I was calling from JavaScript:
Start transaction
SELECT age FROM users WHERE id = 5 FOR UPDATE;
if no record is found:
insert user into table
Commit transaction
(note that what I described above can be accomplished with an insert that ignores errors, but this is to demonstrate how locks would help in a situation like this; the actual code that I had was slightly more complex)
The problem with the code above is that if two transactions try running at the same time, the “SELECT” does not acquire a lock when the row is nonexistent, so both transactions can complete that line of code. Then, because there was no lock needed, they’ll both try inserting into the database. Depending on whether you had “FOR UPDATE” or not, you’ll get different errors:
- If you had “FOR UPDATE”, then you’ll get ER_LOCK_DEADLOCK.
- If you do not have “FOR UPDATE”, then you’ll get ER_DUP_ENTRY (assuming the ‘users’ table had ‘id’ as a primary key).
I couldn’t figure out a solution for this that doesn’t involve locking the whole table. I attempted “LOCK IN SHARE MODE” and setting the transaction isolation level to “READ COMMITTED”, but neither worked. I didn’t want to lock the whole table in my particular case, so I instead just detected an error and had the client retry the whole command on an error (I could have also had the server retry this, but I didn’t want to run into infinite loops potentially).
To test this quickly, it’s very simple. Just set up a ‘users’ table with a PK on ‘id’.
START TRANSACTION;SELECT age FROM users WHERE id = 5 FOR UPDATE;COMMIT;When I ran everything but the “COMMIT” from transaction #1 and then tried to do the same SQL from transaction #2, transaction #2 would have no problem returning an empty set from the “SELECT” instead of waiting for the first transaction to complete like I wanted.
From this reference link: “InnoDBdoes not remember the exactWHEREcondition, but only knows which index ranges were scanned. […] If you have no indexes suitable for your statement and MySQL must scan the entire table to process the statement, every row of the table becomes locked, which in turn blocks all inserts by other users to the table. It is important to create good indexes so that your queries do not unnecessarily scan many rows.”
This just didn’t mean what I expected it to mean when it comes to nonexistent rows.
Table-level locks (reference)
Section titled “Table-level locks (reference)”If you want to lock an entire table, you can do something like this:
LOCK TABLES users WRITE;
— Do stuff here that will now prevent other queries from being able to write to “users”
UNLOCK TABLES;
If locking multiple tables, make sure to do so in a single command:
LOCK TABLES users WRITE, accounts READ;
Keep in mind that you shouldn’t need to lock on an entire table when dealing with potentially nonexistent rows. See this section of the notes for more details.
Note that this level of lock can affect transactions! I wrote a note about this here, and the official docs talk about it here.
Also note that you want to limit how frequently you lock on a whole table to help avoid deadlocks—“To reduce the possibility of deadlocks, use transactions rather than LOCK TABLES statements” (reference).
Named locks (reference)
Section titled “Named locks (reference)”If you ever find yourself wanting to make a new database table just so that you can lock on a unique row via “SELECT FOR UPDATE”, then don’t; that’s why named locks exist.
Locks are released implicitly when your session terminates in any way. They’re releasable explicitly via RELEASE_LOCK.
Deadlocks (reference - actually very helpful, reference2)
Section titled “Deadlocks (reference - actually very helpful, reference2)”Deadlocks can occur even from just inserting/deleting a single row (because of how they work under the hood with obtaining locks). They are not fatal, and the documentation suggests that the application retry the transaction.
I am going to try to always acquire locks in the same order, that way I shouldn’t run into a deadlock.
Subqueries (reference)
Section titled “Subqueries (reference)”Subqueries can be nested.
Using data from one table to populate another
Section titled “Using data from one table to populate another”INSERT INTO users (name, age, nickname)
SELECT name,
18,
name
FROM other_users;
Note: you can specify any immediate values you’d like in the subquery.
You can use this to duplicate rows in a table easily:
INSERT INTO users (name, age)
SELECT name,
age
FROM users
WHERE id = 5;
Selecting the average of a count by using subqueries:
I had something like this:
select count(distinct mission_id) as COUNT from campaign_missions;
This returned a table like the following:
+-------+| COUNT |+-------+| 1 || 1 || 4 |+-------+I wanted to get the average, which is 2. Here’s how I did it:
select avg(COUNT) from (select count(distinct mission_id) as COUNT from campaign_missions) as t1;
Here’s a very simple update using a subquery:
update some_table set count = 0 where id in (
select id from some_other_table
);
An alternative to subqueries
Section titled “An alternative to subqueries”This can be a helpful way to avoid using subqueries. For example, here I want to select the number of times outcome is 2 and divide it by the number of times outcome was 2.
SELECT
computer_level,
SUM(outcome = 2) AS def_wins,
SUM(outcome = 0) AS def_losses,
(SUM(outcome = 2) / SUM(outcome = 0)) AS def_win_ratio
FROM
matches
GROUP BY computer_level;
Foreign keys
Section titled “Foreign keys”- For how “ON DELETE” works and what the options are, check this out.
- To see the full details about a foreign key, you can’t just describe a table. Instead, you have to use “show create table TABLE_NAME” will tell you ALL of the details about everything required to create that table, including something like “ON DELETE CASCADE”.
- Foreign keys are indexes by default when the engine is InnoDB (reference)
Indexes
Section titled “Indexes”Basics
Section titled “Basics”There’s no real need to use an index unless you predict having thousands of entries (e.g. 10k+). Remember that there’s no guarantee that the storage engine uses your index (because it can determine that sequential searching may be faster).
How to use them (reference)
Section titled “How to use them (reference)”CREATE TABLE users (name TEXT, INDEX(name(5)));
Note: the number in parentheses indicates how long of a prefix you’re going to index on. It can be higher or lower than the number of characters in each individual name in the table. The lower it is, the less hard drive space the index will use, but the less performant it will be.
Suppose you created the index with length 1 and then added ‘Adam’ to your table 3 times. You could run “EXPLAIN” on your query as below:
mysql> EXPLAIN SELECT * FROM users WHERE name = ‘adam’;
| id | select_type | table | partitions | type | possible_keys | key | key_len | red | rows | filtered | Extra |
|---|---|---|---|---|---|---|---|---|---|---|---|
| 1 | SIMPLE | users | NULL | ref | name | name | 6 | const | 3 | 100.00 | Using where |
For information on how to interpret the above, look at this reference.
Also, if you explicitly want to IGNORE a particular index, you can specify it just after the “SELECT” but before the “WHERE” clause like this:
SELECT *
FROM matches
IGNORE INDEX (matches_defender_and_replay_id_index)
WHERE defender_id = 2
AND replay_id IS NOT NULLG
Troubleshooting
Section titled “Troubleshooting”Password expired (or you just want to change your password) (AKA “ER_MUST_CHANGE_PASSWORD_LOGIN”)
Section titled “Password expired (or you just want to change your password) (AKA “ER_MUST_CHANGE_PASSWORD_LOGIN”)”“Your password has expired”
“ERROR 1820 (HY000): You must reset your password using ALTER USER statement before executing this statement.”
Just set the password again using the root account:
mysql -D botland -u root —password=password —default-character-set=utf8mb4
SET PASSWORD FOR ‘Adam’@‘localhost’ = PASSWORD(‘password’);
Note that if this happens while you’re on root, you can do this (reference):
SET PASSWORD = PASSWORD(‘password’);
Make sure you set the password for the right user when you do this.
Cannot set a foreign key without an indexed column
Section titled “Cannot set a foreign key without an indexed column”The error looks something like this:
Error in foreign key constraint of table botland/#sql-11b8_44: FOREIGN KEY (device_id) REFERENCES devices (device_id): Cannot find an index in the referenced table where the referenced columns appear as the first columns, or column types in the table and the referenced table do not match for constraint.This is caused when you try to set a foreign key to a column in a table that does not index that column. When I ran into this myself, it was because I had something like this:
devices table
user_id
device_id
device_token
PK: composite of user_id and device_id
notification_settings table
user_id
device_id
notification_type
is_enabled
I wanted notification_settings’ device_id to point to the “devices” table’s device_id, but that wasn’t possible since the “devices” table has a composite primary key. To fix my specific problem, I made notification_settings have a composite foreign key since that’s what I was intending to do in the first place.
Trying to install an old version of MySQL on Windows, but it keeps installing the newest one
Section titled “Trying to install an old version of MySQL on Windows, but it keeps installing the newest one”Their installer is incredibly strange on Windows. If you choose a Custom install, I think it always installs the newest versions of everything. You have to choose Developer Default, which is likely what you want anyway (I originally thought it would be bad since I didn’t want the Visual Studio plug-ins and whatever other nonsense is provided). After that, it should work flawlessly.
Warnings
Section titled “Warnings”If you ever run a query and you see something like “1 row in set, 2 warnings (0.00 sec)”, then do “SHOW WARNINGS” to see the warnings.
Note: code 1003 is just the code for “EXPLAIN EXTENDED” (reference)
ER_CANNOT_ADD_FOREIGN
Section titled “ER_CANNOT_ADD_FOREIGN”I wrote about this in the Knex note, but the summary is to run “SHOW ENGINE INNODB STATUS;” and look for the latest foreign-key error.