Firebase auth
Created: 2020-03-26 22:33:42 -0700 Modified: 2020-04-18 11:29:06 -0700
Firebase authentication (reference)
Section titled “Firebase authentication (reference)”Basics
Section titled “Basics”- They have two options: a drop-in authentication solution and the SDK-based authentication
- If you go to the settings gear → General → Public settings, you can customize the public-facing name and the support email.
- There’s a function for whenever your authentication state changes (reference). It’s recommended that you use this since it happens on sign in or sign out regardless of how, e.g. it could be that you refreshed the page and Firebase signed in for you using persisted credentials.
- On the web, firebase.auth().currentUser.providerData will return all identities that you have.
- Session persistence (reference)
- By default on the web, your authentication information is saved in IndexedDB → firebaseLocalStorageDb → firebaseLocalStorage → fbase_key. This is set to persist until the user explicitly logs out.
- Using IndexedDB as storage shouldn’t be susceptible to CSRF attacks since the database is only read by the client-side JavaScript code on the site itself.
- IndexedDB itself is usable by all modern browsers (reference)
- The data that’s stored includes a bearer token, and that token expires after one hour.
Changing a user’s email address
Section titled “Changing a user’s email address”Basics
Section titled “Basics”- Google can generate verification emails for you, but only if Email/Password is enabled as a Sign-in provider via the console → Authentication → Sign-in method. Note: you don’t actually have to use email/password as a method for signing in, but the option needs to be enabled.
- After this is enabled, the user can change their email themselves without needing to involve your Cloud Functions or anything (reference):
await firebase .auth() .currentUser.verifyBeforeUpdateEmail('yournewemail@example.com');- If you change a user’s email address via the admin SDK, then I think it invalidates their current auth session:
const { uid } = context.auth;await admin.auth().updateUser(uid, { email: newEmailAddress,});Also, in this case, Google won’t send a verification email, so you would need to do that yourself (reference). They do have a way to form the verification email’s link.
Custom tokens
Section titled “Custom tokens”Basics
Section titled “Basics”- Tokens last for an hour before expiring. Firebase handles refreshing them: “Note: this only controls the time when the custom token itself expires. But once you sign a user in using signInWithCustomToken(), they will remain signed in into the device until their session is invalidated or the user signs out.” (reference, GitHub issue commenting on it)
Creating tokens
Section titled “Creating tokens”- You create a custom token with “token = await admin.auth().createCustomToken(anyUid)” (reference).
- You can pass in literally any string for a UID and you’ll get a valid token back.
- All this is doing is signing your UID into a JWT. The resulting token string represents this JSON:
{ "aud": "https://identitytoolkit.googleapis.com/google.identity.identitytoolkit.v1.IdentityToolkit", "iat": 1586189630, "exp": 1586193230, "iss": "firebase-adminsdk-abcde@your-proj.iam.gserviceaccount.com", "sub": "firebase-adminsdk-abcde@your-proj.iam.gserviceaccount.com", "uid": "12345"}- This will not create an entry in your project’s Authentication tab in the Firebase console until a user calls signInWithCustomToken.
- After signing in, if you call admin.auth().getUser(‘12345’), it’ll return this:
{“uid”:“12345”,“emailVerified”:false,“disabled”:false,“metadata”:{“lastSignInTime”:“Mon, 06 Apr 2020 16:19:53 GMT”,“creationTime”:“Mon, 06 Apr 2020 16:16:31 GMT”},“providerData”:[]}
-
You could create the user yourself with createUser, that way you can specify an email address, displayName, etc.
-
There are other requirements to make custom tokens that are mentioned here. If you don’t feel like reading that, then just encounter the errors and look at my troubleshooting section below for help.
My notes from setting up GitHub authentication for the first time (reference)
Section titled “My notes from setting up GitHub authentication for the first time (reference)”- Goal: have a “sign in with GitHub” button that can communicate with my own back-end and Firebase
- Note: originally, I wanted to do this with Twitter, but Twitter has an application process for making an app, and I wanted to do this immediately.
- I needed to add Firebase to my JavaScript project (reference)
- I didn’t have an app already in Firebase, so I made one. It spewed two script tags that I needed to copy into my page (this blob is public since it will end up in the client’s browser). I just put them into a temporary HTML file for now and ensured that they loaded with no errors (note that if you’re doing this on any project using a bundler, e.g. NextJS / Node, you can install firebase from NPM).
- Part of those tags is a TODO item saying to add an SDK. There’s a page on how to do this here because the instructions vary based on where you’re hosting the page. Because I’m just testing this locally, I chose “From the CDN”.
- At this point, make sure that you don’t have firebase-app.js twice since it’s also included from the blob that Firebase gives you when you create an app.
- Make sure you have the Firebase config set up (this too is given to you when you create a Firebase app, so make sure you don’t have it twice).
- I didn’t have an app already in Firebase, so I made one. It spewed two script tags that I needed to copy into my page (this blob is public since it will end up in the client’s browser). I just put them into a temporary HTML file for now and ensured that they loaded with no errors (note that if you’re doing this on any project using a bundler, e.g. NextJS / Node, you can install firebase from NPM).
- I made a fake GitHub account for testing all of this stuff.
- I didn’t have an app on GitHub, so I went to https://github.com/settings/applications/new
- I set the homepage URL to http://localhost:3000. From what I can tell, this doesn’t actually matter too much.
- I set the authorization callback URL to what the pop-up on the Firebase Authentication console gave me:
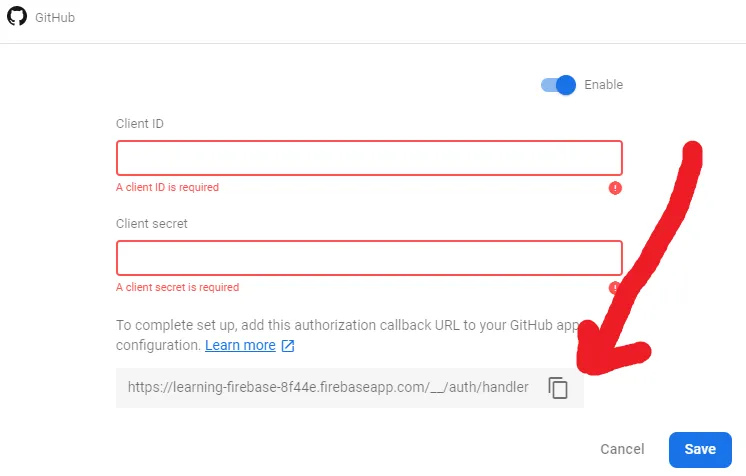
- I copy/pasted the client ID and client secret back into the Firebase Authentication console
- I copy/pasted the code from here with minimal logging added:
var provider = new firebase.auth.GithubAuthProvider();
firebase  .auth()  .signInWithPopup(provider)  .then(function(result) {    // This gives you a GitHub Access Token. You can use it to access the GitHub API.    var token = result.credential.accessToken;    // The signed-in user info.    var user = result.user;    // ...
    console.log("Success");  })  .catch(function(error) {    // Handle Errors here.    var errorCode = error.code;    var errorMessage = error.message;    // The email of the user's account used.    var email = error.email;    // The firebase.auth.AuthCredential type that was used.    var credential = error.credential;    // ...
console.error("Error", error); });- I got an error saying that I needed to serve this page properly and not from a file:/// handler, so I used http-server. That led to an error saying “This domain (10.0.75.1) is not authorized to run this operation. Add it to the OAuth redirect domains list in the Firebase console -> Auth section -> Sign in method tab.”
- For reference, I believe those are “authorized domains” in the Authentication console:
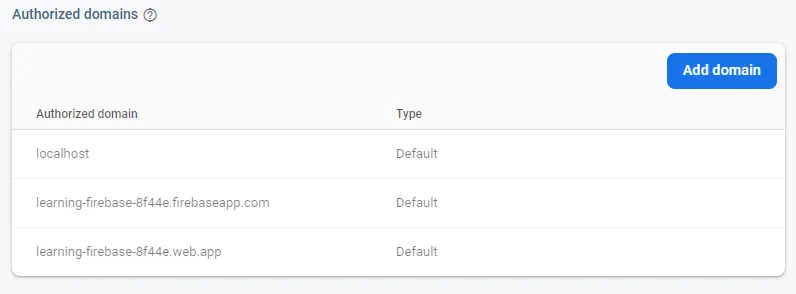
- Since localhost is already there, I just loaded my page via localhost and not some random 10.0.X.Y IP address.
- After authorizing my test app locally, I could then see my user in the Authentication console → Users.
- At this point, if you want to use the token/user blobs that you get back from this, you would typically pass them to the server, then the server could set this information in a cookie (reference) (note: on that page, the first code block is to be run on the client).
Getting an email address from Cloud Functions for Firebase
Section titled “Getting an email address from Cloud Functions for Firebase”- You can look up a user by their email address (reference) with admin.auth().getUserByEmail(email). There’s a big warning on that page saying that you can only get the email address associated with the first linked account.
- The NodeJS API for setting up a callable function looks something like this:
exports.default = functions.https.onCall(async (data, context) => {// …});The context only contains two properties: a uid and a decoded token. The token’s format is based on the platform. Google, for example, chooses to return the email address in the token, whereas Twitter will not. In that case, you have to call admin.auth().getUser(UID) and then access the “email” property.
Unlinking identity providers (reference)
Section titled “Unlinking identity providers (reference)”The API is super easy to understand and is described at the reference link. What’s not apparent is that you can unlink all identity providers, and by doing so, the account can become anonymous. That means that you won’t be able to log in to it again after the current session. A book showed up in my Google search about this saying that you should either prevent unlinking the last account or tell the user after doing this that they should connect a new account.
By the way, the result of the link/unlink APIs is the updated users; I don’t believe they trigger onAuthStateChanged.
Specific providers
Section titled “Specific providers”- As of 3/26/20, Twitter doesn’t seem to support any kind of scopes at all, not just for Firebase (reference, reference2). However, you can still get a user’s email address, but it requires a special permission to be set in your Twitter app, which means you have to have a privacy policy and TOS (reference).
- Twitter may not return an email address at all for some users (reference): “When [the include_email property is] set to true email will be returned in the user objects as a string. If the user does not have an email address on their account, or if the email address is not verified, null will be returned.”
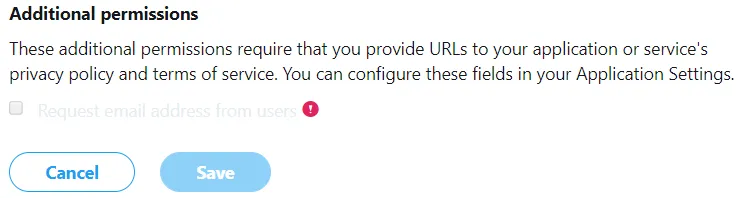
- On this same note, Twitter does have a way for you to control the main permissions so that they look less scary if you’re just trying to get their email address. However, it’s done through Twitter itself, not Firebase: developer.twitter.com → choose your app → details → Permissions → choose “Read-only”.
Twitch
Section titled “Twitch”I made a separate note for this since there are a lot of details.
Troubleshooting
Section titled “Troubleshooting”I authenticated to Firebase with Twitter but it didn’t show in Authentication → Users
Section titled “I authenticated to Firebase with Twitter but it didn’t show in Authentication → Users”This had happened right after I enabled the requesting of email addresses through Twitter. They say that after you enable that setting, you have to regenerate your API key and secret. I hadn’t done that in Firebase, so Firebase presumably never got my auth information.
I assume that I was getting an error when this happened, but I didn’t look for it anywhere.
”The identity provider configuration is not found.” (reference)
Section titled “”The identity provider configuration is not found.” (reference)”You probably didn’t enable the identity provider through Firebase itself. This happened to me when I was first moving from development to production and hadn’t set up my production environment the same way.
”An account already exists with the same email address but different sign-in credentials. Sign in using a provider associated with this email address.”
Section titled “”An account already exists with the same email address but different sign-in credentials. Sign in using a provider associated with this email address.””This happens when you have two identities with the same email address in Firebase.
There are two major resources here to help:
- [More helpful] Link multiple auth providers to an account using JavaScript - this tells you how a “Connections” tab on a site might work where you are already logged in with Identity Provider X and you want to allow logging in with Identity Provider Y. Basically, the flow is to call something like signInWithPopup for one account, then linkWithPopup for the other account. At that point, your Authentication → Users row will look something like this:
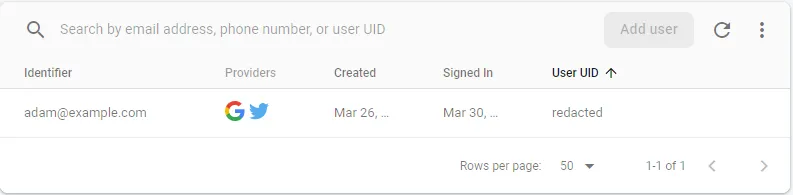
(notice both Google and Twitter under “Providers”)
- [Less helpful] “Allow multiple accounts with the same email address” - this tells you about a setting that exists in Authentication → Sign-in method → Advanced → One account per email address. By enabling this setting, you can have Firebase allow multiple different accounts even though they have the same email address.
”The custom token corresponds to a different audience.” (auth/custom-token-mismatch)
Section titled “”The custom token corresponds to a different audience.” (auth/custom-token-mismatch)”What’s most likely is that you called initializeApp on the client with the wrong project’s configuration. This was my problem; I have dev and prod environments, and I was using the prod configuration.
What’s way less likely is that you don’t have the right permissions or you configured the wrong service account on the server. If that’s the case, read on:
This is caused when you generate a custom token with a service account that isn’t related to your Firebase project (reference). Most Google accounts have lots of corresponding service accounts, and admin.credential.applicationDefault() is going to use your project-id@appspot.gserviceaccount.com account.
Cloud Functions can specify a service account’s ID rather than having to manifest the whole JSON file (reference). The ID is just the email that you get from the GCP console, and you switch to initializing your app like this:
admin.initializeApp({ serviceAccountId: 'my-client-id@my-project-id.iam.gserviceaccount.com',});auth/insufficient-permission (reference)
Section titled “auth/insufficient-permission (reference)”You usually see this coupled with the following error:
‘Identity and Access Management (IAM) API has not been used in project numerical-project-id before or it is disabled. Enable it by visiting https://console.developers.google.com/apis/api/iam.googleapis.com/overview?project=numerical-project-id then retry. If you enabled this API recently, wait a few minutes for the action to propagate to our systems and retry.; Please refer to https://firebase.google.com/docs/auth/admin/create-custom-tokens for more details on how to use and troubleshoot this feature.’ },
You visit the link that they give you, click “Enable”, and this part is solved.
You’ll then hit this error:
‘Permission iam.serviceAccounts.signBlob is required to perform this operation on service account projects/-/serviceAccounts/project-slug@appspot.gserviceaccount.com.; Please refer to https://firebase.google.com/docs/auth/admin/create-custom-tokens for more details on how to use and troubleshoot this feature.’ },
Just go here and add the “Service Account Token Creator” role to the account whose email matches the one in the error message.