Rider
One-liner usage notes
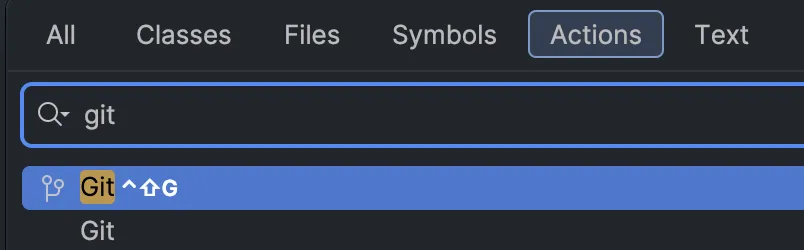
Section titled “One-liner usage notes”- To push through Git, click your branch name which shows for me at the top left, then choose “Push…” (you can also type “Push” into the “Find Action” dialog).
- When rebasing, the “continue rebase” button is where you’ll find the control mentioned in the parent bullet point (i.e. where you’d go to push code). It is NOT in the commit dialog!
- Shelving vs. stashing: shelving happens at the IDE level, and you can apply shelved changes multiple times if needed.
- Undo a commit:
- Open Git menu (it’s the tree icon if you just want to click something)
- Right-click a commit → Undo Commit… → press enter when it asks for a target changelist
- Open Git menu (it’s the tree icon if you just want to click something)
Sharing settings with teammates
Section titled “Sharing settings with teammates”- Search everywhere → type “Manage Layers”. You’ll see something like this:
-
- I just manually created
SiaBT.sln.DotSettingsalongside ourSiaBT.slnxsince we didn’t already have one. I then populated it with some of the contents from my “This computer” file.- Right-click “This computer” from the image above
- Click “Export to File…”
- Choose what you want to export
- Save the file somewhere, then copy relevant bits into the teamwide file using a text editor

Comment wrapping
Section titled “Comment wrapping”Update: I just installed this plugin and bound a key to “Wrap Line to Column”. This works like how Rewrap does in VSCode except that you have to select the entire comment block in Rider for it to format the way it does in VSCode with your selection anywhere in that block.
Old notes (which didn’t fully work as expected):
- To get proper doc-comment wrapping in C#:
- Make a custom Code Cleanup profile
- Go to Settings → Editor → Code Cleanup
- Duplicate “Built-in: Reformat Code”
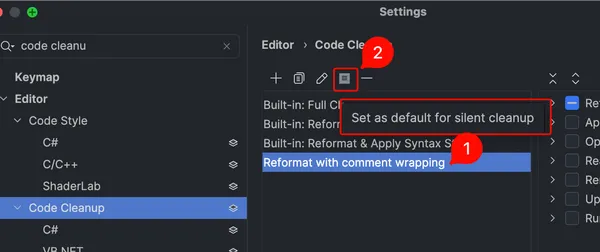
- In the duplicated profile, enable ”✅ Reformat embedded XML doc comments” under Reformat code → C#.
- Set that profile as the default silent-cleanup profile in that same dialog:
-
- Bind a key to “Silent Reformat and Cleanup”.
- Note: this will format the whole file unless you have a selection.
- Make a custom Code Cleanup profile
Random setup notes
Section titled “Random setup notes”I went through a marathon of setting Rider up, and I don’t think some of these notes may matter again in the future, but here they are anyway.
- Open in VSCode: add an external tool for this; it’s dead simple. The arguments you want are
--reuse-window --goto $FilePath$:$LineNumber$:$ColumnNumber$. - Preventing leaking
.envfiles or other secrets (e.g. while streaming)- ⚠️ Note: even if you perform the steps below, reloading the IDE will reset the search scope, which means you could easily leak a secret.
- Deindex the files so that they don’t show in “Go to file”
- Right-click the file (or containing folder) in the Explorer view and choose [Edit → Exclude] or [Tools → Stop Index] (depending on whether you’re in the files or solution view).
- Hide the files from search. I think the only “easy” way to do this is with a custom scope.
- Open Find in Files
- Click “Scope” and then the ”…” button:
- Add a new scope with this Pattern:
!file:*.env*- Local just means it won’t go into version control (reference)
- Make sure to select the new scope that you added

Comparison to VSCode
Section titled “Comparison to VSCode”- Things I’ve enjoyed about Rider over VSCode
- Godot
- Typing out
res://paths has autocomplete because it’s aware of whatres://represents. - VSCode had some kind of hallucinations around Godot’s
Vector2, e.g. I would do something likesomeVector.X - 1and getInfinitywhen it clearly was something like4. - It knows that C# code needs a corresponding UID, so deleting a C# file deleted the
.uidfile, too.
- Typing out
- Committing
- Staging ranges is easier since Rider adds a checkbox to each range.
- Debugging
- There’s autocomplete in conditional breakpoints and the expression evaluator.
- Conditional breakpoints always seem to work instead of saying it couldn’t evaluate the expression.
- Godot
Usage with Godot
Section titled “Usage with Godot”Follow these instructions with these modifications:
- Leave ”✅ Ignore asset root” checked. I don’t know why they say to uncheck it, but it doesn’t show up in the plugins if you uncheck it (also, unchecking it doesn’t match the contents of their screenshot).
- I think the plugin tries modifying things for GDScript, which is what Text Editor → External controls, but if you’re using C#, you need to modify Dotnet → Editor. It’s not super clear how to fill out the values, so here’s what I used:
- External Editor: choose JetBrains Rider from the list
- Custom Exec Path: use what JetBrains fills in for Text Editor → External, which for me is `/Users/adam/Applications/Rider.app/Contents/MacOS/rider
- Custom Exec Path Args:
{project} --line {line} {file} - Editor Path Optional: it seems like blanking this out so that Godot or Rider sets it is correct. Mine ended up with this value:
/Users/adam/Applications/Rider.app
- Add an empty
.gdignoreto your exported-builds folder (I useout) so that it won’t scan the builds for extensions. Without this, you’ll get something likeERROR: Error loading GDExtension configuration file: 'res://out/YourGame.app/addons/rider-plugin/bin/rider-plugin.gdextension'.- You may also need to:
- Delete the line containing
res://outfrom your.godot/extension_list.cfg. - Modify
export_presets.cfg’sexclude_filterto containaddons/rider-plugin/*.
- Delete the line containing
- You may also need to:
- I needed multiple
.slnxfiles once I had multiple.csprojfiles. For example, I have a game project and a tooling project. The tool isn’t exactly private, but end users shouldn’t have access to it so that it doesn’t bloat the build size. If I only had one.slnxfile and addedtool.csprojto it, then it would make it to players’ computers even if I didn’t reference it fromgame.csproj. As a result, I split the solution file intogame.slnxandgame_dev.slnx. I needed to put these in separate directories since Godot only actually seems to find the solution based on the name of the.csprojfile included within it. As a result, giving Godot a reference togame_dev.slnxdoesn’t actually change the exported build at all.
Hot reloading
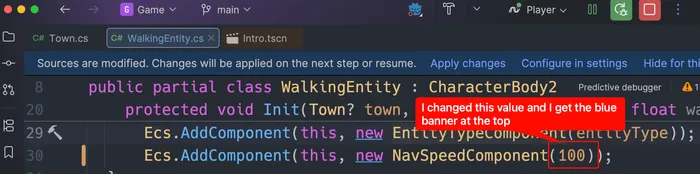
Section titled “Hot reloading”This is enabled by default in “automatic” mode. However, you still need to manually do something—either pause/resume execution, click “Apply changes”, or hit a breakpoint (and then resume execution).
Live templates
Section titled “Live templates”“Snippets” from VSCode are called “live templates” in Rider. They let you type something like gdready and have it turn into
public override void _Ready(){}To add new ones, go to Settings | Editor | Live Templates | C#.
Preventing Rider from deleting parameter names
Section titled “Preventing Rider from deleting parameter names”Suppose you have a struct like this:
public readonly record struct SoundData( string Path, VolumeSliderId VolumeSliderId, float MinPitch = 1, float MaxPitch = 1, float Volume = 1);…you would instantiate it like this:
var sd = new SoundData( "some_path", VolumeSliderId.Player, 0.6f),In this case, the 0.6f represents MinPitch, but if you ever added another float parameter after VolumeSliderId, it could be ambiguous, and nothing would flag that you’ve recontextualized your arguments. As a result, I like to write the instantiation this way:
var sd = new SoundData( "some_path", VolumeSliderId.Player, MinPitch: 0.6f // Add "MinPitch:" label),However, Rider seemingly doesn’t have a setting to outright ignore those labels; it will either delete them or add them based on certain situations, not ignore them. Those settings are under Settings | Editor | Code Style | C# → Syntax Style → Arguments.
I.e. this note only exists to say that I spent a moderately long time looking into this but did not end up with a solution. However, I do have a workaround! It’s to use refactoring tools to change the struct’s definition:
- Go to
SoundData - Run the “Change Signature…” action
- Add in a new parameter
- If adding an optional parameter, it’ll follow up with a dialog to choose the value. You can choose “use 0” (well, that’s the default for
floatat least) or a custom value.
- If adding an optional parameter, it’ll follow up with a dialog to choose the value. You can choose “use 0” (well, that’s the default for
Troubleshooting
Section titled “Troubleshooting”Error finding “mono” for Godot
Section titled “Error finding “mono” for Godot”Mono location is not specified in settings correctly and cannot be discovered automatically. Please check Mono settings under File | Settings | Build, Execution, Deployment | Toolset and Build.This is spurious if running Godot C# games. Instead, edit your run configuration and set the runtime to “.NET / .NET Core” (it was “Automatic” for me, which was probably trying to pick Mono).
Files of certain types don’t show in the “Find in File…” dialog
Section titled “Files of certain types don’t show in the “Find in File…” dialog”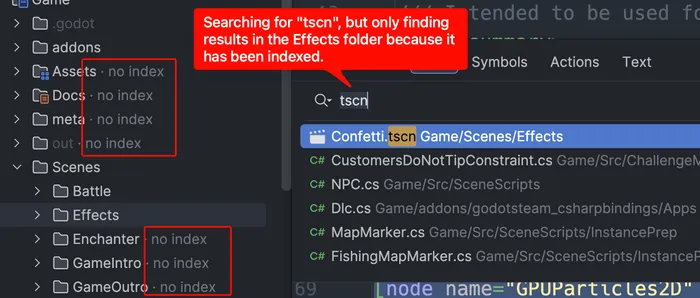
There are a few options here:
- Index the file in Rider. The indexed files will be stored in an
indexLayout.xmlin an.ideafolder. They will then show up in the find/search results. This has no impact on the build since it’s a Rider-specific setting.- Open the Explorer view
- Right-click a folder → Tools → Start Index
- When searching, make sure you’re scoped to “All Places” and not just the solution.
- Add it to your
.csprojfile. You can do this by switching the explorer to the “File System” view, then right-clicking a folder and choosing “Include”. It will then show up like this in the.csprojfile:<ItemGroup><Content Include="project.godot"/></ItemGroup>- Keep in mind that
Contentis typically for files that may be embedded or published with the project (reference). It’s confusing from that documentation whether it actually is embedded or published by default (I don’t think it is), but there’s also a<None>tag that you can use (reference) which clearly indicates that the file has no role in the build process.- Note: at least with Godot, if you have
<Content Include="some.asset" CopyToOutputDirectory="Always"/>in your.csprojfile, it’ll output to every build target. For macOS, this means the files will be duplicated. If they’re just for use in your game, you’d be better served by keeping them in yourGamefolder so that they go into the.pckfile automatically as part of the export.
- Note: at least with Godot, if you have
- Keep in mind that
- Add it to the solution. This should just be for organizational purposes, not anything that impacts the build. You can do this like so:
- In the “Solution” view, right-click the root solution node.
- Choose Add | New Solution Folder and name it something like “SolutionItems”.
- Right-click that folder.
- Choose Add | Existing Item.
- Select your files.
- After doing this, you should see a change to your
.slnor.slnxfile like this:<Solution><Folder Name="/SolutionItems/"><File Path="..\..\project.godot" /></Folder><Project Path="Game.csproj" /></Solution>
When deciding between the above three options:
- Rider indexing:
- For including files, I only use this for
.gitignoreso that I can quickly open the file from Rider. I wouldn’t expect this to be in the.csprojfile. - For excluding, it may make sense to add something here like a
binfolder, but it should probably be in your.gitignoreanyway.
- For including files, I only use this for
.csproj: use this for most files as long as the file is scoped to that particular project..slnx: use this for something shared across the entire solution.
Commit messages don’t show warnings
Section titled “Commit messages don’t show warnings”First of all, you can configure these in Settings → Version Control → Commit → Commit message inspections.
It’s just a known bug that the warnings don’t show anywhere.
Inspections show up for scratch/buffer files
Section titled “Inspections show up for scratch/buffer files”This was pretty confusing to figure out:
- Go to Settings → Editor → Inspection Settings → Inspection Severity → Other Languages → Scroll WAY down to “Proofreading” (or just search for it in the inspection-specific search box).
- Click “Proofreading” so that you modify all of the sub-settings at once.
- Change “In All Scopes” to “Project Files”
- Uncheck “Everywhere else”
- Click the ➕ and add “Scratches and Consoles”
- Set its severity to “No highlighting (fix available)”
- Click the ⚙️ to “Edit Scopes Order…”
- Put “Scratches and Consoles” on top so that it takes priority.
Rider inspections are complaining about “Src” being in a namespace
Section titled “Rider inspections are complaining about “Src” being in a namespace”This is actually a general problem, which is that you don’t have a folder configured as a namespace provider. For example, I have the directory structure Game/Src/EntityComponentSystem/ComponentHolder.cs. In that file, I have this line:
namespace Game.Src.EntityComponentSystem; // Rider warns: "Namespace does not correspond to file location, must be: 'Game.EntityComponentSystem'"To fix this, all I had to do is right-click the Src folder from within Rider → Properties → ”✅ Namespace provider”.
Roslyn analyzer not working as expected
Section titled “Roslyn analyzer not working as expected”In my case, I hit this issue. In this comment, they say to use a particular version of Microsoft.CodeAnalysis.NetAnalyzers. To do this, I had to right-click my csproj file in Rider, choose “Manage NuGet Packages”, and then right-click the correctly versioned Microsoft.CodeAnalysis.NetAnalyzers entry and choose “Install”.