Blender
Created: 2020-08-24 08:51:54 -0700 Modified: 2021-01-25 18:33:14 -0800
These notes are ones that I don’t know if they’ll be important, but I’d like to take them anyway.
The playlist that I’m using is here: Interface Overview - Blender 2.80 Fundamentals
Note that the playlist starts out kind of slow, then there’s a lot of repetition as you go through, but the momentum picks up from videos 8-15. If I ever find myself wanting to get back into Blender, it’s probably best to just follow the entire series again at 2X speed because of how many little tips there are that end up being helpful.
5upercircuits recommended a couple of learning routes:
I still owe you an answer regarding my Blender journey. I’m still a novice though.
I learn exclusively by watching YouTube videos. I can generally recommend “Grant Abbit” and “Blender Guru”. The two are very different in their approach. Grant is going more for a stylized look and also recommends starting by learning how to create low poly models. Blender Guru is the exact opposite, he focuses on photorealism - getting as close to reality as possible. His mantra is that you should learn how to create photorealism first before attempting to do anything stylized, because any stylized version is supposed to always be the real thing but with certain aspects emphasized or removed.
For me the Blender Guru way has been the better choice so far, because I’ve got no clue about art. Going for photorealism trains my eye to see what makes an axe, flower etc. the way it is - the same with lighting, composition etc. So, currently I’m following the “How to learn 3D effectively” series by Blender guru. Here’s a link to his blog post, where he explains a lot about how to learn a skill and why this way makes the most sense - recommend watching even if you’re not into 3D ;).
https://www.blenderguru.com/podcasts/episode-4
Basics
Section titled “Basics”- In Blender, the Z axis is considered “up”.
- At the bottom of the screen, you can see what each mouse button will do at any given time. This also works while holding modifier keys, so holding shift will update the UI.
- Many actions (like rotating) are performed based on your viewing vector. This is most helpful when you have a standard viewing vector (e.g. “top view” by pressing 7 on the numpad). At that point, pressing R will let you rotate along the Z axis (i.e. the X-Y plane) since you’re looking from the top.
- Deleting geometry is just a matter of selecting that geometry and then pressing X.
- You should probably use X-Ray Mode (alt+Z) or Wireframe Mode (Z → Wireframe) when doing this.
- You can’t edit the meshes of two separate objects together in Edit Mode (reference).
- Render engine basics (reference):
- Eevee - apparently good for realtime work and physics-based lighting
- Workbench - apparently good for previewing animations
- Cycles - apparently better lighting than Eevee (uses raytracing)
- 3D cursor: this is where new objects will go, and it can also act as the pivot for selected objects
- View layer: a way to separate renders either for compositing or easier selections
- Collection (as in a “scene collection”): this is just a logical grouping for your scene objects (and other collections). An object can appear in multiple collections.
- Modifier: an automatic operation that changes an object’s geometry in a non-destructive way. This can bevel, subdivide, smooth, etc.
- Constraint: a way to control an object’s properties using static values or another object entirely (e.g. to always look at that object, to copy its location, etc.).
- Tweak: this just means “drag”, e.g. “Tweak Left” is left-click+drag (reference).
- Mesh: a collection of vertices, edges, and faces. It’s essentially the 3D geometry of the object.
- Remember that objects are collections of meshes, so if you add a mesh to a selected object while in Edit Mode, both meshes will represent a single object. If you wanted two separate objects, then add the mesh while in Object Mode.
Hotkeys
Section titled “Hotkeys”- Ctrl+space while hovering over a panel: maximize that panel
- T: open the tools menu
- Shift+space (no need to hold): pop up the tools menu at the cursor
- Note that the corresponding hotkeys can be pressed outside of the shift+space menu in order to perform an operation just once. E.g. if you press B to enter box-select, you’ll only do it once and not change your tool afterward.
- Shift+space (no need to hold): pop up the tools menu at the cursor
- N: open additional quick settings, e.g. editing the transform
- F (in Edit Mode): make a new edge or face from the selected vertices
- Note that if you have more than 4 selected vertices, you’ll create an n-gon. In those cases, alt+F may be better since it’s the Face → Fill command instead of the Vertex → New Face command.
- Alt+F:
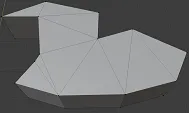
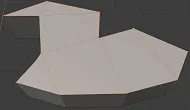
- Alt+J after that to turn triangles into quads (Face → Tris to Quads):
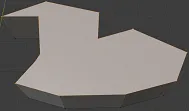
- F:
- Ctrl+[PgUp|PgDwn]: switch workspaces (e.g. from Modeling to Sculpting)
- Shift+A: add
- Deletion
- X: delete with confirmation (pressing D will confirm)
- Delete: delete without confirmation
- Shift+right-click: place 3D cursor
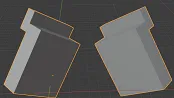
- L: select linked. This is helpful if an object is split into several separate meshes and you only want to select one of those meshes. For example, you would enter face-selection mode with 3, then you would hover over a face and press L and you’ll select all faces in that mesh.
- For example, these two meshes are part of one object:
- I hover over the left side and press L:
- For example, these two meshes are part of one object:
- Middle-click+drag: rotate
- Shift+middle-click+drag: pan
- Shift+tab: enable snapping
- Rendering
- F12: render an image (this can be done from any workspace, not just the Rendering workspace)
- If you want to render exactly what’s showing in the viewport, do View → Viewport Render Image
- F12: render an image (this can be done from any workspace, not just the Rendering workspace)
- W: cycle through the various selection options, e.g. Select Cube → Select Circle → Select Lasso
- (this is not a generic “cycle through tool variants” option)
- This can also be used to go back to selecting things, e.g. if you had a tool like Extrude chosen already.
- E (in Edit Mode): extrude. When you have an armature selected, this will create another armature.
- Tab: switch between edit and object modes
- O: toggle Proportional Editing. This is what lets you move nearby or connected vertices when you have lots of vertices to work with. It’s this button in the UI next to snapping:
![]()
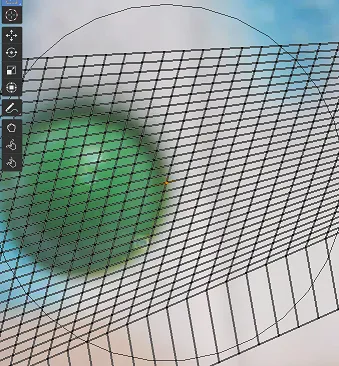
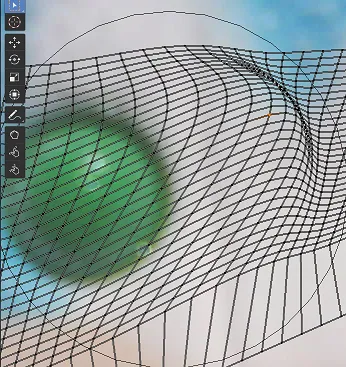
- For example, with Proportional Editing enabled, select a couple of vertices and press G to move them. Then, scroll the mouse wheel to affect the radius of influence. As you scroll, you’ll see the proportional size at the top change:
![]()
-
-
↓ I moved one vertex with smooth falloff and a relatively small proportional size (0.15)
-
-
Press U to unwrap the UVs back to their defaults.
-
Camera controls
- Ctrl+alt+numpad-0: move the camera to the current position/rotation
- Shift+backtick: enter “View Navigation”, which lets you use WASD to move the camera around for easier positioning
- Shift+[Numpad 4 | Numpad 6]: roll the camera
-
Collection-related shortcuts
- M: move to collection
- Shift+M: link to collection (although apparently this isn’t recommended since it’s hard to tell that an object is linked)
- With a collection selected…
- C: create a new collection
-
Resetting transforms
- Alt+G: reset selected object’s translation
- Alt+R: reset selected object’s rotation
- Alt+S: reset selected object’s scale
-
While performing a grab/scale/rotate (e.g. by pressing G, S, or R)
- Holding shift while dragging: slow down the drag for fine-grained control.
- X|Y|Z: only perform the action along that axis
- Shift+[X|Y|Z]: don’t perform the action along that axis (e.g. shift+X will always perform the action in the Y and Z axes)
- Shift+Z is useful for keeping objects aligned with the floor as you grab them
- Pressing the axis again will switch between the local axis and the global axis. For example, if an object is rotated 45° around the X axis, its local axis’s “up” would be different from the global axis.
- Shift+[X|Y|Z]: don’t perform the action along that axis (e.g. shift+X will always perform the action in the Y and Z axes)
- Middle-click+drag: perform that action while snapping to the closest axis
- This is helpful for the single-time movement/rotation/scale commands where you still want to align to an axis without pressing X, Y, or Z on your keyboard (which is nice when you don’t want to think which axis is which).
- Right-click or escape: revert the action to before you had done anything
- Typing numbers, an axis, and then enter: modify the relative transform.
- E.g. type G → 10 → Y → enter will translate the object by 10m on the Y axis.
- This works for negative numbers too, although you can press the minus key however many times you want to keep toggling it. Remember that the positive direction is indicated by the circled axis indicator:

- (positive Y goes to the left since that’s where the circle is)
-
Alt+Z: toggle X-Ray - this is what lets you select multiple overlapping vertices.
- If you don’t want overlapping vertices, you can merge them with “M” and merge them at their centers.
-
Selection
- Shift+left-click: select or deselect a single object
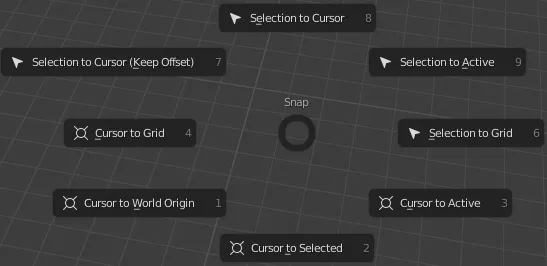
- Shift+S: selection and cursor menu (in Layout Mode)
-
E.g. you can use this to move the selected object to the 3D cursor (8) or move the cursor to the world origin (1).
-
C: circle-select mode (the circular reticle has to intersect an object’s midpoint to select or deselect (via middle-click))
-
Alt+A: deselect all
- A: select all
-
When selecting a box…
- Left-click+drag: select objects
- Ctrl+left-click+drag: deselect objects
-
Choosing what granularity to select (when in Edit Mode):
-
1: vertex select
-
2: edge select
-
3: face select
-
Note: you can hold shift or ctrl while selecting this to select or remove multiple at once
-
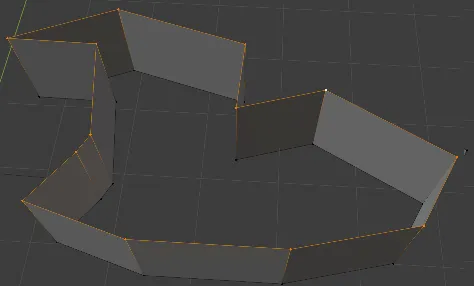
Alt+click (in Edit Mode): select a vertex loop
- For example:
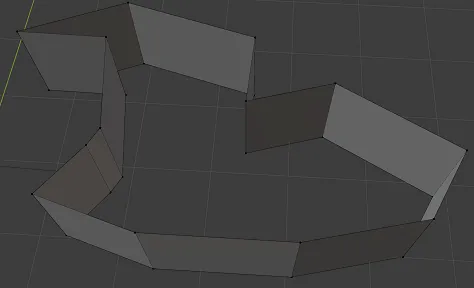
↓ (I alt-clicked the top “face” even though no real face is there)
-
Note that if you have it set to select edges or faces (by pressing 2 or 3), then you’ll select the edges or faces around that loop
-
Views
- Backtick: pie menu to see all of the different views
- Keep in mind that the numbers don’t correspond to the numpad keys, so 7 here is “front”, not “top”
- This is helpful since it’s a pie menu, so pressing backtick followed by moving your mouse in this direction (↘) will view the selected object.
- Numpad keys (probably prefer the backtick menu over this so that you can use your left hand)
- Numpad period: view → frame selected (centers camera on the selected object)
- Numpad 0: look through the camera
- Numpad 5: switch between perspective (depth taken into account) and orthographic
- Numpad 9: switch to the “opposite” view (e.g. front → back, top → bottom)
- Backtick: pie menu to see all of the different views
-
F3: sort of a command palette
Modifiers
Section titled “Modifiers”General
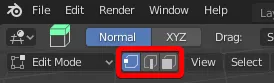
Section titled “General”- You can change a modifier’s visibility in different modes via the buttons at the top of each modifier:
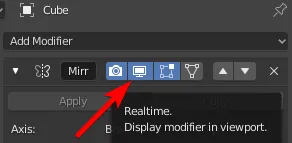
- The “apply” button for a modifier will persist that modifier directly into the scene/geometry. For example, if you mirror half of a car to make a full car and apply that modifier, it will appear as though you’d just made a full car to begin with, and any future changes won’t be mirrored. As a result, don’t apply modifiers unless you’re absolutely certain you’re not going to change them in the future or if you otherwise can’t perform some operation (e.g. if you no longer want your car to be mirrored).
Mirror
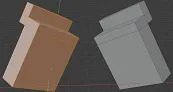
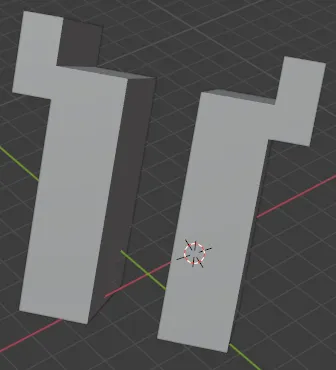
Section titled “Mirror”- An object can mirror itself if you want. For example, you can render half of a car and have it mirror itself to render the full car.
- This is as opposed to an object being mirrored around another object.
- Object mirrored with itself:
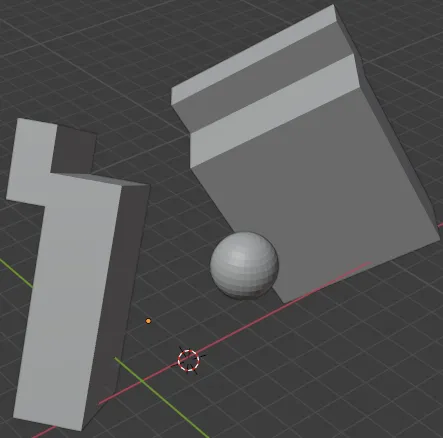
- Object mirrored around another object (the sphere in this case):
- The “Clipping” checkbox will prevent vertices from going through the mirrored image when you’re editing.
Specific tools
Section titled “Specific tools”Extrude (E)
Section titled “Extrude (E)”- While extruding, if you right-click to cancel the extrusion, it will not remove the duplicate faces. This is roughly the same as just using the Inset tool to completion, although you’d likely want to scale the “fake” face after extrusion so that it would resemble the use of the Inset tool.
- Note that I find this process a little cumbersome as a newbie; I would prefer to just use the Inset tool.
- The extrude-along-normals variant of the tool can sort of “thicken” your mesh since it keeps the “connected” property of extruded faces (i.e. already-connected faces will still be connected at the end).
- Ctrl+right-click without even having the Extrude tool selected will extrude the selection to the cursor. This is great for rough shapes, emphasis on the “rough” part since it’s not very accurate.
Loop Cut (ctrl+R)
Section titled “Loop Cut (ctrl+R)”- You hover over edges to make loop cuts, not faces.
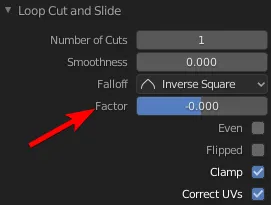
- If you entered the Loop Cut tool directly from ctrl+R (i.e. you didn’t press shift+space first), then you can use the scroll wheel to change the number of cuts, and you can right-click to reset the slide position to the factor (which shows in the bottom left in the operator panel).
- You can left-click+drag to slide where the cut will go so that it’s not always based on “Factor” at the bottom left:
Bevel (ctrl+B)
Section titled “Bevel (ctrl+B)”- The difference between the bevel tool and the modifier is that the tool will change the mesh itself whereas the modifier can always be turned off at will. It’s somewhat suggested to use the modifier over the tool so that you have less geometry to deal with as you’re editing your model.
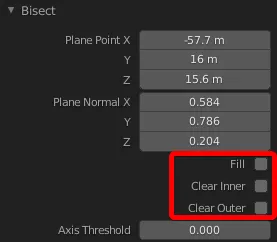
Knife tool (K)
Section titled “Knife tool (K)”- This can be used to add vertices to a set of faces (K) or to bisect your mesh entirely (shift+space → shift+2). When bisecting, make sure to use the operator panel at the lower left for common options:
Shaders
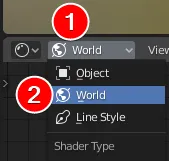
Section titled “Shaders”- The world itself has a shader which you can edit through the Shading workspace:
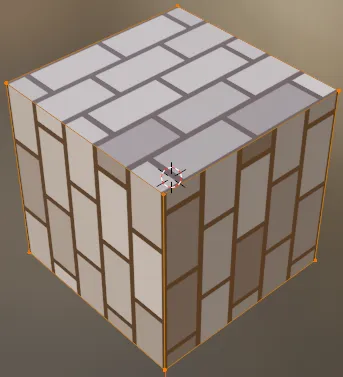
- For 2D textures like the brick texture, you need to add a UV Map node in the Shader Editor as an input to the brick texture for it to texture something like a cube.
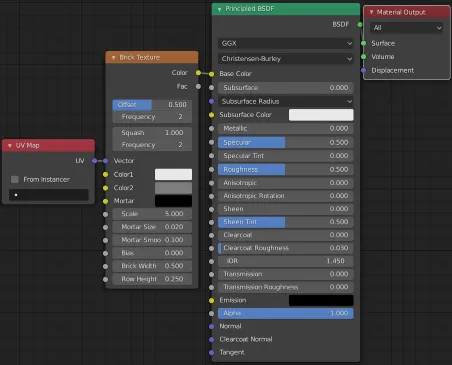
- Output:
- Texturing is done through the shader-node system and is most commonly done with image files.
- You can only have one output node connected at a time, but that doesn’t mean you can’t have multiple in the shader editor. E.g. this is an output node since it has only inputs coming into it:
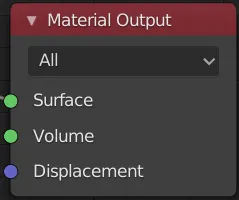
-
To switch which output you’re using, just click its red “title bar”.
-
Node connections
- If you want to delete an intermediate node while keeping the prior and subsequent nodes connected, you can choose “Delete with Reconnect” (ctrl+X). Alternatively, you can alt+drag the node out to disconnect it without deleting it.
- You can “mute” nodes in the editor by pressing M:
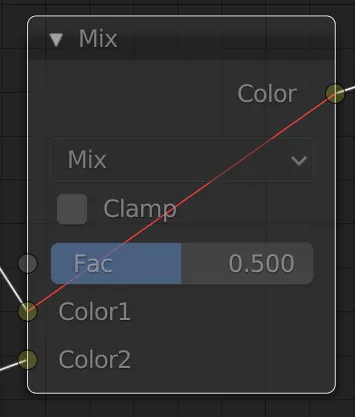
- (↑ this is muted, so the first input will be used without considering the second input)
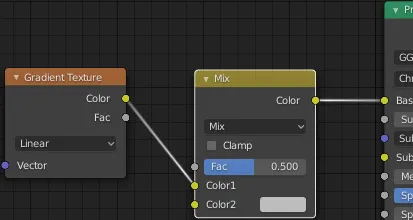
- If two nodes are already connected and you drag a third node on top of the connection, it will sandwich the new node between them as shown below:
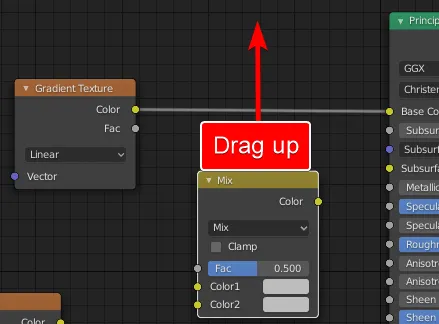
↓
- Hotkeys
- Shift+A: add a new node (and then you can press “S” for “Search” and start typing a name if you want)
- Ctrl-click+drag a connection: move the connection even from its input handle somewhere else
- You can use the G, S, and R hotkeys to grab, scale, and rotate selected shader nodes (reference).
- Alt+drag: “disconnect with reconnect”, i.e. take out an intermediate node while reconnecting the adjacent nodes
- F: to easily connect two nodes via their first open, matching-color slots, you can select them both and press F (Node → Make Links). Pressing F more times will connect subsequent matching slots.
- Shift+F (Node → Make and Replace Links) will overwrite the topmost connection
- Ctrl+right-click+drag: cut links by drawing lines over the connections
UV Editor
Section titled “UV Editor”- There’s a concept of seams for how to unwrap your 3D object into UV maps. This video goes over them, but I don’t think it’s worthwhile to document all of that here.
- The UV editor will only show vertices corresponding to the ones that you’d selected in the 3D viewport. This means that you need to be in Edit Mode in your 3D viewport.
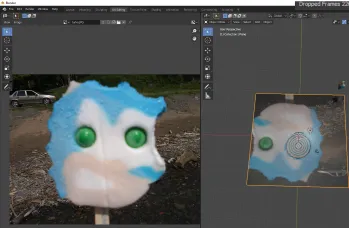
- Shown above: the UV editor isn’t showing anything interesting because I don’t have any vertices selected, just the object itself. This is because I’m not in Edit Mode. To fix this, I press tab.
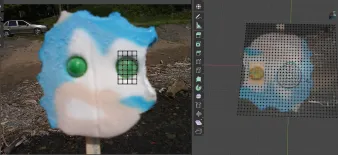
- Shown above: I have just selected the vertices around the eye.
UI tips
Section titled “UI tips”- Panels
- Any panel can be customized by choosing the dropdown at the upper left.
- There are some default layouts at the top of the screen for particular tasks, e.g. modeling vs. animation.
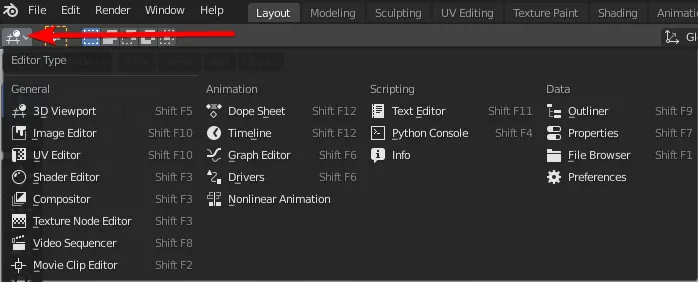
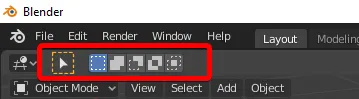
- Workspaces and editors
- Workspaces are just the “layouts” at the top part of the screen:
- Any workspace can be linked to any editor with this menu at the upper left:
- Workspaces are just the “layouts” at the top part of the screen:
- Computations
- Wherever you can type numbers, you can type equations, e.g. “5 * 10” will input 50.
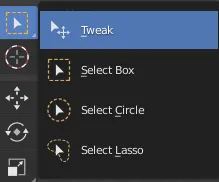
- Selecting tool variants
- Just long-press a tool to see the variants that you’d cycle through with W.
- View layers
- View layers remember which collections are checked or unchecked (reference)
- Camera
- Locking your camera to your view will move the camera such that it always looks where you’re looking:
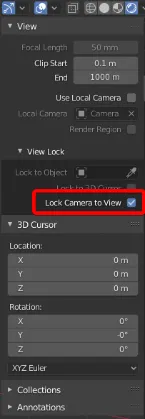
-
You can find this in the “N” menu and choosing “View”
-
Wrapping the mouse around the screen
- Let’s say you want to drag an object really far away. You can press G to select the “grab” tool, then just keep moving the mouse up. As you move it up, it will eventually wrap to the bottom of the screen automatically so that you don’t have to perform two actions.
-
Tool properties
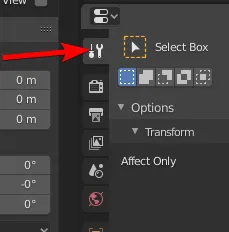
- You can also sometimes find this at the upper left:
Troubleshooting
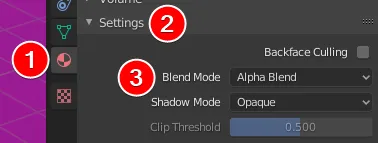
Section titled “Troubleshooting”My texture is not actually transparent
Section titled “My texture is not actually transparent”If you just modify the alpha of a shader, it won’t make your object transparent. You have to change the Blend Mode (e.g. to Alpha Blend) in Material Properties → Settings → Blend Mode.