GitHub
One-liners
Section titled “One-liners”- Collapse all diffs in a PR: just hold alt and click any single collapse button (reference)
- Cherry-pick a commit with
git cherry-pick commit_hash. If it’s in a separate remote, you may needgit fetch --allfirst.
It’s dead-simple to set up GitHub pages (~30 seconds from scratch). Just follow these instructions. Note that the repo either needs to be public or paid.
Releases
Section titled “Releases”You can use releases to automatically create a changelog (reference).
- If you’ve never used releases before, just append
/releasesto your GitHub URL to access them for the first time. - Create a new tag named after your version by clicking the tag dropdown, typing something like
v0.7.3, then clicking the ➕. - To automatically generate release notes, click “Generate release notes”. Note that it does this based on PRs, not raw commits.
- This requires that you have an old tag to compare against (or else it’ll probably use the entire history). For that, you should use the command-line:
git checkout COMMIT_HASH→git tag TAG_NAME→git push --tags.
- This requires that you have an old tag to compare against (or else it’ll probably use the entire history). For that, you should use the command-line:
Protecting repos that I make public
Section titled “Protecting repos that I make public”For streaming, I want to make sure that I don’t publish secrets, and if I do, someone else could potentially remove them before too many people see.
- Add some collaborators who can use these steps
- Enable push protection
Projects
Section titled “Projects”- General usage
- Based on experience and nothing more (i.e. I haven’t seen how other people do things or what GitHub recommends), I think that you should generally use a repo’s issues and then pull things into your project from there. This is as opposed to using the project for everything, which becomes unwieldy because the board takes up a TON of vertical space and requires a lot of scrolling. Also, adding all of the project-specific information at first is a lot of cognitive load (e.g. which iteration or milestone, which priority, etc.). Sometimes, things like the priority can’t even be determined at the time that the issue is created, only when it’s about to be assigned.
- The UI even hints that your “Prioritized backlog” shouldn’t contain a ton:
- For one, it’s called “Prioritized backlog”, not “Backlog”
- Each individual column has numbers like “0/3”, so seeing “87/3” feels wrong.
- The UI even hints that your “Prioritized backlog” shouldn’t contain a ton:
- Based on experience and nothing more (i.e. I haven’t seen how other people do things or what GitHub recommends), I think that you should generally use a repo’s issues and then pull things into your project from there. This is as opposed to using the project for everything, which becomes unwieldy because the board takes up a TON of vertical space and requires a lot of scrolling. Also, adding all of the project-specific information at first is a lot of cognitive load (e.g. which iteration or milestone, which priority, etc.). Sometimes, things like the priority can’t even be determined at the time that the issue is created, only when it’s about to be assigned.
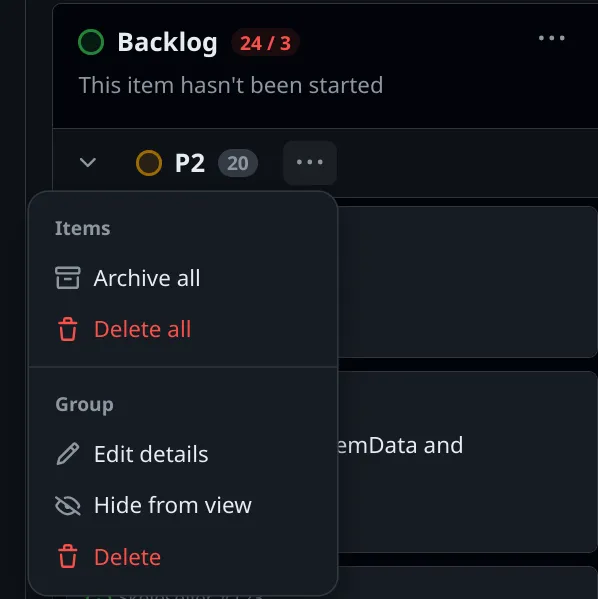
- To bulk-remove issues from a project, simply click “Delete all” on one of your boards:
- Keyboard shortcuts
- gb: go to projects view
- ⌃Space: make a new item
- Preface the item with ”#” to choose a repo to create an issue in
- To see your milestones, click Issues → Milestones
-
- To add iterations, follow these simple steps. You can just click “Add iteration” a bunch of times in a row if you want.
- You can also just left-click on the roadmap if you want.
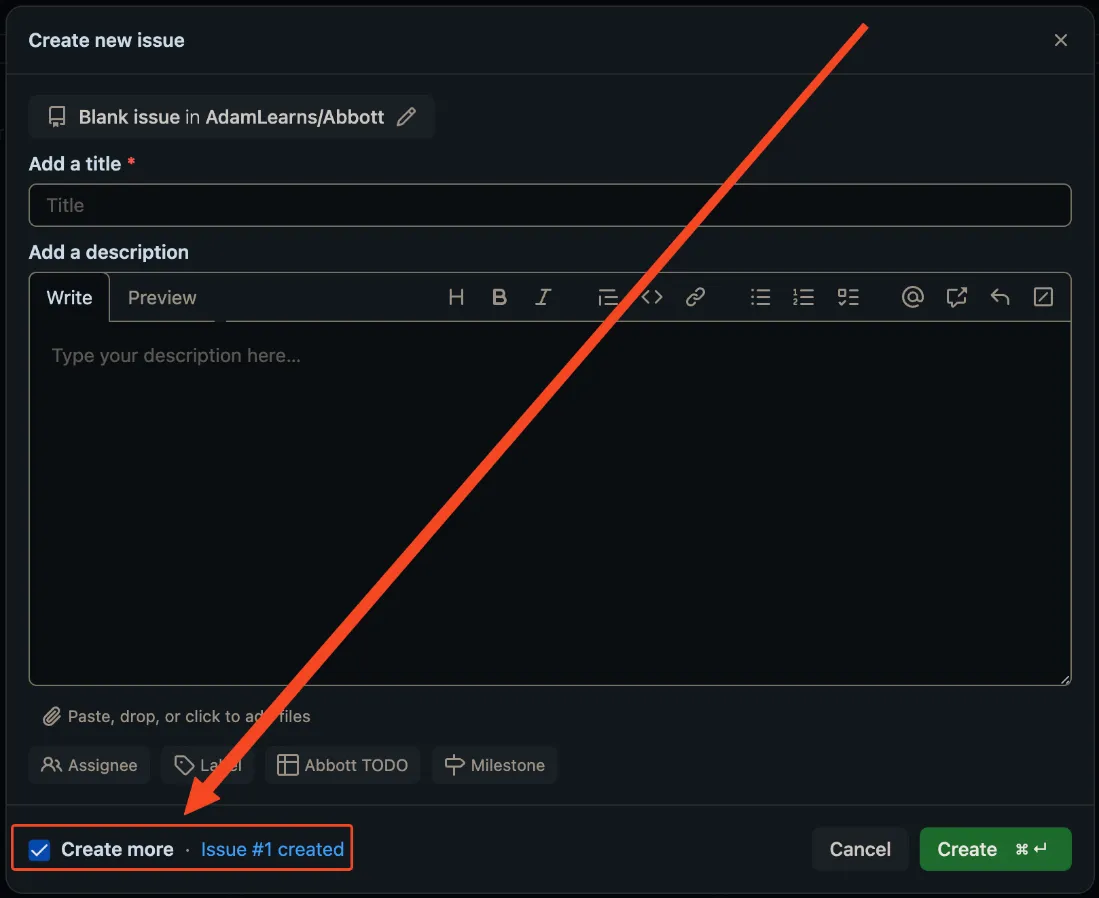
- If creating multiple issues at once, you can check “Create more” at the bottom of the dialog:

Markdown
Section titled “Markdown”- Footnotes (reference) are just
[^1]in the main text and then[^1]:at the end. If you want a code block in a footnote, indent the whole block with 4 spaces.
- To add images, save the gist, paste the image into the comments for the gist, then copy the markdown that you get by doing that (reference)
- To use gists for markdown, make sure the gist’s file is named “.md”

Comparing across commits (reference)
Section titled “Comparing across commits (reference)”You can do this with commit hashes or tags.
Editing wikis
Section titled “Editing wikis”As of 3/29/2019, this is not done through pull requests; if you have an “Edit” button, then you will just immediately save the results by pressing “Save Page”.
[14:37] EasyExperience: there’s no way to do PRs for wikis right now. That’s why some people just use a folder full of markdown files.
Refined GitHub (reference)
Section titled “Refined GitHub (reference)”This is a browser extension that adds a bunch of features to GitHub.
Keyboard shortcuts
Section titled “Keyboard shortcuts””?” will always tell you the keyboard shortcuts for a particular page, so I’m just linking really helpful ones:
- “L” when filing an issue will let you add a label. Note: I couldn’t figure out a fast way to get back to editing the issue text other than pressing shift+tab 6 times.
Selecting multiple lines
Section titled “Selecting multiple lines”If you’re in a code view like this, hold shift while you click a line number in the gutter and you can select multiple.
Making tables of contents (reference)
Section titled “Making tables of contents (reference)”For pages like this, managing the TOC can be really annoying. This will generate it for you as long as you’re not on Windows. :P
Pulling a pull-request repo
Section titled “Pulling a pull-request repo”Note that to make a pull request, you have to fork the repo, then you typically make your own branch and submit the pull request through that. To make finding this particular fork and branch easier, there is this tool
The “hub” tool can also do this. See notes here.
GitHub pages
Section titled “GitHub pages”I haven’t actually used this, so just copy/pasting something should I ever need it. The context is that this was advice around OpHog, but I couldn’t actually use GitHub pages since the artwork was licensed (and thus couldn’t be stored on GitHub):
9/11/17
3:33 HiDeoo: Adam13531 Just enable github page on the repo settings
3:33 HiDeoo: And serve index.html
3:33 HiDeoo: It’s free and give you an url
3:37 HiDeoo: Adam13531 Yeah, that’s what I used for https://hideoo.github.io/twitch-emotes-viewer/ it just serve the index.html from the repo. The only difference for you is that index.html is not on the root of the repo but in src so what you would want is not the serve the master branch but a new one called gh-pages and you would simply push the src folder in this branch with “git subtree push —prefix src origin gh-pages”
Linking to code on GitHub
Section titled “Linking to code on GitHub”To get something like the image below:
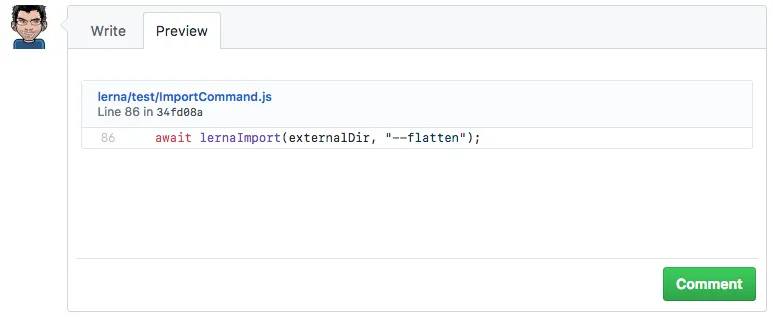
- Open some code that you want to link to on GitHub.
- Press “Y” while looking at the code to get the canonical link, that way you’re not linking to Master. For example, this changes a link like
https://github.com/lerna/lerna/blob/master/src/commands/ImportCommand.js#L74intohttps://github.com/lerna/lerna/blob/34fd08aaac474693f8d9e0cc46bf22db862880ba/src/commands/ImportCommand.js#L74 - Paste the canonical link into an issue without Markup.
- Preview your comment to make sure it worked.
Making tables of contents
Section titled “Making tables of contents”There’s a tool that can do this here
Note: this technically works for any markdown, not just on GitHub
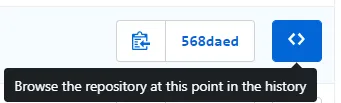
Browsing the repository at a particular point in history
Section titled “Browsing the repository at a particular point in history”Suppose you want to see what all files looked like at a particular commit and not just the changed files for that commit:
Closing/deleting branches
Section titled “Closing/deleting branches”If you click “Branches” as shown below, you’ll get UI that will let you delete branches:
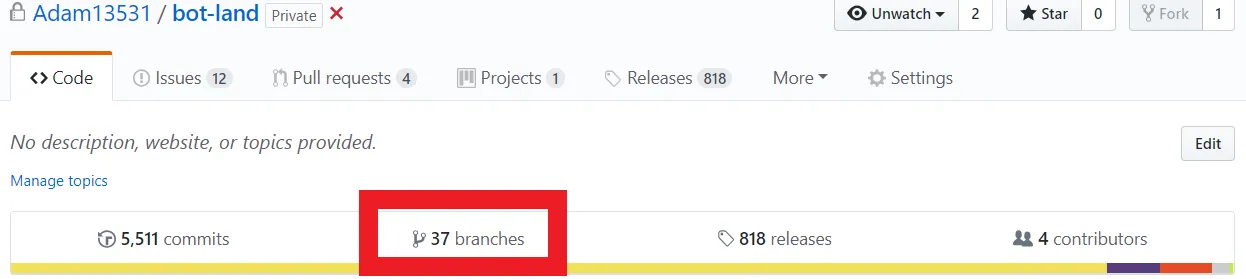
You can’t delete protected branches, so you’ll have to go into the repository’s settings to “unprotect” those branches first (I did this by changing “Apply rule to *” to “Apply rule to AAA” just to undo it temporarily, but that’s because no one else is pushing code for Bot Land).
Pull requests
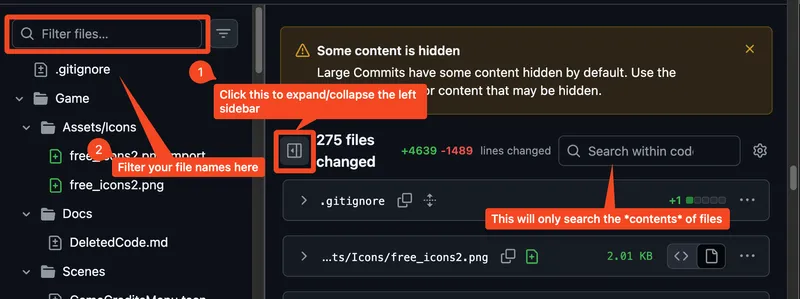
Section titled “Pull requests”Finding a specific file
Section titled “Finding a specific file”Suppose you have ~50+ files. It’s not easy to find the specific one that you want even if you know its name, and neither the browser’s built-in search nor the file-contents search on GitHub will help. Instead, you need to expand the left sidebar and filter the file names through there:
Making a pull request
Section titled “Making a pull request”If you ever want to make a change to someone else’s repository in such a way that they can easily merge it back into their codebase, do these steps:
Full steps:
- Fork the repo
- Clone the repo locally
- Make a new branch on the forked repo
- This is because new changes are committed to the PR as well, so you typically want to make a new branch that you can sort of “freeze” for the sake of a PR.
- Make changes on this new branch
- Commit and push (no need to merge)
- On GitHub, refresh your repo and you should see your change with a “Compare and pull request” button next to it (if not, just go to “new pull request” from the main repo and choose “compare across forks” to be able to see your fork). Click that. Make sure to pick the source branch and the destination branch correctly.
Note: any new pushes you do to that branch will automatically update the PR.
Simple steps:
- Go to a file in their GitHub and click the “Edit” button.
Comparing across pull requests
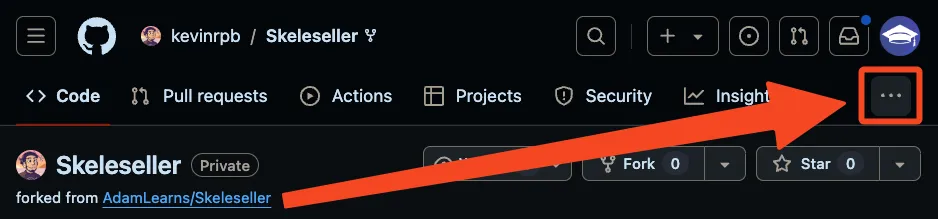
Section titled “Comparing across pull requests”Often, someone may submit two PRs:
- PR 1, which adds, say, 100 lines of code
- PR 2, which is based on PR 1 but only adds a single line
If you only want to see that single line, you can use the “Compare” feature to compare across PRs. Simply append ”..” to the URL (e.g. https://github.com/AdamLearns/Skeleseller/pull/341) or click the three dots at the upper right of someone’s fork:
Submitting a pull request without cloning your own fork (reference)
Section titled “Submitting a pull request without cloning your own fork (reference)”If you did the above steps WITHOUT step #2 (“clone the repo locally”) and you instead cloned the original repo, you can just change the remote of the cloned repo to point at your fork, then continue to push as normal.
- First, get your remote URL. This is in the “clone” button on GitHub. Here’s an example:
- Run the command
git remote set-url origin https://github.com/Adam13531/react-radio-group.git
Closing issues automatically when the pull request is accepted (reference)
Section titled “Closing issues automatically when the pull request is accepted (reference)”Just say “fixes #123” or “closes #123” in your pull request, even in the description.
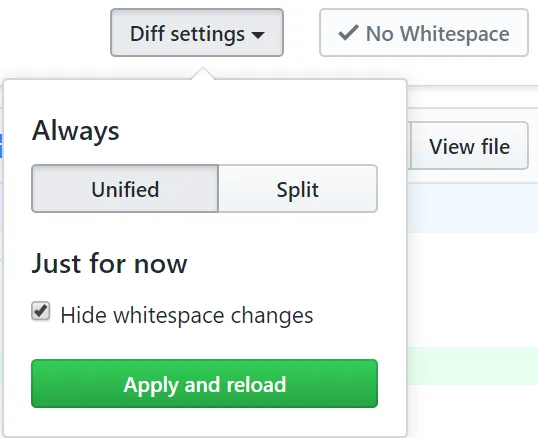
GitHub “secret” features (e.g. ignoring whitespace in diffs) (reference)
Section titled “GitHub “secret” features (e.g. ignoring whitespace in diffs) (reference)”Ignoring whitespace
Section titled “Ignoring whitespace”Add “?w=1” to the URL.
Note: this is no longer a secret
Seeing more context for a commit
Section titled “Seeing more context for a commit”Press the “close laptop”-lookin’ button at the bottom or top:
