DaVinci Resolve
Editing basics
Section titled “Editing basics”This section talks about making basic edits that I’ve needed for basically all of my videos: trimming clips, transitioning between them, etc.
-
Overview
- Modes: the bottom bar has several modes you can use (which Resolve calls “pages”):

- It generally seems to go in order from left to right of how your workflow:
- “Cut” is great for setting up the timeline with all of your unedited clips
- “Edit” (the next mode) is for trimming clips, relocating them, etc.
- Modes: the bottom bar has several modes you can use (which Resolve calls “pages”):
-
Transitions:
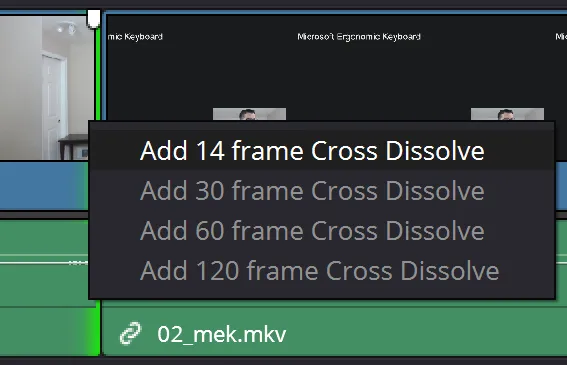
- Add quick cross dissolve: right-click right at the boundary of any two clips to quickly add a cross dissolve between them.
- Add quick cross dissolve: right-click right at the boundary of any two clips to quickly add a cross dissolve between them.
-

-
Zooming in as closely as I’ve shown above lets you easily right-click the transition to change its properties.
-
Video transitions: they can seemingly only be added to the beginning or end of a clip, so use the Blade tool to create new beginnings/ends so that you can easily add them where you want.
-
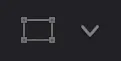
Copy/pasting a clip to a different track: copy your clip, alt+click the “Auto Track Selector” button (it looks like this:
[<>]) on the track you want to paste to, then paste. -
Editing numbers: you have to press tab twice to shift between adjacent fields.
-
Fine-tuning edits: when in Trim Edit Mode (shortcut=T), let’s say you used the blade tool to split a clip so that now you have Left Clip and Right Clip. You can select one of the two clips and use comma or period to nudge where the clip starts. You can hold shift to nudge more frames at a time.
- For example, if you want the Right Clip to start sooner, select it and press [shift+]comma a few times.
- You can also just click and drag the clip rather than use the keyboard (ensure you’re in Trim Edit Mode first though), but this must be done at the boundary (so the cursor will look like this:
<[:).
-
Adding text: click “Effects” at the upper left to show the Effects panel, then click “Titles” in the resulting panel. Each effect is really its own mini timeline, so depending on where you hover, you’ll see the start/middle/end of it. When you find one you want, drag it onto a higher video track.
- Use the Inspector panel to change the properties of the text, e.g. the string you’re displaying, animation properties, etc.
- Editing in Fusion: if you chose a cool animation, you can right-click the text effect and choose “Open in Fusion Page”.
-
Modifying the transform with the mouse: click this button
- …it’ll turn white and you’ll see animation controls show up in the preview:

-
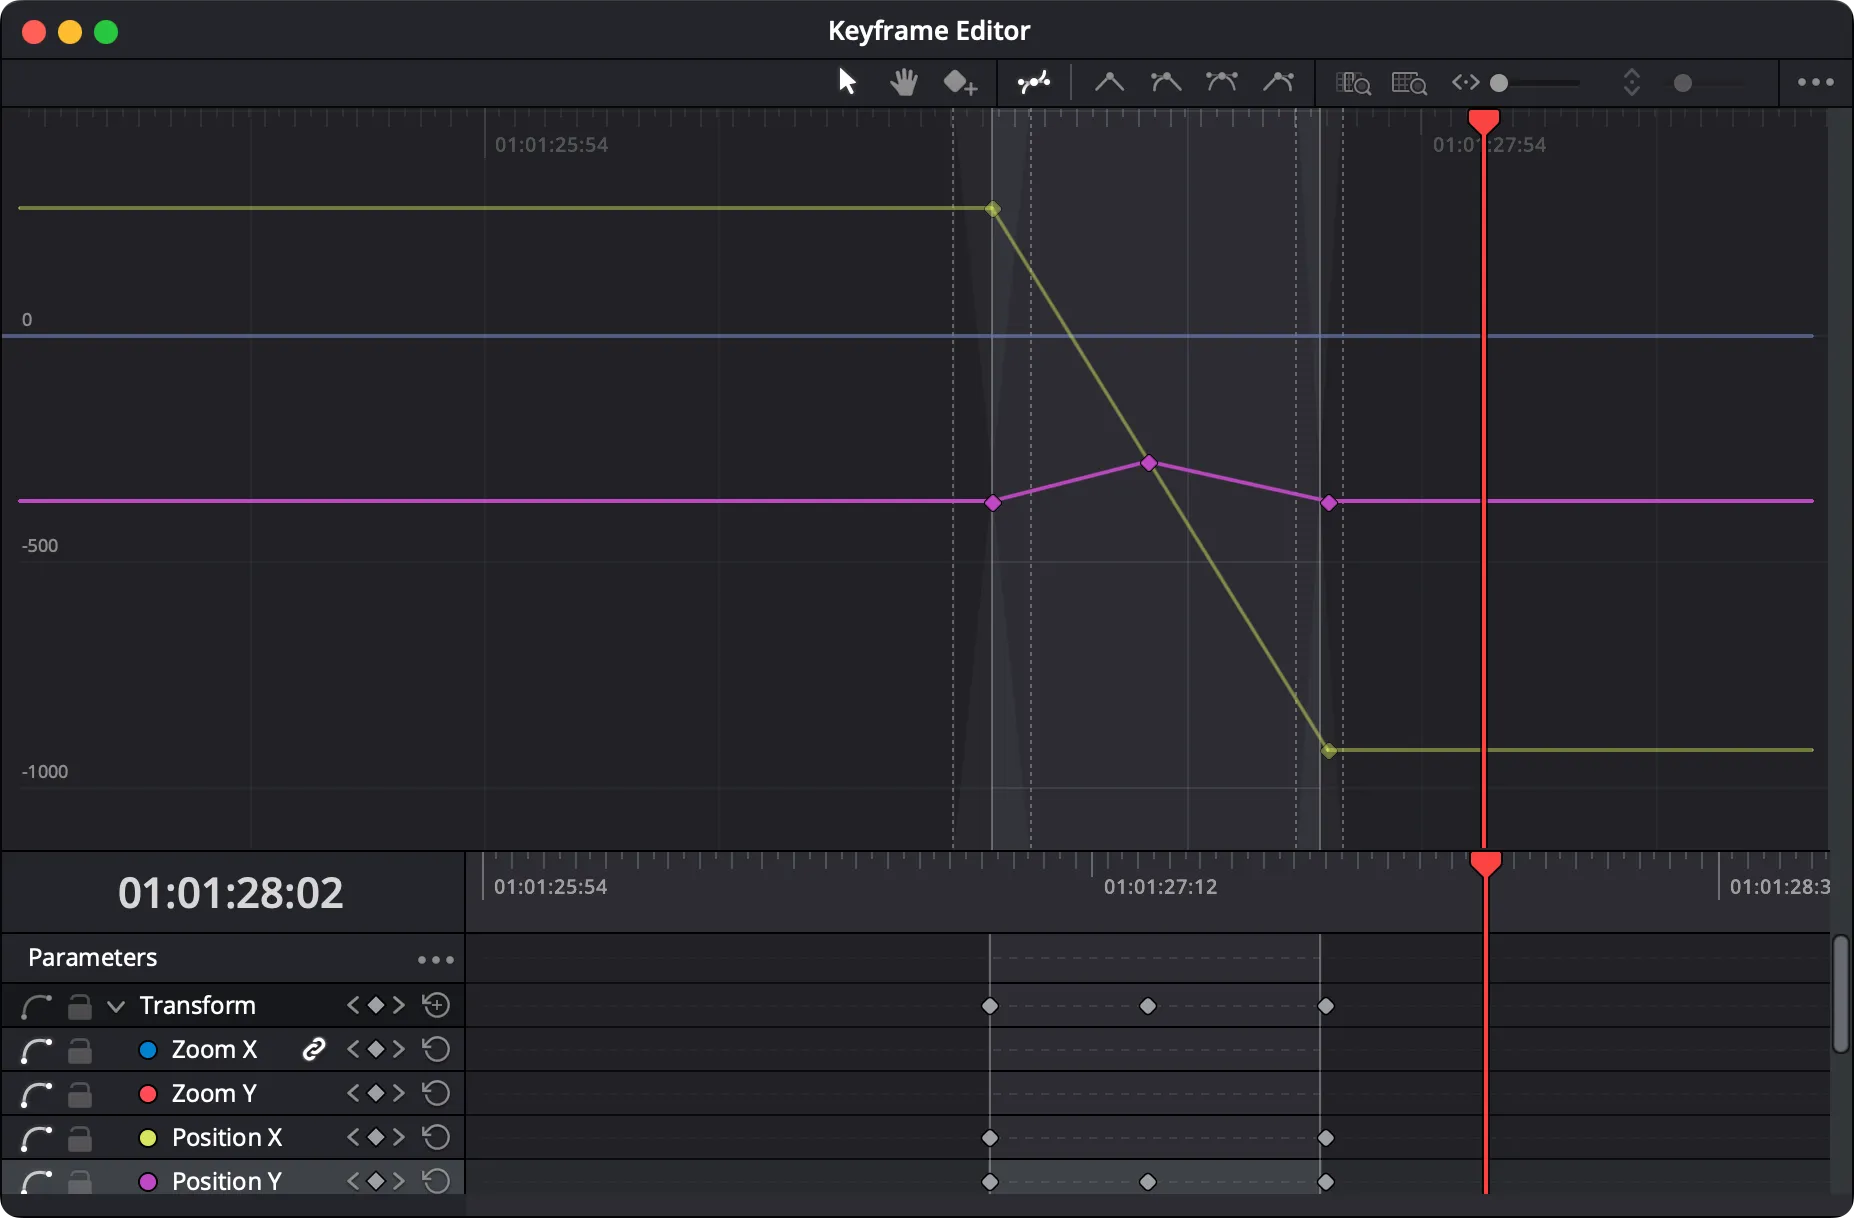
Using keyframes to animate position/size (e.g. to zoom in): Davinci Resolve - How to Move Images (Animate Movement)
- UPDATE: in DaVinci 20, there is now a Keyframes panel at the top (where you find Media Pool, Effects, Index, etc.). Click that to see your keyframes. Then, clicking the “Maximize”-lookin’ button undocks to a separate window and makes the controls much more specific.
- To see keyframes, click the black icons on the right side of a clip in the editor (reference).
- You can copy/cut/paste keyframes in this video.
- You can also drag a selection rectangle to select many keyframes.
- When zooming in on something, set the Anchor Point rather than animating the Position so that you don’t jitter while zooming.
- You don’t need to make keyframes for the anchor point unless you’re going to be zooming on multiple different positions in the same video track (and then you’ll only use the keyframes when no zooming is happening).
- I.e. just set the anchor point once before you start zooming.
- You don’t need to make keyframes for the anchor point unless you’re going to be zooming on multiple different positions in the same video track (and then you’ll only use the keyframes when no zooming is happening).
- After zooming, you’ll probably want to reverse the zoom back to normal (e.g. zoom in on something to show, then zoom out to the full picture again). The easiest way to do this is:
- Select a keyframe
- Copy/paste it at the playhead
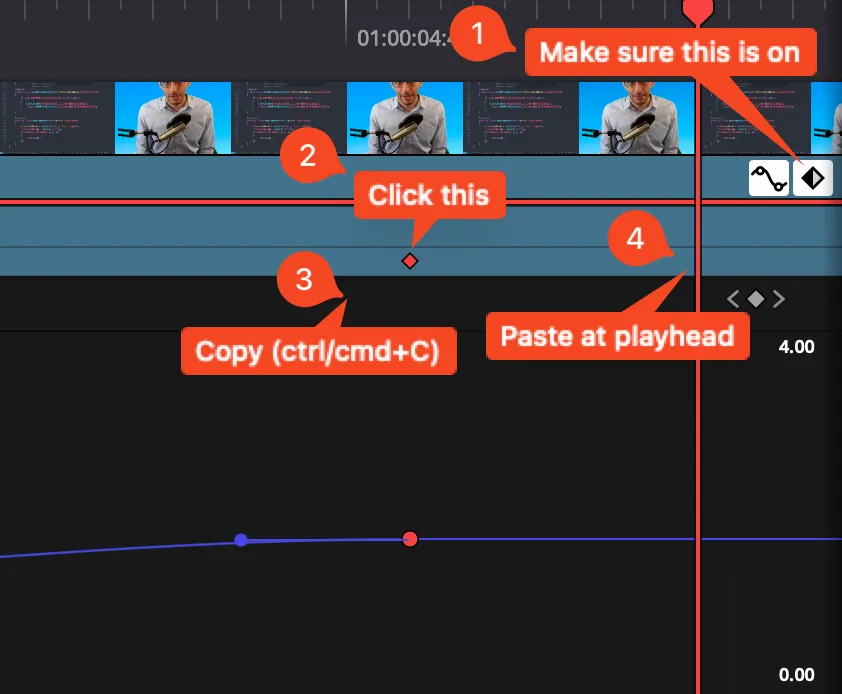
- UPDATE: in DaVinci 20, there is now a Keyframes panel at the top (where you find Media Pool, Effects, Index, etc.). Click that to see your keyframes. Then, clicking the “Maximize”-lookin’ button undocks to a separate window and makes the controls much more specific.
-
Highlight something with a circle: How to Draw a Circle in Davinci Resolve
-
Speeding up a clip (e.g. due to a hesitation): split out a clip that you want to speed up, then right-click it and go to “Retime controls”. Then, you can just drag the clip (from the “Speed Change” bar, not the clip itself) to be smaller on the timeline.
-
Add/insert blank space (reference): put cursor at the spot you want to add, press “Y” to select all clips after that spot (⌥Y to select on all tracks; see Timeline → Select Clips Forward), then type
+1.to add a second-long gap. -
Ripple delete blank space:
- First, click the blank space to select it.
- Then, right-click and ripple-delete it.
-
Selectively mute audio: alt+click an audio track to select only that track and not the corresponding video, then split out the part you want to mute. After that, press D to disable that clip.
-
Normalizing audio: you can select all of your audio clips and normalize them from the right-click menu, but all that does is change the clip’s “volume” property that you see in the Inspector.
- You typically want music to be -15 to -20 dB lower than voices.
- Be careful with the “independent” setting since any sped-up clips may end up being super loud if they were just ambient noise to begin with. It doesn’t mean you shouldn’t use the independent setting; it just means you have to check your video afterward and manually lower the audio level in the Inspector for outliers.
-
Keyboard shortcuts (reference)
- ⭐️ Up/down: navigate to previous/next clip
- Ctrl+plus/minus: change timeline zoom level
- Edit Mode
- A: enter selection mode
- B: enter blade mode (to split clips where you click).
- ⌘\ will split at the playback head
- ⌘B seemingly does the same (but maybe only on tracks with autoselect enabled?)
- ⌘\ will split at the playback head
- P: preview in fullscreen
- Delete: remove clip and ripple backward
- Ctrl+scroll: scroll left/right
Chromakeying
Section titled “Chromakeying”(kw: green screen)
- Note: chromakeying in DaVinci is actually really easy by just cropping the video and following this brief tutorial. My own written instructions:
- Enter the “Color” workspace using the color-wheel tab all the way at the bottom
- At the top, you’ll see a clip with a green square and a line going out to a green circle. Right-click the background and choose “Add Alpha Output”
- Connect the blue square to the blue circle.
- Click the color picker (“Qualifier”) tool and make sure “Picker” is selected (the dropper with the circle).
- I click the vertical center of my green screen (since my lighting is imperfect and creates a vertical gradient). This should make the subject disappear.
- Click the “Invert” tool to the right of the “Qualifier” tool so that the subject reappears.
- Set In/Out Ratio to -100
- Set Blur Radius such that there’s still the tiniest green outline around the subject.
- Click the “Feather Add” tool and then click part of the subject (I click my face). This should get rid of the rest of the green outline.
- After choosing Feather Add, you can drag the hue “triangle” inward if it did too much and leaves artifacts (e.g. fingers looking like AI).
- Zoom out while still in the “Color” workspace to make sure all of the green is actually gone. If not, click the Qualifier tool again and click the now-mostly-invisible background to try a different green color.
- Then, after getting done with all of that, the video won’t actually have an alpha channel until you go back to the Edit workspace, right-click your clip, and choose “New Compound Clip…”, then set the cropping (again).
Automatic captions
Section titled “Automatic captions”Note: this is a paid feature.
- Adding automatic captions (reference): just go to Timeline → Create Subtitles from Audio… and click “ok”.
- To change the appearance, click your new subtitle track, and in the inspector, choose “Track”.
- To change the individual captions, click your subtitle track and choose “Caption” in the inspector.
- I don’t recommend manually changing all of your captions until you’re toward the end of editing the video. If you got the pacing wrong and have tons of captions, then you pretty much have to regenerate the captions from scratch to get the proper timings (or tediously edit everything individually).
- You can italicize/bold/color individual words by selecting some section of the caption, checking “Customize Caption”, and modifying the style below. It’ll only affect the selected words.
- If you quick-export to YouTube, it won’t burn-in the captions, so you have to do a custom export and choose the right caption settings.
- Make sure the captions show above the bottom ~15% of the screen or so since that’s where YouTube shows UI with the video title, channel, etc.
- Make sure to normalize audio if you want that (it’s in the audio-specific settings). I left the target level at 0.0 dBFS (decibels relative to full scale).
- It’s a good idea to link the subtitle clips to the corresponding video clips in case you edit/move clips.
Basic gradient and outline
Section titled “Basic gradient and outline”E.g. this:

- Add the “Slime” title
- Change the colors by clicking the two gradient points under “Shading”
- Stop it from being wavy/slanted
- Under Layout → Type, choose “Point”
- Under Layout → Rotation, set Z to 0.
Vertical videos
Section titled “Vertical videos”Suppose you’re making short-form content. Here are some settings I wanted to change:
- File → Project Settings…
- Master Settings
- Timeline resolution: 1080x1920 (you can just pick the normal 1080p resolution and check “Use vertical resolution”)
- Image Scaling
- Input Scaling → Mismatched resolution files: Center crop with no resizing
- If you don’t set this, then you’ll end up with black bars if you have a 1920x1080 video file and you try fitting it to a 1080x1920 timeline resolution.
- Input Scaling → Mismatched resolution files: Center crop with no resizing
- Master Settings
Some other caveats:
- Some phones will crop the edges slightly (reference), so try not to have anything super important right on the very edges. Note that for my phone, I think it only chops the edges off when viewing through the browser, not through the YouTube app.
Scaling pixel art videos with nearest-neighbor
Section titled “Scaling pixel art videos with nearest-neighbor”All you should have to do is click the clip, then go to Video → Resize Filter → Nearest Neighbor in the Inspector: 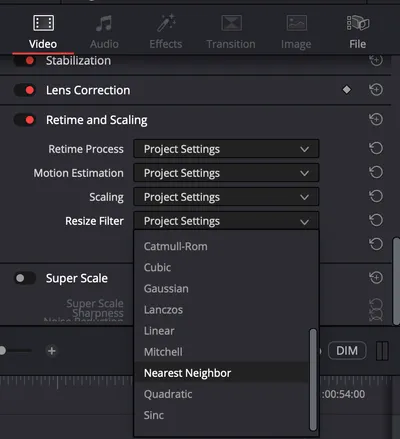
If this still looks bad, then it’s probably because the source video is lossy, which will naturally introduce some artifacts.
Small, very specific tips
Section titled “Small, very specific tips”- Adjusting output framerate (reference): the framerate is set when you make a project. You can go to File → New Timeline…, uncheck “Use Project Settings”, go to the “Format” tab, and choose a different framerate. Then, you can copy/paste all of your existing timeline to the new one.
- Removing mic hits/pops (e.g. you bump your mic while recording a video and a bass-y sound appears in the audio file): I found this easiest by isolating the audio clip using the Blade tool, then clicking that clip and enabling “AI Voice Isolation”. That’s all I had to do.
Exporting
Section titled “Exporting”- Blurry videos?
- I had sort of blurry output when there was a lot of motion and sped-up clips. I did two things to try to address it, but I’m not sure which one was needed:
- Choose “Quality: Best”
- Set a keyframe every 18 frames rather than every 30
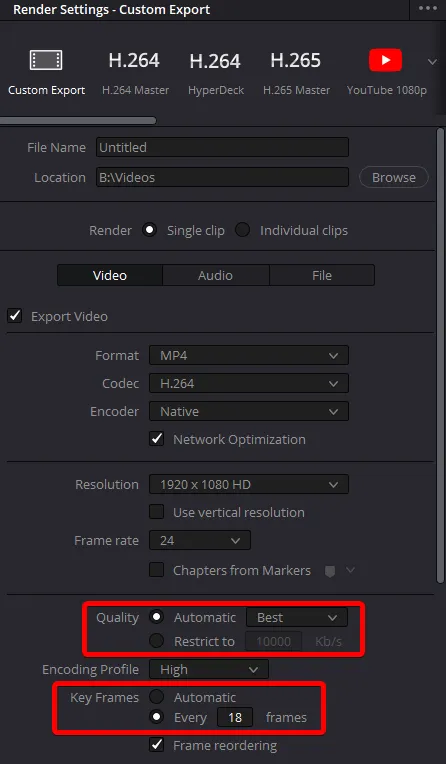
- I had sort of blurry output when there was a lot of motion and sped-up clips. I did two things to try to address it, but I’m not sure which one was needed:
Animating text
Section titled “Animating text”Raw notes from when I did this on Sat 03/22/2025:
https://www.youtube.com/watch?v=LIOZpc5LgzYhttps://www.youtube.com/watch?v=eaSdRTfS-A0
Add Text+Set however you wantRight-click in text box and choose "Follower"Edit in FusionLayout → change type from Point → FrameModifiers → Transform → change Transform from Characters → Words  Add some keyframes for the size  Space them about 10 frames apart—this is how long it will take for one word to animate in, and it'll be applied to all of the words

To modify individual characters (https://www.youtube.com/shorts/bKmnm_xR8YY), go to Fusion, use the Modifiers tab, right-click in the Text section and add Character Level Styling, then select your characters and change their properties- You can’t easily update many Text+ clips at the same time. You can easily add a “Transform” effect to a clip, then copy the whole clip, right-click another clip and Paste Attributes → Plugins
Troubleshooting
Section titled “Troubleshooting”Playback lag (reference)
Section titled “Playback lag (reference)”- Go to the Media page, right-click a clip, and go to Generate Optimized Media. This can take a long time (10 minutes for 300 MB for me (which is about 15 minutes of video)). Everything should be buttery smooth after that.
- This takes a significant amount of hard-drive space. I used something like 250 GB optimizing the clips for a 15-minute video in 1080p60. Granted, many clips were way longer than they needed to be since I had multiple takes in each clip.
- The cache is in a folder called CacheClip in the folder specified by Preferences → Media Storage.
- You can generate optimized media just for the portion of the clip that you’re using by right-clicking from the timeline in Edit Mode.
- This takes a significant amount of hard-drive space. I used something like 250 GB optimizing the clips for a 15-minute video in 1080p60. Granted, many clips were way longer than they needed to be since I had multiple takes in each clip.
- Reduce playback resolution via Playback → Timeline Proxy Mode → Half (or Quarter) Resolution. I think you need to go to the Media page and generate proxy media for all of your clips before this will work, but I’m not sure since generating optimized media already fixed the problem for me.
Can’t add transition (reference)
Section titled “Can’t add transition (reference)”Resolve just needs enough clip to work with on either side of the transition, so try trimming each clip (i.e. remove some of the end of Clip #1 and some of the start of Clip #2). That way, Resolve can use the trimmed section for the transition.
Ligatures have weird spacing
Section titled “Ligatures have weird spacing”
To fix this: use a Text+ title → Inspector → Video → Title → Advanced Controls → Use Ligatures → change from Non-Latin to All Scripts.