ECS
Created: 2018-10-19 11:55:06 -0700 Modified: 2019-06-10 16:07:37 -0700
Basics
Section titled “Basics”ECS is Elastic Container Service. It includes services like ECR (for storing Docker images), EKR (for running Kubernetes), and its own orchestration involving either EC2 instances that you manually control or Fargate (which controls EC2 instances for you).
One thing that was tough for me to wrap my head around at first was how task definitions and services interrelate. This page has some basic information. Tasks are formed from task definitions, and services simply control the number of tasks to run. Taking Bot Land as an example, it sounds like you’d want task definitions for each of the following:
- Verdaccio
- Matchmaker
- Account Server
- Game Server
- Overseer
- Database (if I wasn’t using RDS)
More reasons/proofs pointing at wanting different services for most endpoints:
- You can’t split the configuration granularly enough to support multiple services. For example, the network configuration of a service defines which subnets and security groups can be used. However, all containers in the service will be placed in those subnets/groups.
- As mentioned under “Best Practices for Fargate Networking” here, scaling containers in the same task is done with the same coefficient. To use their example, if you want 1 web tier and 1 API tier, then that’s fine, but if you need 2 API tiers to cover 10 web tiers, then you have to split services.
You do not need to have multiple clusters to support many different kinds of endpoints. Going back to the Bot Land example, all of those services can run in the same cluster. This is why the services are split as they are.
There are two kinds of networking when it comes to Fargate (reference): container networking and external networking. Just like running two processes on the same EC2 instance, you can use localhost from Fargate between two containers in the same task thanks to the awsvpc network mode. This is container networking. External networking is everything else: communication to or from the outside world. Just like outside of Fargate, you should prefer using the private IP address on any endpoint that has both a private and a public IP address, that way traffic stays inside the subnet.
When it comes to load balancing, this page talks about common scenarios and is incredibly helpful. If you have an Internet-facing service, then you would probably want a load balancer inside the public subnet to forward traffic to the private endpoints in your private subnet. If you have a private service (e.g. a password service), then you can put a load balancer into the private subnet.
Regarding hyperthreading (reference1, reference2): “Each vCPU is a hyperthread of an Intel Xeon CPU core, except for T2 instances.”
You can’t seem to change ThreadsPerCore for Fargate instances, only for EC2 instances.
If you want to run “docker exec”, I think you can only do so if you have EC2-backed instances as opposed to Fargate-managed instances. If using EC2 images, SSH into the machine and run “docker exec”. If on Fargate, you can set up SSH and do this, but it’s pretty hacky (reference).
For performance of vCPU vs. RAM on startup time, network utilization, etc., check out this blog post. Their conclusions:
- Having more instances of low-resource containers is better than having fewer instances of high-resource containers
- The startup times were high enough for them where they wanted a pool of warm/standby containers.
- Note that Fargate has ready EC2 instances for its own usage, but it doesn’t have ready containers for your application’s/stack’s purposes. Having containers at the ready is apparently easy with autoscaling.
I couldn’t find a conclusion of whether you can or should use an equivalent of —restart-unless-stopped. My theory was that it would speed up failures by not having to provision a brand new container. However, I don’t think it’s very important unless you think there are going to be tons of failures. For more information about the scheduler concepts, check this out.
Task placement is not specifiable with Fargate (reference); instances are always spread out across availability zones. It wouldn’t make sense for you to be able to use “binpack” since you’re not controlling the underlying EC2 instances by yourself anyway.
I’m 99% sure that your private IP address assigned to a Fargate container using AWSVPC (which is currently required as the networking mode, so saying “Fargate with AWSVPC” is technically redundant) is static, meaning you can read it once and pass it around internally for usage later (reference). The reference link has this particular quote:
“When you use the awsvpc network mode in your task definitions, every task that is launched from that task definition gets its own elastic network interface, a primary private IP address, and an internal DNS hostname.”
As far as I can tell, there’s actually no internal DNS hostname for each task in Fargate. It was very difficult to find any information supporting that there would be a hostname.
The same does not hold true for public IP addresses; those can change at any given time in Fargate.
To reference a Dockerhub image from task definitions, just specify the image name without any protocol or domain, e.g. “metabase/metabase:latest”.
Metadata file (reference) and metadata endpoint (reference)
Section titled “Metadata file (reference) and metadata endpoint (reference)”The metadata service (which you access via a static IP address) is not available from Fargate because you’re not controlling the EC2 instances yourself. Instead, you can use the metadata file that’s given to you via a Docker volume or the metadata endpoint that can be accessed over the intranet (i.e. you definitely need to submit a web request and read the JSON response).
Instructions:
- Enable this feature by setting the ECS_ENABLE_CONTAINER_METADATA environment variable to true.
- Read the file located at the ECS_CONTAINER_METADATA_FILE environment variable (you can’t hard-code a path because it contains a random ID for some reason).
Getting the service name from the task metadata
Section titled “Getting the service name from the task metadata”I had a specific scenario where I was trying to get the target group name (or ARN) from a running container. I thought I could use the metadata file a little more simply than these steps:
- Pull the TaskARN from the metadata file
- Call describe-tasks with the TaskARN to get the startedBy property (this looks like ecs-svc/9223370495928052730)
- Call list-services to get all service ARNs.
- Call describe-services with up to 10 of those ARNs at a time.
- Search through the result for the startedBy that you saw earlier and get the target group ARN from the load balancer
This sounded too tedious for me to do, so I think it’s better to just pass in the service name as an environment variable.
Using ECS for a public service that doesn’t need to be scaled
Section titled “Using ECS for a public service that doesn’t need to be scaled”My scenario was that I had a Verdaccio instance that I wanted to run in Docker on Fargate, but the only people who would connect to it are the developers of Bot Land and the continuous integration system. That meant that this service scales based on number of developers, not number of users, so it doesn’t actually really need to scale anytime soon for Bot Land. This is why I don’t think it’s a use-case of ECS, or at least not the main focus.
The problem that I ran into when I tried putting Verdaccio in Fargate anyway was that it didn’t have a public IP address. You can use service discovery and auto-naming to set up a Route53 “A” record pointing at your private IP address, but you can’t point at the public one that way. This leaves you with two major options:
- Make an ALB solely for giving a public IP address.
- Pro: easy to do
- Con: costs money every month for something that’s intended for load balancing but that would just be a proxy to your container.
- Don’t use ECS; switch to EC2. You can either use Docker on the EC2 instance or just make an AMI that has the contents of the container directly on it.
- Pro: not spending extra money on a pointless load balancer
- Con: you have to manage the EC2 instance yourself
- [this is not a major option] Work around the problem entirely, e.g. by paying NPM for private modules.
If I didn’t have other endpoints that needed to be publicly load-balanced, then I may have gone with option #2. However, Bot Land’s Account Servers are also accessible through the Internet, so it makes sense to use a single ALB for all publicly accessible traffic, then use host-based routing to control where traffic is going. If I ever needed to do it, I could allow/block traffic based on the source IP address as well using WAF.
Terminology
Section titled “Terminology”- A task is a logical group of Docker containers deployed with specified settings.
- A cluster is what AWS calls the back-end used to scale your containers. It has tasks that get thrown into it and the cluster will figure out how to set up machines to back all of this.
- Task definition: this includes everything about running your containers, including the underlying RAM/CPU requirements. This is similar to a docker-compose file.
- A service keep track of how many instances of each task should be running (among other things like configuring EC2 vs. Fargate, which load balancer to use, etc.).
Using an ALB with Fargate (reference, troubleshooting reference)
Section titled “Using an ALB with Fargate (reference, troubleshooting reference)”General notes:
- The way that load balancing with Fargate works is generally like this:
- You create a Fargate service with load balancing configured (that particular configuration can only be done at the time of creation).
- In that configuration, you point to a target group, which is a logical grouping of endpoints with settings for health checks and attributes like sticky sessions (this way you can have different settings for your web servers from your other servers if needed).
- When creating a Fargate service, I don’t think you can omit the health check at all despite that the underlying API (create-target-group) says it’s optional. I think the reasons why are:
- The reason why you probably omit a health check from a target group is so that you can manage the entry/exit of instances in the load balancer yourself. In Fargate, you don’t manage individual instances.
- Target groups aren’t only used by Fargate.
- If you somehow didn’t have to have a health check and the service went offline, then the load balancer would just route to a dead endpoint.
- When creating a Fargate service, I don’t think you can omit the health check at all despite that the underlying API (create-target-group) says it’s optional. I think the reasons why are:
- When configuring the load balancer, you make a set of listeners. A single listener tells you where/how to route traffic and is roughly a protocol, port, and a rule. For example, a listener may look something like “HTTPS / 443 / forward to Account Servers”, where Account Servers would be one of the target groups that you set up.
- With Fargate, the load balancer is needed so that the public IP address of the containers can change at any time and be normalized through the load balancer. Internal traffic can still communicate without using the load balancer.
- Target groups have a health check. Two properties of it are “Healthy threshold” and “Interval”. Assuming your container could somehow come online instantaneously in Fargate, it still wouldn’t be accessible in the ALB until [Interval * HealthyThreshold] seconds have passed. For example, if your interval is 30 seconds and the threshold is 2, it will take a minute before traffic gets routed to it.
- Currently (10/26/2018), you can’t have one service registered twice in the same load balancer. This means that if you need to support, say, HTTP and HTTPS traffic from a server in the load balancer, you have to make two separate services.
- Technically, using a Classic Load Balancer supports having two ports go to the same container instance, but they don’t recommend doing that in case only one of the tasks in that container fails.
- However, you can’t even use a Classic Load Balancer if your network mode is awsvpc, and currently, that’s the only supported network mode for Fargate.
- In order for any of this to work, you need the ecsServiceRole role on your account (reference).
- For instructions on how to actually create the ALB, see here.
- You’ll be asked to set the target type of “IP” or “instance”. Choose “IP”. From here:
- “Services with tasks that use the awsvpc network mode (for example, those with the Fargate launch type) only support Application Load Balancers and Network Load Balancers. Classic Load Balancers are not supported. Also, when you create any target groups for these services, you must choose ip as the target type, not instance. This is because tasks that use the awsvpc network mode are associated with an elastic network interface, not an Amazon EC2 instance.”
- You’ll be asked to set the target type of “IP” or “instance”. Choose “IP”. From here:
- After setting up the ALB and the target groups, you’ll have a completely empty load balancer. This is because the Fargate service needs to be associated to a target group (reference - look for “(Optional) Configuring Your Service to Use a Load Balancer”).
- After configuring your service, “Target Groups” is where you’ll find the individual IP addresses of the instances that Fargate created. Remember that these can change at any time, so you shouldn’t ever use these directly, but they can be helpful for debugging.
- You have separate health checks for the ALB from your task definition’s health checks (i.e. the container’s health check). It seems like the task definition’s health checks are relatively new (reference). They allow you to check health beyond what HTTP/TCP can access, e.g. if your container needs to have foo.exe running in order to be healthy, the load balancer has no way of checking this.
My scenario (for the specific notes below):
- Allow HTTP traffic (port 4873) to go to Verdaccio containers
- Allow HTTPS traffic (port 443) to go to Account Server containers. However, the Account Servers should see the traffic via HTTP on port 8080.
Specific steps:
- Make a target group for Verdaccio and a target group for Account Servers. I’m pretty sure the process to create an ALB through the console only allows you to make one target group at first. To set up target groups, you go to Console → EC2 → Load Balancing (on the left) → Target Groups (still on the left)
- All target groups need a “target type” of “IP” since I’m using the awsvpc networking mode.
- It’s probably a good idea to hyphenate your names here since you can’t use spaces.
- Make sure to create the target group in the same VPC as the load balancer, otherwise you’ll see it as a disabled option from the dropdown when editing the ALB.
- For the target group’s port, I set this to 8080.
- In the ALB, configure listeners to route to the target groups. For now, this will just be port-based. I could set up host-based routing (reference) eventually.
- In my particular case, I want the load balancer to take in HTTPS traffic and then send it unencrypted to the Account Server.
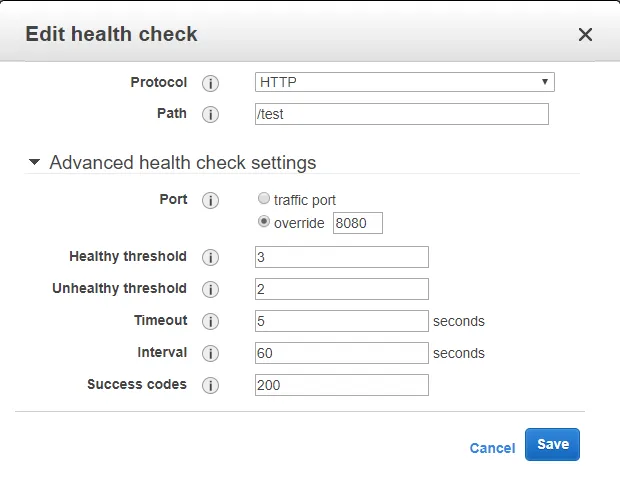
- I wanted Account Servers to have sticky sessions. This was very easy to set up. You go to Target Groups and then edit the target group (reference).
- The security group on Verdaccio is such that it should only allow traffic from the load balancer and nothing else.
- The security group on the Account Server is more complex
- Traffic needs to be allowed directly to this instance from Overseers on port 8080
- Traffic needs to be allowed from the ALB
- Make sure the inbound and outbound rules are set correctly on the load balancer. Inbound traffic rules are just based on host/port (and host should be 0.0.0.0/0 for public traffic). Outbound traffic rules are based on security groups and should be what you configured earlier.
Host-based routing from ALB (reference)
Section titled “Host-based routing from ALB (reference)”This is pretty straightforward EXCEPT FOR where you find the UI; that foiled me: AWS console → EC2 → Load Balancing → Load Balancers → Click a load balancer → Listeners tab → Under the “Rules” column in the table, click the “View/edit rules” blue link (it’s not a giant button).
Preventing access to AWS credentials supplied to the container (reference)
Section titled “Preventing access to AWS credentials supplied to the container (reference)”(keywords: “container agent configuration” (since this is how you can configure any other variables like this))
Even if your container needs to make AWS API calls, you probably almost always want to block the container from accessing your AWS credentials. There’s a very easy way to set this up: add an environment variable for ECS_AWSVPC_BLOCK_IMDS set to true.
This is achievable in many ways, but I found the Dockerfile route to be the easiest. Simply add this line pretty much anywhere in your Dockerfile:
ENV ECS_AWSVPC_BLOCK_IMDS true
↑ That’s it. I wanted to test if this actually worked, so I did the following:
- Modify my task definition to include this in the health-check command:
curl -f http://169.254.169.254/latest/meta-data- (keep in mind that this needs to run with “CMD-SHELL” and that “curl” needs to be installed)
- Start a new task with that as the health check.
- Wait for interval * num_retries seconds and ensure that the container is still healthy.
- Modify the Dockerfile as indicated above to include the ECS_AWSVPC_BLOCK_IMDS environment variable, then rebuild and re-push the image.
- Start the task again.
- Ensure that the health check fails.
Sample scenario that accesses S3 from a container
Section titled “Sample scenario that accesses S3 from a container”My scenario was that I wanted Verdaccio to be able to store any Node modules that it caches on S3 so that it wouldn’t be ephemeral storage. Without this, every time I restart the Verdaccio container, all published modules would cease to exist.
For the actual code part, there was a plug-in already called verdaccio-s3-storage that I won’t cover here. However, here are the steps I had to do in order to get that to work:
- Remove the ECS_AWSVPC_BLOCK_IMDS environment variable that I’d set up here. This was necessary because the plug-in works by using the aws-sdk directly, which means credentials are going to be pulled from ~/.aws. This meant that I couldn’t block the usage of the credentials.
- I had to create an S3 bucket. I did this through the AWS console. Remember that bucket names have to be unique globally, so you can’t just make “verdaccio” since someone else likely has that. Other than that, all of the default options are fine.
- Make a new IAM role so that the container would have access to S3.
- AWS console → IAM → Roles → Create role → Choose S3 as the service that it will use → Search for “s3fullaccess”
- I named this “Verdaccio-S3-full-access”.
- Set the trust relationship for the IAM role that you just created so that it has access to ECS-tasks.
- AWS Console → IAM → Roles → Click the role you just created → Trust relationships → Edit trust relationship → have it look like this
{ "Version": "2012-10-17", "Statement": [ { "Effect": "Allow", "Principal": { "Service": "ecs-tasks.amazonaws.com" }, "Action": "sts:AssumeRole" } ]}- Note: the only way I even figured out what to set the Service property to was via this page (well, first I’d tried “ecs”, but that didn’t work, so it had to be “ecs-tasks”).
- If you didn’t set the above up correctly, then when you try to launch the service in Fargate, you’ll see something like this:
service fargate-verdaccio-service failed to launch a task with (error ECS was unable to assume the role ‘arn:aws:iam::212785478310:role/Verdaccio-S3-full-access’ that was provided for this task. Please verify that the role being passed has the proper trust relationship and permissions and that your IAM user has permissions to pass this role.).
- Once you have the role set up, you need to specify its ARN in your task definition file as taskRoleArn.
Using Fargate (reference)
Section titled “Using Fargate (reference)”- Prerequisites
- You may need to make a new VPC (reference)
- I did this because I didn’t have a VPC with an elastic IP address. Note that the elastic IP address costs money if not associated with an instance. Also, a NAT isn’t needed in all cases (see below where I talk about NATs).
- The wizard creates a private and a public subnet
- You may need to make a new VPC (reference)

-
Keep in mind that you pay something like $33/month just to have a NAT running even if no traffic is going to it. The NAT is so that private subnets can communicate with the Internet (and works basically like how your router does for your home with multiple devices). There are a some ways around this without sacrificing Internet connectivity:
- Put everything in a public subnet and…
- …use security groups to prevent traffic that you don’t want.
- …use an egress-only Internet gateway (reference). See my notes here on this.
- Put everything in a private subnet and use something like lambda to access the Internet when needed.
- Apparently you can use an egress-only IGW with a private subnet as well.
- CONCLUSION: it almost always makes sense to just use a public subnet and set security groups. Read more about this here.
- Put everything in a public subnet and…
-
In the docs, they mention how the wizard creates two CIDR blocks already: 10.0.0.0/24 and 10.0.1.0/24. One was created for the private subnet, and one for the public subnet. So when it tells you to create another subnet of each type, you can’t have the same numbers for both.
-
When it tells you to edit the Route Table, you have to use the dropdown to select the other route table.
-
When it tells you to modify security groups, I just allowed all traffic from the Internet by adding an inbound rule for 0.0.0.0/0.
-
It’s a good idea to set your AWS region so that future commands don’t need to specify it: ”$ aws configure” (see this for information about regions, but names are like “us-west-2”)
-
It’s a good idea to stop the container from having access to your AWS credentials. See these notes on how to do that (it’s very easy).
-
Set up your IAM roles - I did not use the first-run wizard. Note: regardless of whether you’re using the wizard, if you’re just using ECR, then that’s not considered a private registry (in that you don’t need the AWS secrets manager)
- https://docs.aws.amazon.com/AmazonECS/latest/developerguide/service_IAM_role.html
- Just keep in mind that for the bolded part of this message: “Search the list of roles for ecsServiceRole. If the role does not exist, use the procedure below to create the role. If the role does exist, select the role to view the attached policies.” - the “procedure below” is not step 3; it’s all the way at the bottom of the page.
- https://docs.aws.amazon.com/AmazonECS/latest/developerguide/instance_IAM_role.html
- https://docs.aws.amazon.com/AmazonECS/latest/developerguide/task_execution_IAM_role.html
- https://docs.aws.amazon.com/AmazonECS/latest/developerguide/service_IAM_role.html
-
Step 1 - create a cluster
- I decided to do this so that I wouldn’t need to update any “old” code if I ever end up with two clusters (if you only ever use the default cluster, then you don’t need to specify a cluster name for any operations that you perform).
- aws ecs create-cluster —cluster-name fargate-botland-cluster
- After doing this, all you have to remember is your cluster’s name, not the clusterArn.
-
Step 2 - create a task definition (reference for all parameters here) - if you want to bypass writing out JSON by hand, you can go to this link and have it generate the JSON for you (or manually get to that link by AWS console → ECS → Task definitions → Create):
- There are a lot of resources for this. You can generate a template JSON file by running ”$ aws ecs register-task-definition —generate-cli-skeleton”
- The network mode has to be awsvpc for Fargate. Also, you have to be using a particular version of the ECS-optimized AMI (reference).
- Many of the parameters say that they correspond to Docker parameters (e.g. entrypoint, command, user, etc.). This means that you only need to specify them if you want to override them for whatever reason. This can be helpful if you’re using a third-party image and you don’t want to “clone” the image just to modify a single parameter.
- For Fargate, you have to specify a logConfiguration of “awslogs”. By default, the task-execution role that you set up has permissions to create log streams but not log groups, so you either have to create a log group manually in CloudWatch → Logs → Actions → Create log group, or modify the role to have the “logs:CreateLogGroup” permission and use the bolded part below. You don’t have to have CloudWatch logs, but it’s still a good idea for you to configure them:
“logConfiguration”: {
“logDriver”: “awslogs”,
“options”: {
“awslogs-group”: “awslogs-wordpress”
“awslogs-create-group”: true, ← See above about why you may want this
“awslogs-region”: “us-west-2”,
“awslogs-stream-prefix”: “awslogs-example”
}
},
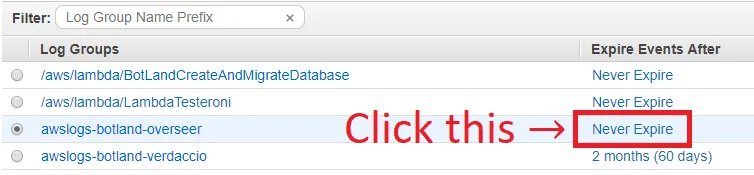
- Making a log is easy: AWS Console → CloudWatch → Logs (on the left) → Create log group
- As far as I can tell, you don’t have to create a log stream, just the log group itself. The log streams that you do get are going to look like this: verdaccio/botland-verdaccio/<UUID of container>
- After that, click “Never expires” to configure the retention
- When you get to “healthCheck”, you have to configure something that will tell if your service is running. For Verdaccio, I did this:
curl -f http://localhost:4873/-/ping(the “-f” makes it fail silently). Typically, you want a command-line check, a socket, a PID, etc. to see if something is working.- FOR THE HEALTH CHECK ABOVE TO WORK, YOU OBVIOUSLY NEED CURL ON THE MACHINE, SO IF IT’S NOT THERE, MAKE SURE YOU INSTALL IT VIA YOUR DOCKERFILE.
- You can test all of this locally without having to be on AWS by using the corresponding Docker commands when running (reference)
docker run -p 4873:4873 --health-cmd "curl -f http://localhost:4873/-/ping> --health-interval 1s --health-retries 1 --health-timeout 5s --health-start-period 2s botland/verdaccio:latest
-
The health check doesn’t seem to have an impact on startup time of the container. I tried an interval of 5 seconds vs. 30 seconds and didn’t see any noticeable change to the startup time.
-
“volumes” - completely optional
-
“placementConstraints” - not supported by Fargate
-
aws ecs register-task-definition --cli-input-json $HOME/code/bot-land/packages/verdaccio/verdaccio-task.json -
You have to specify a role (reference) or else you get this error: “An error occurred (ClientException) when calling the RegisterTaskDefinition operation: Fargate requires task definition to have execution role ARN to support log driver awslogs.”
- For more information about taskRoleArn… (reference)
- This is only needed if your image is going to make AWS API calls for itself. If so, then you need a role that encompasses the various permissions from those calls (with the right trust relationships set up as well). So, for example, if you want to store data in S3 from your container, then you need the permission of listing/creating S3 objects, and a trust relationship is needed for ecs-tasks.amazonaws.com.
- For more information about executionRoleArn… (reference)
- In short, this role directly corresponds to this document and is only needed to launch your instances, so if you followed that, you’ll have a role named “ecsTaskExecutionRole” already.
- Because it’s only used to launch your instance, the permissions needed in the policy typically boil down to these
- “ecr:GetAuthorizationToken”,
- “ecr:BatchCheckLayerAvailability”,
- “ecr:GetDownloadUrlForLayer”,
- “ecr:BatchGetImage”,
- “logs:CreateLogStream”,
- “logs:PutLogEvents”
- For more information about taskRoleArn… (reference)
-
Step 3 is for chumps. Just go to your AWS console → ECS → Task definitions and check it out there if you want.
-
Step 4 - when launching the service…
- I got the family name with the revision number from ECS → Task definitions → Click the task that you have to see the “<family>:<revision>”
- To get the subnet, I went into AWS Console → VPC → Subnets
- Keep in mind to select public vs. private correctly. To tell if a subnet is public or private, look at its route table. If you see a route for “IGW” (Internet gateway), then it’s public. If it shows a NAT, then it’s private. The instructions that I’m going through for these notes have you make the subnets as part of creating the VPC in the prereqs.
- To get the security group, I went into AWS Console → VPC → Security Groups
- If you’re launching in a public subnet (which you should probably always do), you need to auto-assign a public IP (reference) (and again, you should probably just always do this).
- You can do this via the “—network-configuration” property (reference), more specifically the “assignPublicIp” key, e.g.
aws ecs create-service —cluster fargate-botland-cluster —service-name fargate-verdaccio-service —task-definition verdaccio-fargate:3 —desired-count 1 —launch-type “FARGATE” —network-configuration “awsvpcConfiguration={subnets=[subnet-0fe28b633a643088d],securityGroups=[sg-0a67f04ea7ae94e64],assignPublicIp=ENABLED}“
Egress-only Internet gateway (reference)
Section titled “Egress-only Internet gateway (reference)”Suppose you have a private endpoint in Fargate that gets traffic only from a load balancer but should be able to access the Internet. There are several ways to accomplish this:
- Give the service a subnet that has an Internet gateway that allows traffic in both directions, then use security groups to prevent inbound Internet traffic. When setting up a service in Fargate, make sure to set assignPublicIp to ENABLED.
- Give the service a subnet that has an egress-only Internet gateway (which allows only outbound traffic)
- Use a NAT gateway
#2 only allows outbound IPv6 traffic.
#3 costs money every month (something like $20/month).
So I never actually went with an egress-only Internet gateway because I didn’t see a need; #1 seems to work fine.
This led to the question “why would you ever use an egress-only IGW over a regular IGW with security groups?” The only thing I can think of is that you definitely wouldn’t have your instance ever accessible to the Internet if you ever messed up your security groups. Other than that, there’s no apparent cost/speed/functionality difference.
Service discovery and auto-naming (reference, auto-naming reference)
Section titled “Service discovery and auto-naming (reference, auto-naming reference)”These can let you set up DNS automatically for usage internally. The “internally” part is because of this quote (from here):
“The DNS records created for a service discovery service always register with the private IP address for the task, rather than the public IP address, even when public namespaces are used.”
Thus, the use-case for something like this would be if you had a set of servers that needed to be accessible internally without having to refer to the AWS API every single time to list all Fargate containers. Also, keep in mind that a Fargate container’s internal IP address won’t change, so if it reaches out to another one of your internal endpoints X (as opposed to the endpoint reaching out to the Fargate container), then X can always respond on the IP address that it gets on the connection. So if you have a load balancer in front of your endpoints and you never need to start a connection to an individual endpoint, then you don’t need service discovery.
At the time of writing (10/23/2018), you cannot update an existing service to use service discovery; you have to make a new service. Also, it seems like you don’t have to pay for anything other than the typical Route53 components: traffic, a hosted zone, etc.
If you want to update the service discovery service’s DNS TTL, then you need to delete the corresponding service from your cluster. This is why using Terraform is great, since the recreation takes less than a minute when automated.
Here’s a tutorial that I followed for setting up a service using service discovery.
As soon as you’ve performed step #1, you’ll create a new hosted zone in Route53. This costs money unless you delete it within 12 hours.
For step #5, you may have to wait a little while for your container to be in the RUNNING state before you can see any output.
When I wanted to run this for real with my Verdaccio setup, I wanted to make it so that my Verdaccio container would be accessible by npm.bot.land in Route53. I already had a hosted zone for bot.land, but “aws servicediscovery list-namespaces” said that I had no namespaces (and, by the way, whatever it does list will say whether it’s public or private), so I had to run “aws servicediscovery create-public-dns-namespace —name bot.land —region us-west-2”. That made a new hosted zone. Apparently that’s how you have to do things when you use service discovery with an existing hosted zone (reference). You can migrate records between hosted zones (reference). I didn’t worry about this for now because an additional hosted zone is 10¢ per month.
By not having a single hosted zone for everything (which I’m not even sure is possible), you have to create an alias record in the original hosted zone for any services in the new hosted zone (reference). This is a tedious process since you have to use the command line.
For the options, here’s what I had as my setup:
- We’ll call my original hosted zone ZONE-A and the one that I had to create for service discovery as ZONE-B.
- I made this JSON file
{ "Changes": [ { "Action": "UPSERT", "ResourceRecordSet": { "Type":"A", "Name":"fargate-overseer-service-1.bot.land", "AliasTarget": { "DNSName":"fargate-overseer-service-1.bot.land", "HostedZoneId":"ZONE-B", "EvaluateTargetHealth":true } } } ]}$ aws route53 change-resource-record-sets --hosted-zone-id ZONE-A --change-batch ./whatever.json- Keep in mind that you’ll see your record come and go from ZONE-B as the service activates and gets shut down. As far as I understand, this shouldn’t affect ZONE-A’s alias record.
Keep in mind: the step where you run “aws servicediscovery create-service” takes in a name. That name is going to be prepended to your domain name, so name it something like “verdaccio” instead of “verdaccio-service-discovery”.
Troubleshooting
Section titled “Troubleshooting”CannotPullContainerError: API error (500) (reference)
Section titled “CannotPullContainerError: API error (500) (reference)”Connection timed out
Section titled “Connection timed out”Full message:
CannotPullContainerError: API error (500): Get https://212785478310.dkr.ecr.us-west-2.amazonaws.com/v2/: net/http: request canceled while waiting for connection (Client.Timeout exceeded while awaiting headers)
This is caused by one of the following:
- Your subnet is not configured to allow traffic either to a NAT or to an IGW (reference)
- Your security groups do not allow for outbound traffic to all (reference)
- You’re on a public subnet but did not create the service with auto-assigning IP addresses. I wrote notes above on how to set this up.
Access Denied when trying to start a service with Fargate
Section titled “Access Denied when trying to start a service with Fargate”First of all, to even see the picture below, you have to go to AWS Console → ECS → Clusters → <Your Cluster name> → <Your service name> → Tasks → Stopped → Click one of the stopped task’s UUIDs → Click the dropdown under Containers → Look at Details

Alternatively, as shown in the picture above, you can expand the Status section.
I believe this is just a permissions issue. It likely means that you don’t have your executionRoleArn set correctly or that the role doesn’t contain the corresponding permission needed to pull images from EC4.
Failed to launch due to trust relationships
Section titled “Failed to launch due to trust relationships”I talk about this a little bit in this section of the notes. This kind of problem is fixed by going to AWS Console → IAM → Roles → Click the role in question → Trust relationships → Edit trust relationship.
Container never makes it past “ACTIVATING” into “RUNNING” status
Section titled “Container never makes it past “ACTIVATING” into “RUNNING” status”If you find that health checks are failing, then here are some possible things to look into:
- Did you create the service originally without health-check settings? (reference) If so, the only solution that I found was to recreate the entire service and check the “Enable ECS task health propagation” box.
- Does your Docker file have any dependencies needed to run the health check? E.g. if you use “curl”, have you installed it?
- Have you set up security groups correctly everywhere? For example, if you have a load balancer, the load balancer’s outbound rules need to allow access to your container, and your container’s inbound rules need to allow access from the load balancer.
- Are you using the right URL / port? For the load balancer, you can override the port used to send traffic to:
Can’t update a service
Section titled “Can’t update a service”“An error occurred (InvalidParameterException) when calling the UpdateService operation: The container botland-overseer-task-1 does not exist in the task definition.”
For example, in containerDefinitions, I had a container name of “botland-overseer”, but the name of the task in ECS was “overseer-fargate-2”, my service name is “fargate-overseer-service-2” (which should be completely unrelated), and my error said “The container botland-overseer-task-1 does not exist in the task definition.” So it’s clearly trying to find “task-1” of the container name.
When this happened, the problem turned out to be from when I called create-service to begin with; I ended up with a container name of botland-overseer-task-1 because that’s all the dropdown would be populated with:
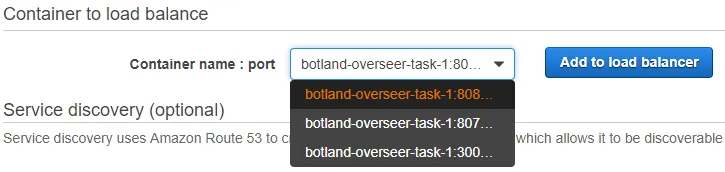
Once you’ve already set up your service with load balancing, you can’t change the container name even via update-service (in fact, the only place “load balancers” exists is in output on that page). You have to delete the service and create it again. Signs point to having to use the command line for this, especially the “—load-balancers” argument so that you can specify the correct container name. However, it was at this point that I decided that I needed to use something like Terraform to manage all of this for me.
”I updated a service but I don’t see any changes”
Section titled “”I updated a service but I don’t see any changes””(keyword: 5 minutes, five minutes)
Potential scenarios:
- You set the desired count of a service down to 0, but you still see a non-zero running count.
- You force-update a service to have the same running count that it already had.
In either case, AWS very likely produced an event in the “Events” tab (AWS Console → ECS → Clusters → Service → Your specific service → Events) saying that it has begun draining the connection. This process takes 5 minutes by default thanks to the deregistration delay (reference):
“The amount of time for Elastic Load Balancing to wait before deregistering a target. The range is 0–3600 seconds. The default value is 300 seconds.”
My reddit issue with Fargate
Section titled “My reddit issue with Fargate”https://www.reddit.com/r/aws/comments/aegh6y/fargate_performance_issues_update_with_minimal/