git
Basics
Section titled “Basics”Always keep in mind that branches in git are just pointers to specific commits.
Learn some Git commands on GitHub’s tutorial site: https://try.github.io/levels/1/challenges/1
Another interactive site for learning: https://learngitbranching.js.org/
- Fixing last commit (AKA “undo last commit”): If you messed up the last commit but haven’t pushed, you can undo it via ”$ git reset HEAD~” (reference)
- Common gitignore files: For common gitignore files, there are several resources that you can use:
- https://github.com/github/gitignore
- https://www.gitignore.io - this can combine multiple gitignore files together
- “Force-pulling”: when someone force-pushes to their branch, this is how you pull:
git reset --hard REMOTE_NAME/BRANCH_NAME, e.g.git reset --hard origin/add-foo. - Autocorrecting mistyped commands: if you ever type “git lgo” when you mean “git log”, git will tell you that you probably meant “log”, but by default, it won’t do anything about it. That’s where “autocorrect” comes in: https://github.com/npm/npm/issues/2933#issuecomment-23098891 . E.g.
$ git pushjWARNING: You called a Git command named 'pushj', which does not exist.Continuing in 3.0 seconds, assuming that you meant 'push'.git config --global help.autocorrect 3- Remove untracked files: If you have untracked files that you want to get rid of, “git clean” can help. ”$ git clean -i” will run in interactive mode so that you can confirm for each file.
- Reverting entire folder: If you have an entire folder that you want to revert, you can do ”$ git checkout — some_folder”
- Cherry-picking a commit: this will let you get all of a particular commit’s changes staged in your current branch: git cherry-pick <commit hash>
- Save all unstaged files in case there are changes you’re worried about deleting: git stash, then “git stash apply” rather than “pop” so that it’s still in the stash.
- Checking out the last branch you were on: “git checkout -” (it’s like “cd -” on Unix/Linux terminals)
- HiDeoo: And for arbitrary number it’s git checkout @{-2} or any other number
- Prune branches (optionally remove “dry run”)
- Renaming a branch (e.g. to make it easy to go back to where you left off): git branch -m OLD_NAME NEW_NAME
- “NEW_NAME” could be something obvious for you like “WILO” (where I left off).
- Reusing branch names: It’s not a good idea to reuse branch names even if the old branch is closed/deleted (because it’s confusing for team members). If you have a local branch that you need to rename, use “git branch -m new_name”.
- Ref log: “git reflog” shows you a list of references, e.g. “HEAD@{1}” refers to the state just before your previous commit. So “git reset —hard HEAD@{1}” will reset you to one commit before HEAD.
- Forget where you made a commit? If you forgot where you made a commit, you can do “git reflog” to see all recent commits, then “git branch —contains <commit hash>” to figure out what branch it’s in. (reference)
- If you find this happening a lot though, you can push a branch immediately after creating it (without making a PR), that way you can search through GitHub (if GitHub has your repo of course)
- Ignore a tracked file just for you: suppose you have some kind of configuration file that needs to be checked in, but you make changes to it locally and don’t want to have your local changes override the repo’s changes. You can use “git update-index —assume-unchanged file” to prevent it from showing in “git status” and then “—no-assume-unchanged” to revert it back. Note that the file can’t already be staged.
- Fixing commits to the wrong branch: every once in a while, I forget to change branches and commit to a merged PR branch or something. To move the commits to the correct branch, consider
rebase --onto(reference). - Renaming tracked files: git has a “git mv” command, but it’s just sugar around “git rm” and “git add”, so there’s really no need to ever do it. Instead, just feel free to use your OS to rename files, and git will see that it’s a semantic rename when you stage the files (but note that before staging, they’ll appear as a separate deletion/addition).
- In general, when renaming, make sure not to make substantial changes to the file, that way Git can still detect that the file has only been renamed. Otherwise, you may lose the history of that file (reference).
- Remove the last commit: [16:28] tollus: “git reset HEAD~1 —mixed” to remove the last commit (“—mixed” keeps your current changes)
- Autopull: “git pull —autostash” stashes, pulls, then pops
- Check line count of the commit while excluding a particular file: git diff —stat — . ’:(exclude)yarn.lock’
Use this to find a commit that introduced some behavior (typically a bug). It just binary-searches through your commit log, so rather than check each of 50 commits linearly, you can just check ~7 of them.
git bisect start.- This will offer to start a bisect for you on the current commit.
- You then probably want to run
git bisect badassuming that you started this process due to a bug that you’re now seeing.
git checkout COMMIT_HASH- The commit is just some commit you want to compare against (e.g. something from 50 commits ago).
- Now, you’ll very likely see good behavior, so do
git bisect good. - Git will now run the bisect process. You just have to build/test your program and do
git bisect good|baduntil it’s done. git bisect resetwhen you’re totally finished or just want to restart the process.
Use different SSH keys per repo
Section titled “Use different SSH keys per repo”Suppose you’re deploying an application that involves two or more independent Git repos (we’ll call them ComponentA and ComponentB) and you don’t want to use Docker for some reason. You can do the following:
- Set up SSH keys and config files
- Run ssh-keygen to make idrsa_component_a[.pub] and id_rsa_component_b[.pub]. Move the id_rsa* files to ~/.ssh/
- vim ~/.ssh/config_component_a
Host github.com
HostName github.com
User your_github_name
IdentityFile ~/.ssh/id_rsa_component_a
- vim ~/.ssh/config_component_b
Host github.com
HostName github.com
User your_github_name
IdentityFile ~/.ssh/id_rsa_component_b
- Set up deploy keys
- On GitHub, you can go to the repo for ComponentA → Settings → Keys. Paste ~/.ssh/id_rsa_component_a.pub there.
- Do the same for ComponentB.
- Clone the repos
- Clone ComponentA
The ~/code folder is just for demo purposes. Put the code wherever you want.
Section titled “The ~/code folder is just for demo purposes. Put the code wherever you want.”mkdir ~/code
cd ~/code
Since you don’t have the repo yet, you need to set the right config file globally before you clone.
Section titled “Since you don’t have the repo yet, you need to set the right config file globally before you clone.”git config —global core.sshCommand “ssh -F ~/.ssh/config_component_a”
Get the URL from the SSH tab on GitHub
Section titled “Get the URL from the SSH tab on GitHub”git clone git@github.com:foo/ComponentA.git
cd ComponentA
Now that you have the repo, you can set the config file locally.
Section titled “Now that you have the repo, you can set the config file locally.”git config core.sshCommand “ssh -F ~/.ssh/config_component_a”
- Do the same for ComponentB
- Undo your global Git-config change:
git config —global —unset core.sshCommand
From here on out, it’ll use the repo-specific SSH keys.
Find a deleted file (reference)
Section titled “Find a deleted file (reference)”Just do
git log — path/file
git log — **/*intro*.js
This works even if the file was deleted.
Find an expression somewhere in git history
Section titled “Find an expression somewhere in git history”At one point, I had a function that existed in my code base that I knew was called at some point but had no other instances found than the definition. To do this, you can use any of the following commands to find the file and commit hash where this existed in history:
git grep <regexp> $(git rev-list —all)
git grep <regexp> $(git rev-list —all —max-count=200)
git rev-list —all | xargs git grep REGEX
14:56 PlayingWithScissors: Adam, you can also use —max-age=<epoch> or —min-age=<epoch>instead of ==max-count
Note that on Windows, I didn’t have git installed in my Linux subsystem, so I had to make sure I was using the right Bash and that I was using the xargs version of the command above:
- “C:Program FilesGitusrbinbash.exe”
- cd /d/Code/BotLand/botland
- git grep switchToJsViewFromBlockly $(git rev-list —all)
- bash: /cmd/git: Argument list too long <— this is the indication that you have to use the xargs version (git rev-list —all | xargs git grep REGEX)
Temporarily go back to old code
Section titled “Temporarily go back to old code”In TortoiseGit, I right-clicked a commit in the log and chose “Switch/Checkout to this…“. I created a new branch in the process, tried out my changes, and then when I was done, went to “Switch/Checkout” on the main repository and went through the menus there to delete the temporary branch.
Stash all tracked files: $ git stash
Restore and remove from stash at same time: $ git stash pop
Restore from stash without removing from the stash: $ git stash apply
Hot-fixing
Section titled “Hot-fixing”What I mean by this is that you have this setup:
Target branch - this is what you want a fix to be in
Source branch - this is where the fix comes from
This is something like how you have a prod branch that you want one single bug fix on.
The solution is to use cherry-picking.
- Switch to target branch
- git cherry-pick commitHash (note: if you’re in TortoiseGit, see the note below about cherry-picking; it’s super easy)
Selectively choosing changes for a commit
Section titled “Selectively choosing changes for a commit”I run into this scenario every once in a while:
- I make some changes to my code. For ease of reference, let’s say there are two lines of code that I’ve added to a particular file. One of these lines was just for testing, so it shouldn’t be committed.
- I want to clean up the commit (in this case by removing the test line) before submitting it to Git, but I’m worried that I’ll “clean” it in such a way that it stops working (e.g. in this case I may accidentally remove the wrong line of code rather than the test line).
There are a few solutions for this:
- Stage or delete by hunk - this lets you selectively choose which changes should make it into a commit.
- Make a new branch, commit everything, then when I merge back, only keep what’s worth keeping
Commit to the current branch, cleanup, and then just amend the commit to remove the bad stuffI don’t think this is such a good idea since this isn’t really what “amend” is intended for, and also because I’ll only have a pointer to the pre-amendment commit in the reflog
Given that I use TortoiseGit, branching seems like the easiest solution:
- Commit all of your changes to a new branch (using the “new branch” checkbox in the commit dialog)
- Switch back to your old branch
- Merge in the new branch (choose “Squash” in the dialog)
Remotes
Section titled “Remotes”Basics
Section titled “Basics”- List all remotes:
$ git remote -v - Add remote:
$ git remote add name_of_remote url_of_remote- For the URL, you can use either the HTTPS version or the “git” version, although you should likely prefer the “git” version. Examples:
git remote add hideoo git@github.com:HiDeoo/bot-land.gitgit remote add upstream https://github.com/mo4islona/node-blockly.git
- For the URL, you can use either the HTTPS version or the “git” version, although you should likely prefer the “git” version. Examples:
- Change URL of remote: git remote set-url <remote_name> <url>
- Add a remote (useful for PRs):
git remote add NAMEOFREMOTE https://github.com/AdamLearns/SomeRepo.git- (then push with
git push NAMEOFREMOTE main)
- (then push with
LFS (Large File Storage)
Section titled “LFS (Large File Storage)”Note: this is really for any non-text file storage, not necessarily large files.
- First, download and install the LFS program. On macOS, this is just
brew install git-lfs.- Make sure to run
git lfs installas mentioned on that page.
- Make sure to run
- Then, track any files that you want to have in Git LFS (reference)
git lfs track "*.png"- Note that this simply modifies your
.gitattributes
- Note that this simply modifies your
Submodules (reference)
Section titled “Submodules (reference)”Basics
Section titled “Basics”Submodules are useful when there’s a third-party library that you want to include without having to manually copy all of the source code over (which would make it difficult to merge changes from the upstream repository).
By using submodules, you’ll end up with a “.gitmodules” file that you can inspect/modify, e.g. to change the URL of the submodule. If you are going to change the URL of the submodule, you may need to do more configuration than just modifying .gitmodules (reference).
Adding a submodule to an existing repo:
mkdir -p Game/Submodulesgit submodule add https://github.com/YourName/YourRepo.git Game/Submodules/translationsgit add .gitmodules Game/Submodules/translationsCommands:
- When cloning a repository with submodules, you can do
git clone --recursiveto download all of the submodules. - Initialize and update submodules:
git submodule update --init- Alternatively, pass
--recursiveto get any nested submodules.
- Alternatively, pass
- Add the submodule:
git submodule add git@github.com:whatever packages/client/public/assets - Whenever you update the submodule repo, make sure to run this in the repo where you added the submodule:
git submodule init && git submodule update --recursive --remote
- Then, commit and push the repo where you added the submodule
If you ever get into a state where you have a detached HEAD in a submodule after having made commits, you can do this:
git log -1git branch new-branch-name sha-of-last-commitgit checkout new-branch-namegit push# Now merge into main…alternatively, if your commits are already on main, you can just git checkout main.
Rebasing
Section titled “Rebasing”Rebasing a pull request
Section titled “Rebasing a pull request”When you are working with a pull request that has merge conflicts, it’s better to rebase to master (make sure to change origin names if yours isn’t “upstream”; “upstream” represents the original repository that a pull request was being made to):
From the PR branch:
git rebase upstream/master
MAKE ABSOLUTELY CERTAIN THAT YOU DON’T SEE ERRORS since they don’t show in red, e.g. “error: failed to open ‘packages/client/public/javascripts/react_and_redux/components/pregameheader.js’: Permission denied”
Fix conflict (do this by opening TortoiseGit or your typical commit flow and fixing the conflicts)
$ git add . ← this marks conflicts as resolved
$ git rebase --continue `` $ git push —force-with-lease name_of_remote` ← when updating a pull request, make sure you specify the PR’s remote. Also, the force-with-lease prevents you from pushing if someone else has pushed to the same branch since you started working on it. If you try pushing without a force, you’ll get an error that says something like “you need to pull”.
To cancel the whole operation, use:
$ git rebase --abort
From <https://bpaste.net/raw/c9eafd07d119>
If you find out that you pushed to the wrong remote, you can fix it relatively easily:
- Check which remotes you have with “git remote -v”. If you don’t see the one you want, do ”$ git remote add name_of_new_remote url_of_remote”.
- $ git push -f name_of_new_remote
- Probably run any build steps that may need to run as a result of having new code in the branch
Keep in mind that when you rebase, it won’t create a new commit; it will rewrite your old commits, so you’ll know it worked because you’ll see CI running again, not because you’ll see a commit from a few seconds ago.
[09:45] sectioneightinc: If you do a git show on the head of your branch, you can see the difference in “author” versus “commit” date on the rebased commit
[09:46] rhymu8354: @Adam13531 Actually, rebase does create a new commit, and you can get the old one back if you want (using “git reflog” to find it) — it just makes the new commit and moves the branch to point to that instead of the old commit
Here are some resources that I never consumed but that may be helpful:
[11:08] AndyFromLithuania: looks like a nice intro to rebase for other nubs like me: https://www.atlassian.com/git/tutorials/merging-vs-rebasing
(from 1/18/17; I haven’t actually consumed these resources)
4:00 HiDeoo: https://tortoisegit.org/docs/tortoisegit/tgit-dug-rebase.html
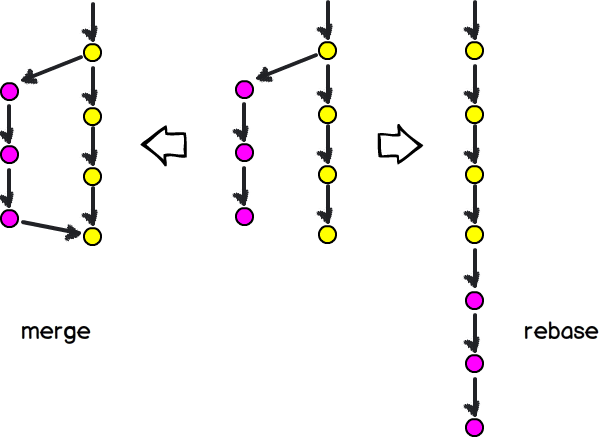
4:03 HiDeoo: Adam13531, Not really, it just merge basically but keep a linear history ^^ People just get scared of words Kappa
4:04 HiDeoo: Adam13531, Quick image explanation http://slides.williamdurand.fr/git-and-github-and-open-source/images/merge_vs_rebase.png
Rebasing onto master from another branch
Section titled “Rebasing onto master from another branch”It’s a good idea to pull in master every once in a while, and the steps are very similar to rebasing for a pull request:
- Push your branch first so that you have a back-up in case you screw up
- Rebase (follow steps from above)
Rerere (“reuse recorded resolution”) (reference)
Section titled “Rerere (“reuse recorded resolution”) (reference)”(sectioneightinc told me about this on Twitch)
This can be used to “replay” the resolution of merge conflicts. For example, suppose you had a conflict where “print hello world” changed to “print hola mundo”. You resolve it by taking “print hola mundo”, then maybe you back out the change or later come across the exact same conflict. rerere will quietly apply the same resolution as before:
CONFLICT (content): Merge conflict in hello.rb
Resolved ‘hello.rb’ using previous resolution.
I don’t know if I want to enable this, because I’m worried that someday, I’ll have a conflict of “A → B” where I want resolution X, then at some later time I’ll hit the same conflict and want resolution Y but not realize that it was even a conflict.
Committing
Section titled “Committing”Guidelines on writing a good commit message: http://chris.beams.io/posts/git-commit/ Copy/pasting from there:
- Separate subject from body with a blank line
- Limit the subject line to 50 characters
- Capitalize the subject line
- Do not end the subject line with a period
- Use the imperative mood in the subject line
- Wrap the body at 72 characters
- Use the body to explain what and why vs. how
In TortoiseGit, go to Settings —> General —> Dialogs 3. Then change “Config Source” to “Local”, disable “inherit” on “Border” and change the number to 72. This won’t enforce auto-wrapping though.
Hosting a repo on a box
Section titled “Hosting a repo on a box”- Linux
- git init —bare
- After this, you should already be able to connect to it (assuming openssh-server is installed and running):
- If on the same machine: git clone ../git_test
- If on a different machine: git clone ssh://adam@192.168.1.24/home/adam/git_test
- Note: a bare repo cannot be used directly (but is needed for pushing/pulling); you must clone it somewhere else (even if it’s on exactly the same machine).
- After this, you should already be able to connect to it (assuming openssh-server is installed and running):
- Create a basic file to be shared
- echo hello > a.txt
- git add a.txt
- git commit -m “First commit”
- git push
- git init —bare
- Windows
- Use GitLab (reference)
Pulling a repo
Section titled “Pulling a repo”-
Linux
- Make sure you have an SSH agent running:
- ssh-agent bash
- ssh-add ~/.ssh/path_to_your_priv_key
- After that, simply do “git clone” or “git pull”. If it asks for a password, then it means you’re probably trying to connect via the HTTPS address, so do “vim ./.git/config” to change the URL to what GitHub or BitBucket tells you for your SSH address.
- Make sure you have an SSH agent running:
-
(2/15/2016) Setting up SSH for auth instead of username/password (reference)
- Make a priv/pub key (reference)
- Note: if you have a “pub” file and it doesn’t start with “ssh-rsa”, then you may need to use puttygen, load the priv.ppk file and get your public key out of there
- Add the public SSH key here
- Make sure to put the algorithm used before the public key if you’re doing this on Windows, that way it shows like this: “ssh-rsa <key text>“.
- Modify TortoiseGit (note: you have to do this for each repository you plan on using the SSH key for)
- Go to TortoiseGit —> Settings —> Git —> Remote
- Click your remote (probably just “origin”)
- Change the URL to “git@bitbucket.org:<accountname>/<reponame>.git”
- Use the “Putty Key:” section to point at your private key.
- Make a priv/pub key (reference)
Syncing a fork (reference)
Section titled “Syncing a fork (reference)”If you forked someone’s repository and they made changes that you want, then follow the steps in the reference. The steps are incredibly straightforward, but merging may not be so easy.
Note that the steps first have you add the original repository as the remote (reference).
Checking files that have changed
Section titled “Checking files that have changed”- “git status” will list all files that have changed.
- “git diff —status” will show slightly more information about how much has changed.
- “git diff” alone will show you the changes themselves.
Reverting files
Section titled “Reverting files”You can revert a single file by simply doing “git checkout path/to/file”. You can revert everything by doing “git reset —hard”.
Branches and merging
Section titled “Branches and merging”- Seeing what branch you’re on (Git 2.22+): git branch —show-current
- To get help on branches and merging, use this demo: http://pcottle.github.io/learnGitBranching/?NODEMO
It doesn’t support “—squash”, but it supports “—no-ff”.
You can do something like “git reset —hard C1” to go to a particular commit.
- TortoiseGit:
- Make a new branch
- Choose Switch/Checkout… —> Check the “Create New Branch” box and type in a name. Click OK. You’ll get a UI where the bottom left says “Merge”, but you don’t need to do that since your branch will already be up-to-date.
- Make commits as you normally would.
- Merge back into Master:
- When you’re done and you want to merge back into Master:
- First, push your branch that you want to merge back in.
- Do a “Switch/Checkout…” back to Master. I don’t check the “merge” box in the “Switch/Checkout…” dialog; I prefer to do it as a separate action.
- Select “Merge” from TortoiseGit
- In this UI, choose the branch you’re merging from and make sure to check “no commit” and “no fast forward”, that way your changes will be “staged” in Master for you to review them, and the “no fast forward” will make an extra commit in the revision history about the merge.
- Commit as normal
- When you’re done and you want to merge back into Master:
- Make a new branch
- Command-line:
- git checkout -b new_branch_name
- This is equivalent to
- git branch new_branch_name
- git checkout new_branch_name
- This is equivalent to
- Make your changes as normal.
- To merge master into your branch:
- git pull origin master
- To merge back to master:
- git checkout master
- git merge test_branches —no-commit —no-ff
- Squash:
- squash merge takes all commits that are missing in one branch and instead of creating a merge commit and joining them, it creates 1 commit as if you just applied the changes and then committed. This is generally a good idea when a PR is a single, logical unit. However, if your PR represents tons of disparate work, then squashing the commits tends to make it harder to hunt down when a specific change was introduced (since they’ll all be attributed to a single commit on GitHub with potentially hundreds of files).
- git checkout A && git merge —squash B == git checkout B && git merge A && git checkout A && git checkout B ./ && git commit
- Rebase:
- If you want to cherry-pick commits, you need to rebase.
- git checkout -b new_branch_name
- “git log —graph” can be handy for looking at your log.
Flowchart - “so you have a mess on your hands”
Section titled “Flowchart - “so you have a mess on your hands””http://justinhileman.info/article/git-pretty/git-pretty.png
Git reflog and resetting commits (i.e. “un-resetting”)
Section titled “Git reflog and resetting commits (i.e. “un-resetting”)”10:34 tolluse: adam, if you type ‘git reflog’ in the command line, it’ll give you a history of the git changes you’ve done, the reset probably just moved you to an older commit
10:35 tolluse: so the git reflog will allow you to see where you were, and you can move back to it
10:35 tolluse: so you want to git reset <commitid>
Cloning someone’s repo into yours without forking it
Section titled “Cloning someone’s repo into yours without forking it”- Make a brand new repo on your GitHub with the name that you want
- Clone the repository that you want on your hard drive (note: make sure not to clone with “—depth” or you’ll have a shallow copy that you’ll later have to unshallow (reference))
- Modify “.git/config” to point to your brand new repo
- Push
Cherry-picking commits from another repo (reference)
Section titled “Cherry-picking commits from another repo (reference)”(note: this even lets you cherry-pick across forks (reference))
- Add the repo as a remote
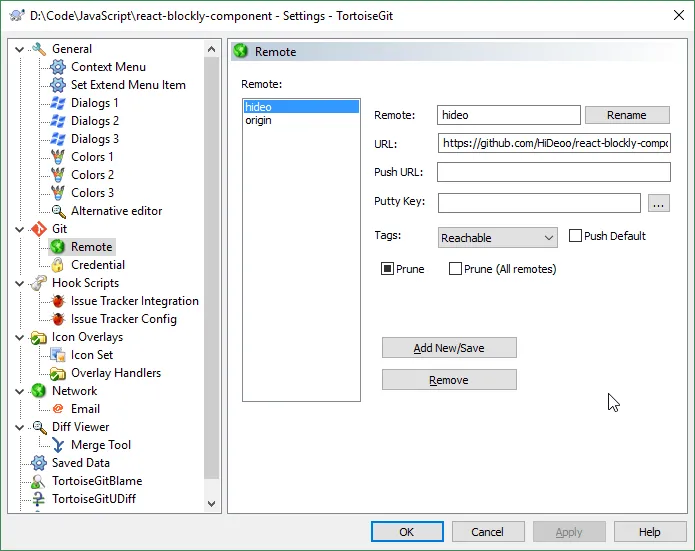
- git remote add hideo https://github.com/HiDeoo/react-blockly-component.git
- If you want to do this from TortoiseGit, it looks like this
- Pull the new remote
- git pull hideo
- From TortoiseGit (reference), right-click your repo and show the log of it. At the upper left, you’ll see a clickable link that probably says “master”. Click that, expand “remotes”, find the new remote and select that.
- From the log menu, find the commit that you want to cherry pick, right-click it, and select “Cherry Pick this commit…“. I just clicked “Continue” and it seemingly worked. The new commit’s files/changes were visible as my working change.
- When finished, you could remove the remote if you want, but it’s only local. By not removing it, it means you can push to it later on or pick from it again. They’re just pointers to other repositories. There’s no real need to remove the remote.
9:51 HiDeoo: Also Adam13531 another quick solution is to add .patch to the Github url like https://github.com/HiDeoo/react-blockly-component/commit/3133cbb7340a982d62f1d183bbb89694abe12e11.patch, save that and do git am < file.patch
Relocating a file
Section titled “Relocating a file”TortoiseGit:
- To relocate a file, go to TortoiseGit —> Rename… and simply type the full path instead of just the filename, e.g. “../server/connection.js”. It’s smart enough to understand just the folder path too, e.g. “../server”.
Helpful aliases
Section titled “Helpful aliases”How to use aliases
Section titled “How to use aliases”If you want to be able to type “git <name of alias>” in your command line, then modify .gitconfig:
[alias] bname = rev-parse --abbrev-ref HEADThese will be autocompleted when you type something like “git bn<tab>“.
Delete local branches which have already been merged into the current HEAD (reference)
Section titled “Delete local branches which have already been merged into the current HEAD (reference)”Delete local branches which have already been merged into the current HEAD.
Section titled “Delete local branches which have already been merged into the current HEAD.”alias gitcleanup=‘git branch —merged | grep -v "" | xargs -n 1 git branch -d’
Misc command-line notes
Section titled “Misc command-line notes”- Config:
- To view the git config, do “git config —global —edit”. This is typically located in ~/.gitconfig
- You can get values with “git config —global —get user.email”
- Don’t pass “—global” if you only want those settings for a particular repository, and then I believe it goes into ./.git/config (which is a file, not a folder).
- “git reset —hard” will put you at the same code that the master’s head has.
- “git rev-parse HEAD” will get you the last commit hash. I wrote a batch file to put this on the clipboard:
@echo offfor /f %%i in ('git rev-parse HEAD') do set commitHash=%%i
echo|set /p=%commitHash%|clipcolorize "`g`%commitHash%`A` is on the clipboard now."
Troubleshooting
Section titled “Troubleshooting”General troubleshooting
Section titled “General troubleshooting”ohshitgit.com
Unprotected private key file
Section titled “Unprotected private key file”@@@@@@@@@@@@@@@@@@@@@@@@@@@@@@@@@@@@@@@@@@@@@@@@@@@@@@@@@@@
@ WARNING: UNPROTECTED PRIVATE KEY FILE! @
@@@@@@@@@@@@@@@@@@@@@@@@@@@@@@@@@@@@@@@@@@@@@@@@@@@@@@@@@@@
Permissions for ‘somekey.pem’ are too open.
It is required that your private key files are NOT accessible by others.
This private key will be ignored.
On Linux, just do chmod 400 ~/.ssh/id_rsa
To fix this on Windows, read this post.
Note: I also had to delete “Authenticated users”, which I did through ACLUI.
fatal: HttpRequestException encountered (reference)
Section titled “fatal: HttpRequestException encountered (reference)”When trying to do practically anything, I would get this error, but then whatever I was doing would succeed anyway. Still, it was annoying, so I looked into it and found the reference link. Summary: I installed Git Credential Manager for Windows (reference) since my Git was already up-to-date.
Refusing to merge unrelated histories (reference)
Section titled “Refusing to merge unrelated histories (reference)”Here’s an example of the error:
~/Desktop/del/test_bot> git pull origin master
From github.com:Adam13531/twitch-bot-timeout-new-accounts
- branch master -> FETCH_HEAD
fatal: refusing to merge unrelated histories
This happened when I initialized a repo on my local machine that already had files in it, then did a commit. Then, I made a blank repo on GitHub and tried pulling it.
To fix this, I just did “git pull —allow-unrelated-histories”.
Cannot push due to “error: failed to push some refs to <repo>” (reference)
Section titled “Cannot push due to “error: failed to push some refs to <repo>” (reference)”This happened to me when I was using the GitHub PR extension for Visual Studio Code. It somehow checked out the branch as “foo” when it should have been “bar”. To fix this, I did the following:
git push nameOfRemote foo:bar
Cannot force-push to a protected branch
Section titled “Cannot force-push to a protected branch”This happened to me on GitHub through some means. I had these rules set up in GitHub:
- “Require status checks to pass before merging”
- “Require branches to be up to date before merging”
- CI/continuous_integration → required
I saw this output:
adam@hyper-debian:~/code/bot-land$ git push —force-with-lease origin
Counting objects: 1401, done.
Delta compression using up to 4 threads.
Compressing objects: 100% (1310/1310), done.
Writing objects: 100% (1401/1401), 182.91 KiB | 0 bytes/s, done.
Total 1401 (delta 982), reused 0 (delta 0)
remote: Resolving deltas: 100% (982/982), completed with 65 local objects.
remote: error: GH006: Protected branch update failed for refs/heads/dockerize-overseer.
remote: error: Cannot force-push to a protected branch
To github.com:Adam13531/bot-land.git
! [remote rejected] dockerize-overseer -> dockerize-overseer (protected branch hook declined)
error: failed to push some refs to ‘git@github.com:Adam13531/bot-land.git’
I ended up working around this by removing the branch protection rule on GitHub temporarily (by changing the ”*” for the branch filter to just a single branch that wasn’t the one I was trying to push), force-pushing again, then reinstating the rule.
I still don’t know the cause of this problem. The only thing I could think of is that a CircleCI job that had previously passed (“overseer_build”) was replaced with a new job that had never run (“app_build”).
Cannot pull a branch without merge conflicts (for a branch that definitely shouldn’t have merge conflicts)
Section titled “Cannot pull a branch without merge conflicts (for a branch that definitely shouldn’t have merge conflicts)”I don’t know why this happens, but when it does and the branch is tracked remotely, just delete the branch locally with “git branch -d branch_name”. If you’re already on master, just try “git fetch origin && git reset —hard origin/master”.
Unlink of file ‘.git/objects/pack/pack-0039acfe017b60174aa739fe0208536ede119708.idx’ failed. Should I try again? (y/n)
Section titled “Unlink of file ‘.git/objects/pack/pack-0039acfe017b60174aa739fe0208536ede119708.idx’ failed. Should I try again? (y/n)”This happened for a lot of files for me. I think it was due to having Webpack running on Windows as I ran “git fetch”.
Git push asking for a username
Section titled “Git push asking for a username”In my case, I had to switch from HTTPS to SSH (reference).
“unexpected disconnect while reading sideband packet”
Section titled ““unexpected disconnect while reading sideband packet””Full error:
error: RPC failed; HTTP 400 curl 22 The requested URL returned error: 400send-pack: unexpected disconnect while reading sideband packetThis was because I was trying to push an 18-megabyte .wav file over HTTP. The solution was to configure the postBuffer to be larger (reference): git config http.postBuffer 524288000
Note: the default value as of Tue 09/24/2024 is 1 MiB, which means even large screenshots in notes will cause you to hit this issue.