PixiJS
Created: 2016-03-29 11:06:50 -0700 Modified: 2019-07-22 15:50:02 -0700
Basics
Section titled “Basics”- If you’re trying to repro an issue, you can use Pixi Playground. Just be careful because anyone with the link can apparently save over what you’ve done (including yourself, so maybe use the clone button before making any modifications?).
- In V4, most of the WebGL interactions are in a separate repo, pixi-gl-core. In V5, these were lumped into a monorepo.
Shaders vs. filters
Section titled “Shaders vs. filters”Apparently Pixi makes a distinction between shaders and filters. englercj’s first response in this thread talks about it:
As far as replacing the shader, you can set the shader a sprite will use by assigning your filter to the .shader property. Filters (using the .filter property) are post-processing effects, meaning the object is rendered normally, then the shader is applied on top. When applied to a container all children render themselves normally, then the shader runs on the container space.
…but that’s from 2016 when V3 (I believe) was in use. Ivan then talks about how V4 doesn’t let you assign shaders to sprites in this thread and that it would require some hacks, but that they wanted custom shader support in V5.
As far as I can tell, there’s no way to directly use a shader over a filter in V5. Here’s some foundational code just to set up a shader, but then as I mentioned, I couldn’t figure out how to use it:
const shaderCode =`precision mediump float;varying vec2 vTextureCoord;varying vec4 vColor;
void main(void){    gl_FragColor = vec4(1.0, 0.0, 1.0, 0.5);}`;
const customShader = PIXI.Shader.from(PIXI.Filter.defaultVertexSrc, shaderCode, {});
// This seems to do nothing (probably because I'm using it wrong), but I wanted to include how to get the ShaderSystem (which is what "shader" refers to below)app.renderer.shader.bind(customShader);
My v5 migration experience
Section titled “My v5 migration experience”- I updated the official migration document here (my specific revision is here)
- My note about BaseTexture.loadSource is not accurate: https://github.com/pixijs/pixi.js/pull/5556
- Construct a PIXI.Renderer instead of a PIXI.WebGLRenderer
- Needed to upgrade pixi-particles from 3.1.0 to 4.0.1
- The default vertex shader is apparently completely different and Ivan suggests copying it from v4 so that we don’t get the new v5 uniform set (reference)
- calculateNormalizedScreenSpaceMatrix has apparently been deprecated (reference)
- Ivan says to use ((vTextureCoord * inputSize.xy) + outputFrame.xy) / outputFrame.zw
- This worked, and my code looks like this at the top now:
- Ivan says to use ((vTextureCoord * inputSize.xy) + outputFrame.xy) / outputFrame.zw
uniform highp vec4 inputSize;uniform highp vec4 outputFrame;
void main(void){    // Texture coordinates    vec2 uvs = vTextureCoord.xy;
// Texture colors - vec4 (rgba) outputted to GPU vec4 baseColor = texture2D(uSampler, vTextureCoord); vec4 maskColor = texture2D(maskSampler, ((vTextureCoord * inputSize.xy) + outputFrame.xy) / outputFrame.zw);- I may need to start using “endFill” for Graphics objects
- Need to test sprite batching to see if it’s faster than the tessellation that I’m doing.
In upgrading, VRAM usage went up from 569 MB for a scene to 752 MB (+183 MB), so I decided to downgrade. Note to self: this took place on 7/17/2019.
Mipmapping sprites from a spritesheet with non-divisible coordinates (issue I filed here)
Section titled “Mipmapping sprites from a spritesheet with non-divisible coordinates (issue I filed here)”Just to note: the issue I filed contains a repro and a full explanation, but I’ve duplicated most of that here.
I had a 2048x1024 spritesheet with a sprite that was 256x256. The spritesheet was mipmapped correctly, but when I tried rendering that 256x256 sprite, it looked a bit blurry:
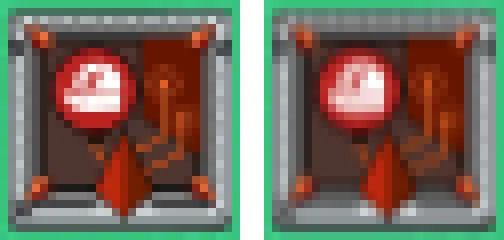
On the left, I made a RenderTexture out of the 256x256 sprite and mipmapped that. This is what it’s “supposed” to look like.
On the right, I just drew the 256x256 sprite from the spritesheet directly (meaning the PIXI.Sprite’s Texture’s dimensions were 256x256, but the Texture’s BaseTexture’s dimensions were 2048x1024).
As you can see, the sprite on the left looks clearer than the sprite on the right. Ivan said here that you should ensure your spritesheets have special offsets for each sprite if you’re going to be scaling like this. For example, I have a scale of 1/8th, so my spritesheet should place sprites at coordinates divisible by lastPow2(8) (note: the TexturePacker that can do this is Code And Web’s TexturePacker (which costs money), not the libgdx one, which only seems to support a setting called multipleOfFour). To explain the lastPow2 part: the scale will pull from the nearest mipmap level, so if you want to scale to 1/12th the original sprite’s size, then you need the coordinates to be divisible by 8. I did some testing to verify that too.
Another workaround is to rasterize the display object to power-of-two dimensions as mentioned here.
”Nightmare task” - blurry images when zoomed out
Section titled “”Nightmare task” - blurry images when zoomed out”To be clear, this was a bug that I encountered in Bot Land based on how I was rendering everything:
0.5x zoom

1x zoom
2x

You can see that bots look much clearer at 1x and 2x than they do at 0.5x. My overall conclusion is essentially just to ignore this since I spent ~14 hours on this and couldn’t come up with a proper solution. Also, it looks fine on devices with the same code, whereas the above screenshots were taken on desktop Chrome at 100% zoom with devicePixelRatio of 1.
My assumption for why it looks blurry is a mostly due to how scaling/mipmapping work. When I said “1x” and “2x” above, I was talking about Bot Land levels of zoom. The underlying sprite.scale values are 0.125 * [the Bot Land zoom level], meaning 1x zoom is really scale.set(0.125). I think the blurriness starts happening with non-powers-of-two scale values, e.g. 0.123. I don’t know what to do to fix that though. I had reported this through Twitter to Ivan.
I learned a lot as I was investigating this:
- I needed to set the resolution of the PIXI renderer to be equal to the devicePixelRatio. On retina displays (including hi-res monitors), this is > 1 and could be a floating-point number.
- If your graphics look blurry when you use the browser zoom and then refresh, then it’s an indication that you’re rendering incorrectly. For me, the fix involved rendering to a “full”-sized canvas and then setting the CSS of that canvas to be the final size that you expect on the screen. Here’s some code to handle that (call it from a window resize listener), but I believe you can just use the “autoResize” setting (reference):
// Note: 'width' and 'height' came from the size of the canvas DOM element.const c = document.querySelector('canvas');c.style.width = `${width}px`;c.style.height = `${height}px`;
// Note: this internally takes the renderer's resolution into// account, and that resolution should match the devicePixelRatio.renderer.resize(width, height);- I believe that if you’re going to use filters/shaders, you need to set PIXI.settings.FILTER_RESOLUTION to the devicePixelRatio. This is used by FilterSystem.js (AKA FilterManager in v4) and generally makes the filter higher quality at the cost of performance.
- This is what really caused the bulk of the bug, because even at regular zoom levels when devicePixelRatio is not 1, sprites will look blurry. Here’s a zoomed-in version at browser zoom = 175%. On the left, we have no shader, on the right, we have a shader.

Jagged edges due to PIXI.settings.SCALE_MODE
Section titled “Jagged edges due to PIXI.settings.SCALE_MODE”In the image below, we perform these steps:
- Generate a sprite
- Scale the sprite to 0.6 of its original size (so that the resulting base64 data will be smaller)
- Generate base64 data using the SCALE_MODE shown in the image itself

Hi-res textures
Section titled “Hi-res textures”All textures have a “resolution” which can be set in the constructor. Alternatively, as mentioned here, they can be set by loading an image that ends in “@2x”. Having “@2x” images otherwise does nothing.
When you zoom in on the browser, you’re changing devicePixelRatio. You don’t have a reliable way of checking whether the zoom level itself changed, but you shouldn’t need that since devicePixelRatio sort of “includes” that. So if your graphics look blurry when zoomed in (and after refreshing post-zooming) then it’s likely that you didn’t take devicePixelRatio into account.
When it comes to mipmapping textures with a resolution set, the resolution has to be a power of 2 for mipmaps to work. If you are mipmapping a RenderTexture, you should probably do all of the resolution-related tasks before calling renderer.generateTexture, then when you finally do call that function, call it with a resolution of 1 (which is 2^0, so mipmapping will still work).
Loading an image directly from base64 data
Section titled “Loading an image directly from base64 data”V4 code:
async loadImageFromBase64() { try { const { default: base64Data } = await import('../images/admArt.png'); const image = new Image(); image.src = base64Data; const baseTexture = new PIXI.BaseTexture();baseTexture.on('loaded', () => { const texture = new PIXI.Texture(baseTexture); const sprite = new PIXI.Sprite(texture); }); baseTexture.on('error', (error) => { throw error; });baseTexture.loadSource(image); } catch (error) { console.error(error); }}V5 code (because BaseTexture::loadSource is gone now, see this):
async loadImageFromBase64() {    try {        const { default: base64Data } = await import('../images/admArt.png');        const image = new Image();        image.src = base64Data;        const baseTexture = new PIXI.BaseTexture(image);
        baseTexture.on('loaded', () => {        const texture = new PIXI.Texture(baseTexture);        const sprite = new PIXI.Sprite(texture);        });        baseTexture.on('error', (error) => {        throw error;        });
        baseTexture.update();    } catch (error) {    console.error(error);    }}
Particles (reference)
Section titled “Particles (reference)”(example code is located here)
This library is really helpful for setting up particle emitters. They have an interactive demo that you can use to generate a JSON blob to pass to the PIXI.particles.Emitter constructor.
Animated sprites (reference)
Section titled “Animated sprites (reference)”Animated sprites are pretty easy to use. Here’s some example code that I have from Bot Land just for testing them out:
const elevenSprites = _.times(11, (index) => this.spritesheetDict.getSpriteSync( `salvage_pack/box-explosion-outro (${index + 1})_1` ));const textures = _.map(elevenSprites, (s) => s.texture);const animatedSprite = new PIXI.extras.AnimatedSprite(textures);this.pixiApp.stage.addChild(animatedSprite);animatedSprite.scale.set(0.5);animatedSprite.animationSpeed = 0.25;animatedSprite.play();_.map(elevenSprites, (s) => { s.destroy();});setTimeout(() => { animatedSprite.destroy();}, 1000);If you want to control individual frame length, you can do that with FrameObject (reference). You just pass in an array of FrameObjects (just a POJO with “time” and “texture”) instead of an array of textures. If you’re going to do this, you probably don’t want to set animationSpeed.
Performance guidelines (reference)
Section titled “Performance guidelines (reference)”Some specific things that I learned while going through performance research/development for Bot Land:
- If there are a bunch of PIXI.Graphics that you want on the same “layer”, then just render them all into the same Graphics object as opposed to having individual objects for each individual rectangle you want to draw.
- Rendering a container into a single sprite (or at least fewer sprites, e.g. tessellation) is very helpful if you’re not going to have animation. If you are going to have animation, you can look into crazy solutions like Pixi-tilemap (although that has several limitations, e.g. can’t have texture sizes greater than 1024x1024 and doesn’t work as-is with Webpack). Note that I never actually used pixi-tilemap, but it looks like it generates GLSL code on the fly so that there’s a huge if-else chain to determine which exact texture [coordinates] to use.
- Culling isn’t necessarily going to be helpful unless you know that visibility test costs less than drawing the object itself. This is because “displayObject.getBounds(false)” is not very fast when called every frame.
- There are a bunch of tips in the main reference link above that didn’t make a ton of sense, e.g. cacheAsBitmap, ordering draw calls like sprite—>sprite—>graphics—>graphics instead of interspersing them, etc.
This gives you access to the whole scenegraph. You can click a node and type $pixi to access it, change properties, etc.
You can apparently right-click to select nodes, but that doesn’t seem to work too well in Bot Land.
One SUPER important thing this can do is show you the bounds of a particular node. I had written some logic for this, but it wasn’t great because sometimes it would change the bounds.
11:34 HiDeoo: Adam13531 I’m promoting my own links but I would say Pixi DevTools for that ^^
11:34 HiDeoo: We achieved lots of improvements by viewing some things we didn’t thought of with the graph
11:35 HiDeoo: Also, it help a lot to remove useless containers
11:35 HiDeoo: Aka rasterizing them when possible
11:36 HiDeoo: Also Adam13531 tip: you can name container & all elements in PIxi and the name appears in the Dev Tools
The name is just ‘name’ (and is on DisplayObject apparently), so you can give them this property in code.
11:37 HiDeoo: Really helpful
Containers with overlapping children and transparency
Section titled “Containers with overlapping children and transparency”Below, you can see a container with three children (head / torso / foot) with an alpha of 0.5 set on the container itself:
As you can see, this looks pretty ugly because you can see the overlap points. If the effect you want to achieve is this:
Then you can do one of these things:
- Rasterize the whole container and then set the alpha on that. Pseudo code follows:
texture = renderer.generateTexturesprite = new Sprite(texture)sprite.alpha = 0.5- Add the Pixi-given AlphaFilter to your container:
const filter = new PIXI.filters.AlphaFilter(0.5);container.filters = [filter,];- Make your own filter (or just add this to an existing fragment filter
This sets the transparency when premultiplied alpha is in effect (see this part of the same note).
if (baseColor.a > 0.0) { float alpha = 0.5; baseColor.rgb *= alpha; baseColor.a *= alpha;}Bit-twiddling
Section titled “Bit-twiddling”If you ever need the fastest implementation of functions like nextPow2, you can use what Pixi uses: https://github.com/mikolalysenko/bit-twiddle
Text spikes and miter limit
Section titled “Text spikes and miter limit”7/30/2017 - I didn’t realize until two years into using Pixi why my text looked spiky. Here’s a good reference. The problem was just that I needed to lower the miter limit from the default of 10 (Pixi JS doc reference on how to do that).
Also, there are apparently three lineJoin properties: bevel, round, and miter. I’m not sure if all of these work for Pixi, but they seem to be in <canvas>.
toLocal, toGlobal
Section titled “toLocal, toGlobal”toLocal
Section titled “toLocal”toLocal will convert a point from “world” coordinates into the local space for a particular DisplayObject. For example, if you have something like this:
Container
Sprite (scale = 0.5)
sprite.toLocal(new PIXI.Point(10, 10), container); ==> (20, 20)
This is saying “I have the point (10, 10) in the Container’s coordinate space and I want to know what it would be in the Sprite’s coordinate space”
container.toLocal(new PIXI.Point(10, 10), sprite); ==> (5, 5)
toLocal works by either taking in a point in the global coordinate system or a point and a reference object. In the case where you pass in a reference object, it will simply call toGlobal on the point from the reference object so that essentially toLocal ALWAYS takes in a point in the global coordinate space.
Specific example
Section titled “Specific example”I had a scene hierarchy that looked like this:
Container - stage (holds everything) (scale = 1)
Container - holds all bot entities (scale = 1)
Container - this particular entity (scale = 1)
Container - this entity’s bot sprites (scale = 0.125)
Head sprite
Torso sprite
Foot sprite
Container - MeleeContainer (scale = 0.01333333333)
Shoulder sprite
Joint sprite
Ball sprite (scale = 0.5)
What I was trying to do was this:
- Get a vector from one bot’s shoulder sprite to another bot’s center. This vector’s distance’s units would be in global pixels. Note that its direction is agnostic of coordinate systems. The reason I needed a vector is because the shoulder could rotate.
- Apply the vector in such a way that I can position the ball sprite of the first bot at the center of the second bot.
I ended up figuring out two different solutions below:
const percentComplete = 1;const centerOfTarget = ClientEntityUtil.getCenterCoordinates(targetEntity);const shoulderWorldCoords = shoulderSprite.toGlobal(new PIXI.Point(0, 0));
// Get distance from the shoulder joint to the center of the targetconst distanceToTarget = util.distance(    shoulderWorldCoords.x,    shoulderWorldCoords.y,    centerOfTarget.centerX,    centerOfTarget.centerY,);
const vector = new Victor(centerOfTarget.centerX - shoulderWorldCoords.x, centerOfTarget.centerY - shoulderWorldCoords.y);vector.norm();vector.rotateTo(shoulderSprite.rotation);vector.multiply(new Victor(percentComplete * distanceToTarget, percentComplete * distanceToTarget));
// This could be ballSprite.worldTransform.a < 0, but only if we did ballSprite.updateTransform() first.if (ballSprite.parent.parent.scale.x < 0) {    vector.multiplyX(new Victor(-1, 0));}
// ---- SOLUTION #1// We have to reset the rotation of the shoulderSprite so that toLocal doesn't take it into account.const oldRotation = shoulderSprite.rotation;shoulderSprite.rotation = 0;const ballSpritePosition = shoulderSprite.toLocal(    new PIXI.Point(shoulderWorldCoords.x + vector.x, shoulderWorldCoords.y + vector.y));shoulderSprite.rotation = oldRotation;
ballSprite.position.set(    shoulderSprite.x + ballSpritePosition.x * ballSprite.scale.x,    shoulderSprite.y + ballSpritePosition.y * ballSprite.scale.y);// ---- END OF SOLUTION #1
// ---- SOLUTION #2// Do this so that worldTransform will be correctballSprite.updateTransform();ballSprite.position.set(    shoulderSprite.x + vector.x / ballSprite.worldTransform.a * ballSprite.scale.x,    shoulderSprite.y + vector.y / ballSprite.worldTransform.d * ballSprite.scale.y);// ---- END OF SOLUTION #2
meleeSpriteComponent.timeInExistence += deltaTime * this.arena.replaySpeed;
Solution #1 uses toLocal. This only makes sense if we have a point of interest in the coordinate of another display object or global coordinates. In this case, shoulderWorldCoords is in the global space and the vector’s magnitude is in global units, so we don’t specify a reference object so that toLocal will apply the entirety of the hierarchy
Solution #2 adapts the vector’s magnitude (which represents the distance in global units) to ballSprite’s local units. It does so using worldTransform. worldTransform.a is the xScale and worldTransform.d is the yScale. They are equal to ballSprite.scale.x _ ballSprite.parent.scale.x _ …all the way up the hierarchy.
In either case, we multiply by ballSprite’s scale a final time to get the position relative to ballSprite. Up until that point, we’ll just have converted to ballSprite’s coordinate system, not to its scaling as well. The reason I think this is okay is because whatever rendering you do with ballSprite is expected to have access to its whole transform. However, it’s NOT expected to know anything about the hierarchy above it, nor should it have to.
Of the two solutions, solution #1 ends up being pretty hacky in my case.
toGlobal
Section titled “toGlobal”toGlobal will do sort of the opposite of that. For example:
Container (x = 100, y = 100)
Sprite (x = 0, y = 0) (these coordinates are relative to the parent)
sprite.toGlobal(new PIXI.Point(0, 0)) ==> (100, 100)
This is saying “I have a point (0, 0) on a sprite and I want to know what that corresponds to in the global coordinate space
Rotating around a particular point
Section titled “Rotating around a particular point”Context: I wanted to animate Melee by having a “shoulder” sprite and a “ball” sprite. The ball extends out from the shoulder. I needed to rotate the shoulder around its pivot point in order to get a vector that the ball could travel along.
shoulderSprite.updateTransform();
const shoulderAnchorXPixels = shoulderSprite.anchor.x * shoulderSprite.width;
const shoulderAnchorYPixels = shoulderSprite.anchor.y * shoulderSprite.height;
const scaledAnchorX = shoulderAnchorXPixels / shoulderSprite.scale.x;
const scaledAnchorY = shoulderAnchorYPixels / shoulderSprite.scale.y;
// Get the position of the point that has to rotate. If the upper left of the sprite were its origin, then we’d be able to just use muzzleX and muzzleY, but because it’s anchored at a different spot, we need to take the anchor into account.
const spriteJointPositionX = activeHardwareSpriteComponent.muzzleX;
const spriteJointPositionY = activeHardwareSpriteComponent.muzzleY;
const shoulderConnectionToRotate = new PIXI.Point(
spriteJointPositionX - scaledAnchorX,
spriteJointPositionY - scaledAnchorY
);
let shoulderWorldCoords = shoulderSprite.toGlobal(
shoulderConnectionToRotate
);
let desiredRotation = Math.PI + Math.atan2(
shoulderWorldCoords.y - centerOfTarget.centerY,
shoulderWorldCoords.x - centerOfTarget.centerX
);
ballSprite.updateTransform();
if (ballSprite.worldTransform.a < 0) {
desiredRotation = Math.PI - desiredRotation;
}
// This function just does this: if (desiredRotation - actualRotation > Math.PI) {desiredRotation -= Math.PI * 2;}
desiredRotation = this.makeRotationClosest(shoulderSprite.rotation, desiredRotation);
shoulderSprite.rotation = percentComplete * (desiredRotation - startingShoulderRotation) + startingShoulderRotation;
// Get distance from the shoulder joint to the center of the target
const distanceToTarget = util.distance(
shoulderWorldCoords.x,
shoulderWorldCoords.y,
centerOfTarget.centerX,
centerOfTarget.centerY,
);
// Now that we’ve changed the rotation, update the transform again
// (toGlobal does this).
shoulderWorldCoords = shoulderSprite.toGlobal(
shoulderConnectionToRotate
);
const oldRotation = shoulderSprite.rotation;
shoulderSprite.rotation = 0;
const localRotatedPoint = shoulderSprite.toLocal(shoulderWorldCoords);
localRotatedPoint.x *= shoulderSprite.scale.x;
localRotatedPoint.y *= shoulderSprite.scale.y;
shoulderSprite.rotation = oldRotation;
const vector = new Victor(centerOfTarget.centerX - shoulderWorldCoords.x, centerOfTarget.centerY - shoulderWorldCoords.y);
vector.norm();
vector.rotateTo(shoulderSprite.rotation);
vector.multiply(new Victor(percentComplete* distanceToTarget, percentComplete * distanceToTarget));
Running examples (reference)
Section titled “Running examples (reference)”Just read the reference, but keep in mind that the examples repo is separate from the Pixi repo.
I then CD’d into the directory and typed “http-server” to get the code served correctly.
Note: modifying Pixi in the examples is difficult as it’s downloaded from cloudfront at runtime.
Adam13531
Section titled “Adam13531”Issues I took part in
Section titled “Issues I took part in”https://github.com/pixijs/pixi.js/issues/3873 - “Filter issue with sourceFrame.fit”
From this, Ivan wrote a quick guide on Pixi v4 filters here
https://github.com/pixijs/pixi.js/issues/3869 - “Memory leak in Grahpics.clear”
https://github.com/pixijs/pixi.js/issues/5824 - Memory leak from RenderTexture despite destroying everything
Shout-out from Hackerham: http://www.html5gamedevs.com/topic/32994-pixi-with-react-or-angular/
Memory leaks
Section titled “Memory leaks”3/1/2017
All of the memory leaks that I’ve faced have been the result of not calling destroy() properly. In order to understand how the leaks form, there’s a lot of background information I had to look up on Pixi.
PIXI.Sprite’s destroy() takes in options with texture and baseTexture properties. As of 3/1/2017, if just “texture” is true, absolutely nothing changes in the destroy() function; both properties need to be true in order for the texture to be destroyed.
If a texture is destroyed with both args mentioned above (or just true) then this code is run:
if (this.baseTexture){    if (destroyBase)    {        // delete the texture if it exists in the texture cache..        // this only needs to be removed if the base texture is actually destroyed too..        if (TextureCache[this.baseTexture.imageUrl])        {            delete TextureCache[this.baseTexture.imageUrl];        }
        this.baseTexture.destroy();    }
    this.baseTexture.off('update', this.onBaseTextureUpdated, this);    this.baseTexture.off('loaded', this.onBaseTextureLoaded, this);
this.baseTexture = null;}- The baseTexture is the texture that a particular Texture uses.
- TextureCache and BaseTextureCache are just objects exported from utils.js
- They can be accessed via PIXI.utils.TextureCache
- They typically contain all of your spritesheet files (e.g. spritesheet1.png, spritesheet2.png).
When using generateTexture, the baseTexture has an imageUrl of null since it’s a BaseRenderTexture.
The Pixi loader is a thin wrapper around resource-loader, but there’s the textureParser middleware that calls Texture.fromLoader if the resource being loaded is an image:
const baseTexture = new BaseTexture(source, undefined, getResolutionOfUrl(imageUrl));const texture = new Texture(baseTexture);
baseTexture.imageUrl = imageUrl;
This code shows how a BaseTexture gets created when loading in an image. This should really never get destroyed unless you plan on reloading the image with the loader (which would only be something you’d probably do in huge applications where you need to manage the number of spritesheets in memory at any given time).
You can also create a BaseRenderTexture by calling generateTexture on a renderer:
(from RenderTexture.js)
static create(width, height, scaleMode, resolution) { return new RenderTexture(new BaseRenderTexture(width, height, scaleMode, resolution)); }BaseRenderTexture extends BaseTexture, but neither constructor is in charge of creating an entry in BaseTextureCache; it’s the “from*” functions that do that. BaseRenderTexture never goes through a “from*” function, so calling generateTexture will not produce a new entry in the BaseTextureCache.
Conclusions:
- A BaseTexture (i.e. explicitly a BaseTexture, not a BaseRenderTexture) that appears in BaseTextureCache is something that corresponds to an actual image that could be on your hard drive (or the Internet, etc.) as opposed to something created in-memory.
- If you see your memory rising to the maximum physical limit in Task Manager but you don’t see any memory leaks while using DevTools profiling, then it likely means that your garbage collector just isn’t getting a chance to run. For example, I wrote a program that kept trying to create a lot of PIXI.Sprite objects every frame and then immediately destroyed them. Firefox showed no memory leaks, but my system RAM usage eventually hit 100%. If I had just created the PIXI.Sprite objects every 60th frame, the garbage collector probably would have cleaned everything up. When I stop creating the objects altogether, the GC finally gets an opportunity to run and memory usage drops back to the starting rate.
- To get rid of the TextureCache and BaseTextureCache, there are two functions exposed from PIXI.utils: destroyTextureCache and clearTextureCache. As of 3/6/2017, these are never naturally called from the PIXI codebase.
- Render textures are safe to destroy their base texture as long as the render texture isn’t shared. For example:
const renderTexture = pixiWrapper.renderer.generateTexture(maskSprite);
const container = new PIXI.Container();container.addChild(new PIXI.Sprite(renderTexture));
container.destroy({children: true, texture: true, baseTexture: true});
// It's still safe to use maskSprite because the renderTexture does not have the maskSprite's texture as its baseTexture. However, if the container contained maskSprite, this WOULD prevent you from using maskSprite again because "children" is set to true, so the sprite's base texture will get destroyed.- If the render texture is shared, then the best solution I found to destroying them reliably is to implement my own reference counting. Incrementing the reference count is easy enough to wrap, but decrementing it should take place from the sprite’s destroy() function, so I wrapped the sprite’s destroy() function too.
Culling
Section titled “Culling”1/16/2017
Pixi doesn’t perform any culling for you (reference):
Yes, because filter will be applied and calculated even if your object is offscreen. Culling algorithm is not a part of pixi, it depends on the game. You have to check every object getBounds() or whatever variables you have for it (Camera.Zoom and stuff), and calculate whether the object is seen or not. “renderable” field is just for that cause.
In order to cull an object, just set its renderable property to false (and then set it to true when you want to render it again).
Bounds
Section titled “Bounds”getBounds() returns a rectangle that takes into account every parent container’s transform.
getLocalBounds() returns a rectangle that doesn’t take parent transforms into account. In fact, the way it’s coded as of 5/31/2017 is that it temporarily nulls out the parent, then calls getBounds, then restores the parent at the end. In the time that the parent is null, it uses a new DisplayObject as a parent.
Note: for some reason, getLocalBounds doesn’t seem to even take the scale into account. I think it’s so that you can get properties of the original texture of a sprite.
Texture vs. BaseTexture vs. Sprite (reference)
Section titled “Texture vs. BaseTexture vs. Sprite (reference)”This description comes from “xerver”, whom I’m pretty sure is one of the Pixi creators:
A texture is just a description of what rectangle of a base texture to use, a base texture is just a description of what image to use.
A sprite describes where and how to draw a texture in the world. This includes scaling and other things.
Slicing/splitting a texture
Section titled “Slicing/splitting a texture”If you have a texture and you want another texture to just be a portion of it, the API is simple:
const rectangle = new PIXI.Rectangle(x, y, w, h);const sectionTexture = new PIXI.Texture(originalTexture, rectangle);RenderTextures
Section titled “RenderTextures”If you want to scale a Pixi object before rendering it to a RenderTexture, just add it to a temporary container and render the container instead (reference).
If you want to get a Pixi object as a base64-encoded string, just use a RenderTexture and call getBase64(). Note: you may want to read this about converting large images to base64 if your browser is crashing: reference.
Examples:
const bounds = thingWeWantToRender.getLocalBounds();
// If we drew thingWeWantToRender directly to a RenderTexture, then the scale would be ignored, so we add it to a temporary container below.
thingWeWantToRender.scale = new PIXI.Point(0.5, 0.5);
const tempContainer = new PIXI.Container();
tempContainer.addChild(thingWeWantToRender);
const renderTexture = tempContainer.generateTexture(renderer);
const data = renderTexture.getBase64();
$(‘body’).append(‘<img src=”’ + data + ’”/ >’);
RenderTextures and mipmapping
Section titled “RenderTextures and mipmapping”I want to save this function since it took me forever to arrive at these particular conclusions. I think it’s relatively efficient. It takes a display object and renders it to a new sprite that’s backed by a RenderTexture. If the region’s dimensions are powers of two and mipmap===true then it will also be antialiased by Pixi. Note that the region controls the resulting dimensions of the returned texture, so for mipmapping to work on sprites that do not have powers-of-2 dimensions, the region will necessarily be larger than the source sprite.
PixiJS uses resolution under the hood in many calculations, so if you’re going to specify a resolution of a mipmapped texture, then it also needs to be a power of two. Make sure you’re not taking the resolution into account twice. For example, below, I pass in a displayObject and then call generateTexture on it, and both could have resolution taken into account.
/** * Renders a display object to a RenderTexture and creates a sprite out of it. * The caller has to destroy both the sprite and the texture. * * I made this function because it wasn't the most straightforward for me to * come up with code that doesn't make an extra temporary sprite (which then * needs to be destroyed). * * Note that the mipmapping itself isn't the most straightforward given how Pixi * works with RenderTextures, so reading this GitHub issue and especially Ivan's * JSFiddle was helpful: * https://github.com/pixijs/pixi.js/issues/4155#issuecomment-342471151 * @param {PIXI.Renderer} pixiRenderer * @param {PIXI.DisplayObject} displayObject * @param {?PIXI.SCALE_MODES} scaleMode - this doesn't have to be defined * @param {?number} resolution - this doesn't have to be defined * @param {PIXI.Rectangle} region - if mipmap is true, then this needs to have * width and height be powers of two. * @param {boolean} mipmap * @return {PIXI.Sprite} */function renderToTexture(pixiRenderer, displayObject, scaleMode, resolution, region, mipmap) {    // Before trying to enable mipmapping, we need to render to the texture    // first or else we'll run into this issue:    // https://github.com/pixijs/pixi.js/issues/3832    const renderTexture = pixiRenderer.generateTexture(displayObject, scaleMode, resolution, region);    const baseRenderTex = renderTexture.baseTexture;    baseRenderTex.mipmap = mipmap;
    // This is the "hack" to enable mipmapping. This would normally happen in    // PIXI's TextureManager, but it doesn't work for render textures.    if (mipmap) {        pixiRenderer.bindTexture(baseRenderTex, false, 0);        const glTex = baseRenderTex._glTextures[pixiRenderer.CONTEXT_UID];        glTex.enableMipmap(); // this is what actually generates mipmaps in WebGL        glTex.enableLinearScaling(); // this is what tells WebGL to USE those mipmaps    }
    const finalSprite = new PIXI.Sprite(renderTexture);    return finalSprite;}
Dynamically creating spritesheets
Section titled “Dynamically creating spritesheets”I believe the best way to do this would be use a PIXI.Container with a bunch of sprite children positioned correctly, then use a render texture to combine all of the sprites by drawing the container onto it.
You should NOT have to manually use matrices as shown below:
let m = new PIXI.Matrix();
m.identity().translate(50, 50);
renderTexture.render(ninjaContainer, m);
Instead, the code is something like this:
function makeSpritesheet() {
const container = new PIXI.Container();
container.addChild(sprite1);
container.addChild(sprite2);
sprite1.position.set(0, 0);
sprite2.position.set(50, 0);
// Apply any filters here if you want
sprite1.filters = [this.createSomeFilter()];
const renderTexture = container.generateTexture(renderer);
renderTexture.render(container);
const spritesheet = new PIXI.Sprite(renderTexture);
// Code should go here to prevent the next gl.glCear call from clearing your
// renderTexture (thus clearing your spritesheet)
return spritesheet;
}
Then, when it comes to drawing something from the spritesheet, you can use code like this:
const rect = new PIXI.Rectangle(440, 143, 178, 104);
const singleTexture = new PIXI.Texture(
PIXI.loader.resources.test_spritesheet.texture,
rect,
rect.clone()
);
const singleSprite = new PIXI.Sprite(singleTexture);
Multiple fragment shaders (reference)
Section titled “Multiple fragment shaders (reference)”1/16/2017
This is possible apparently, but it involves one of two techniques:
- Using a render texture as an intermediate output for one shader and then finally rendering to the screen with another shader.
- Combining all of your shaders into a “mega” shader.
Vertex shader
Section titled “Vertex shader”For more information on shaders, see this note.
Here is a shader that I’d started to write but didn’t finish. It’s just the default shader with an attribute for aMaskTextureCoord, which I couldn’t figure out how to pass in via Pixi.
precision lowp float;
attribute vec2 aVertexPosition;
attribute vec2 aTextureCoord;
attribute vec4 aColor;
// I need to get an attribute of the maskTextureCoord here
attribute vec2 aMaskTextureCoord;
uniform mat3 projectionMatrix;
varying vec2 vTextureCoord;
varying vec2 vMaskTextureCoord;
varying vec4 vColor;
void main(void){
gl_Position = vec4((projectionMatrix * vec3(aVertexPosition, 1.0)).xy, 0.0, 1.0);
vTextureCoord = aTextureCoord;
// This will be interpolated in the fragment shader automatically
vMaskTextureCoord = aMaskTextureCoord;
vColor = vec4(aColor.rgb * aColor.a, aColor.a);
}
Premultiplied alpha
Section titled “Premultiplied alpha”If you try setting alpha gl_FragColor.a to 0.0 and you still notice something rendering, it’s because of premultiplied alpha. Here are some resources:
Not very helpful: http://www.html5gamedevs.com/topic/13719-alpha-in-shader-not-working-correctly/
More helpful: https://github.com/pixijs/pixi.js/issues/3228#issuecomment-257533465
Also helpful: https://pixijs.github.io/examples/#/textures/not-premultiplied-alpha.js
Post about premultiplied alpha in general: https://limnu.com/webgl-blending-youre-probably-wrong/
The fix is to do something like this where you multiply each color component by the alpha:
float alpha = 0.5;if (baseColor.a > 0.0) { baseColor.rgb *= alpha; baseColor.a = alpha;}gl_FragColor = baseColor;The other thing that could be done is to turn off premultiplied alpha. You can apparently do this per texture by looking at the Pixi JS example “not premultiplied alpha”.
Troubleshooting
Section titled “Troubleshooting”RenderTextures and glClear
Section titled “RenderTextures and glClear”If you’re trying to use RenderTextures and a gl.glClear clears the texture: the issue is that when generating a texture, it sets its own buffer to the current buffer, so glClear will affect that. I can fix this by rendering using the camera (although that’s hacky and there’s probably a better way).
Reusing filters with different uniform values
Section titled “Reusing filters with different uniform values”If you’re trying to reuse filters with different uniform values, you may instead have to just make individual filters that each have different values. This is most likely a result of some shared GL state that I was unaware of, so perhaps there’s a better solution. Note: syncUniform and syncUniforms did not seem to be correcting this; there is likely a cached filter or something happening in the background, but I couldn’t find it.
Darkening a mipmapped texture when scaling down (reference)
Section titled “Darkening a mipmapped texture when scaling down (reference)”In short, it sounds like this is the result of not having images set at each mipmap level, so when you scale down, it’s interpolating between the image it DOES have and a black texture, which results in a darkening effect.
The solution could be to call gl.generateMipmap, which Pixi does via its “enableMipmap” function (whose definition is in the pixi-gl-core repo here). However, if that doesn’t work or that’s already being done, then it could be because the source of the texture is not allowed (see this issue). It could also be because you’re trying to enable mipmaps before rendering to the base texture.
WebGL warnings
Section titled “WebGL warnings”[.Offscreen-For-WebGL-00000283DA4E9060]RENDER WARNING: there is no texture bound to the unit 0
I think this happens when you destroy a texture that’s bound (which causes there to be no bound texture).
BaseTexture events never being fired
Section titled “BaseTexture events never being fired”This actually isn’t the problem that you may think it is; when you construct a BaseTexture with an image whose source was already loaded, then the “loaded” event is fired synchronously from the constructor (at least in Pixi V4). This leads to the following:
Bad code:
const baseTexture = new PIXI.BaseTexture(image);
baseTexture.on('loaded', () => {    // this will never get hit because "loaded" was already fired during construction});
Good code:
const baseTexture = new PIXI.BaseTexture();
baseTexture.on('loaded', () => {    // do stuff here});
baseTexture.loadSource(image);