Android Studio
Created: 2019-01-22 22:56:42 -0800 Modified: 2022-03-11 11:00:17 -0800
Basics
Section titled “Basics”- Getting started: try this codelab on JetPack Compose
- HAXM can’t be installed while Hyper-V is enabled (“This computer does not support Intel Virtualization Technology (VT-x) or it is being exclusively used by Hyper-V. HAXM cannot be installed.”).
- You can test payments completely with a local app instead of one from the Play Store.
- HiDeoo and I spent a lot of time confirming this. The only things I’m not certain of are whether you need to have installed the application from the internal testing track at some point and whether you need to have opted in to it at all (which you find via the Console → Release management → App releases → Internal test → Manage → expand “Manage testers” → Opt-in URL).
- To see your published apps: https://play.google.com/apps/publish/
- To customize where the emulator’s screenshots go, go to the emulator’s extended controls (the ”…” button) → Settings (reference).
- Terminology:
- UI/flow terminology
- Fragment (reference): reusable portion of the app’s UI. These can be nested but cannot be top-level.
- Activity (reference): these are essentially different “starting views” for an application. It’s called an “activity” because you can think of it like a user scenario: opening Gmail from your homescreen will show a different activity than composing an email through a social-media widget.
- View: any element of a layout. Every layout must always have a root view.
- UI/flow terminology
- Log with
Log.d(“Testeroni”, someObject.toString()
- To test on a real device, follow these instructions (reference). Note that I didn’t have to install the Windows driver; everything seemed to just work (although maybe I already had it installed).
- By default, the emulator that opens will not have auto-rotate set, so the screen will always render as though you’re holding the phone in portrait mode. Enable this in the emulated OS’s settings.
- If you ever want to change the launch target (e.g. from an emulator to an actual device), you can go to Run → Edit Configurations → Deployment Target Options → uncheck “Use same device for future launches”, then just run the application again.
- To run on a physical device, make sure you have a device connected, then choose Run → Run app, then you should see your connected device there.
- If you ever set an attribute for something, make sure to press enter or it won’t save.
- It’s a good idea to set the minimum SDK version. You can do this while creating the application, but if you’ve already created it, then you can update it via your application’s build.gradle file as minSdkVersion. After doing this, sync your project with gradle files via ctrl+shift+A → “sync”.
- Plug-ins to check out
- Key Promoter X (reference): shows you which actions you use the most with your mouse so that you can make keyboard shortcuts out of them.
- Inspector tools: there is a Database Inspector, the Network Inspector, and the Layout Inspector. The layout inspector does not allow you to change values. There are also profilers for the debugger (reference): CPU, memory, network, and energy.
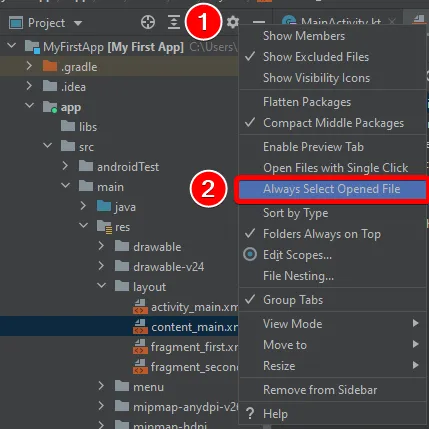
- Show file in the Project view:

- You can configure this to be the default option in the gear menu to the right of that icon:
- Keyboard shortcuts
- Find anything: you can press shift two times to search for everything. From here, you can see the shortcuts to search for specific things
- Ctrl+N for classes
- Ctrl+shift+N for files
- Ctrl+alt+shift+N for symbols
- Ctrl+shift+A will search all commands.
- Go to definition: ctrl+click or ctrl+B or middle click
- Discovering shortcut name from key combo
- If you’re ever confused while writing Kotlin, press alt+enter and you’ll get suggestions that can usually fix problems automatically.
- Ctrl+shift+F12: “hide all tool windows” - maximize the coding pane
- Ctrl+alt+shift+L will open the dialog for formatting your code, ctrl+alt+L will just format it without asking.
- Find anything: you can press shift two times to search for everything. From here, you can see the shortcuts to search for specific things
- Finding any window: hover over the window icon at the bottom left of the IDE
- Gradle
- Overview (reference): this is a great page for understanding what Gradle is all about.
- Emulator settings
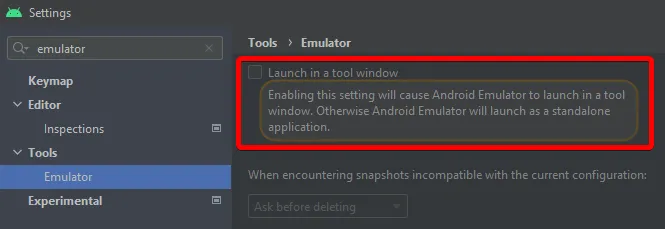
- Popping out the emulator window: right-click the top bar that it’s in → View Mode → float. If you want the emulator to launch in a separate process altogether, then you can use this setting:
- Resizing the emulator: when it’s a standalone app, you can modify the settings so that the window frame shows. That makes it much easier to resize.
- Popping out the emulator window: right-click the top bar that it’s in → View Mode → float. If you want the emulator to launch in a separate process altogether, then you can use this setting:
- If you plan on doing anything on the Internet, you need to manifest the Internet permission (reference): add


<uses-permission android:name="android.permission.INTERNET"/>…to your application’s manifest in the <manifest> tag.
- ProGuard: shrinking, obfuscating, and optimizing the app
- Project view vs. Android view: try out the project view. By doing this, all of your modules’ gradle files won’t be mashed together in the same view. The Project view mirrors what’s on disk.
- Project view by default: Help → Edit Custom Properties → studio.projectview=true
- Any code that you write that’s red is problematic with the default syntax highlighting, e.g.

To switch between the design view and the actual XML representing it, click one of these:
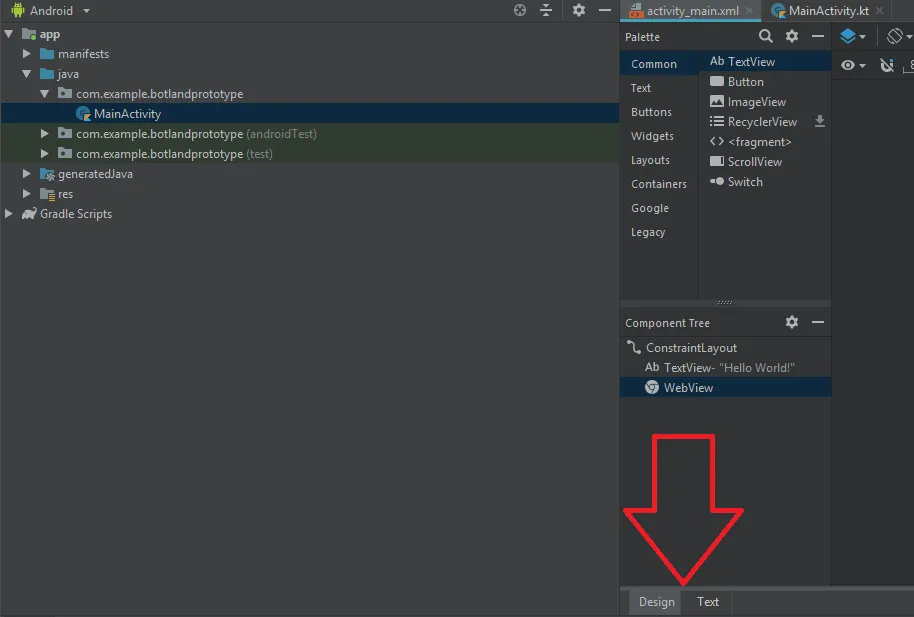
If this doesn’t exist, you can always right-click the file in the Project view → Override File Type (and later revert it if you want).
ANDROID_ID
Section titled “ANDROID_ID”The Android ID is used to identify the combination of your device+app. For the emulator, this can be changed just by making a new AVD.
To obtain it, you can use this Kotlin code (reference):
val android_id = Settings.Secure.getString( applicationContext.contentResolver, Settings.Secure.ANDROID_ID )The resulting string is a hex string of length 16 (although maybe that can change).
Note that for FCM (or at least FCM via AWS SNS), you do not use the ANDROID_ID; you use the Firebase token.
Webview
Section titled “Webview”- To debug webviews, read this. It boils down to adding a single line of code (WebView.setWebContentsDebuggingEnabled(true);), rebuilding, and going to chrome://inspect.
- If you want your entire application to be a webview, then you can make an empty activity application, change the root parent to be a android.widget.FrameLayout, then add in a Webview whose width and height is “match_parent” (which does not show in the dropdown by default).
- Even just for an HTML 5 page outside of a webview app, if you want Android to pop up a bar saying “there’s an app in Google Play” or “you can pin this site to your home screen”, you need to modify the manifest file. After doing this, make sure to clear the cache of your old manifest file or you may find yourself banging your head against the wall for many hours. 😧
Code to manage payments
Section titled “Code to manage payments”This is a private note, but there was some incredibly esoteric knowledge involved in that, so I wanted to make sure to highlight it here.
Building a release/production version (reference, reference2)
Section titled “Building a release/production version (reference, reference2)”- Make sure your code is up-to-date (i.e. pull your repo)
- In Android Studio, press shift twice and search for “build variants”.
- Choose release. Note that you will not be able to upload a debug build to Google Play even for internal testing:
- Build → Generate signed bundle / APK… → Android App Bundle
- Find the APK from here: appreleaseapp.aab
- [Optional] You may want to set the build variant back to “debug” in Android Studio for when you’re testing.

When deploying this, if you ever see this note:

…then it means that your version number needs to be bumped.
Troubleshooting
Section titled “Troubleshooting””The system image […] is missing” followed by “Packages Unavailable”
Section titled “”The system image […] is missing” followed by “Packages Unavailable””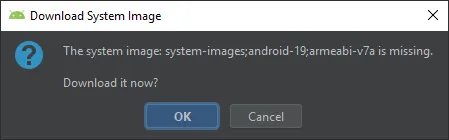
This happened on a brand new install for me. It’s saying that android-19 is missing. I think it’s just that it’s so out-of-date. The SDK Manager didn’t seem to help. Instead, I clicked “Create New Virtual Device” via Tools → AVD Manager, chose a Pixel XL, then chose to download Pie:
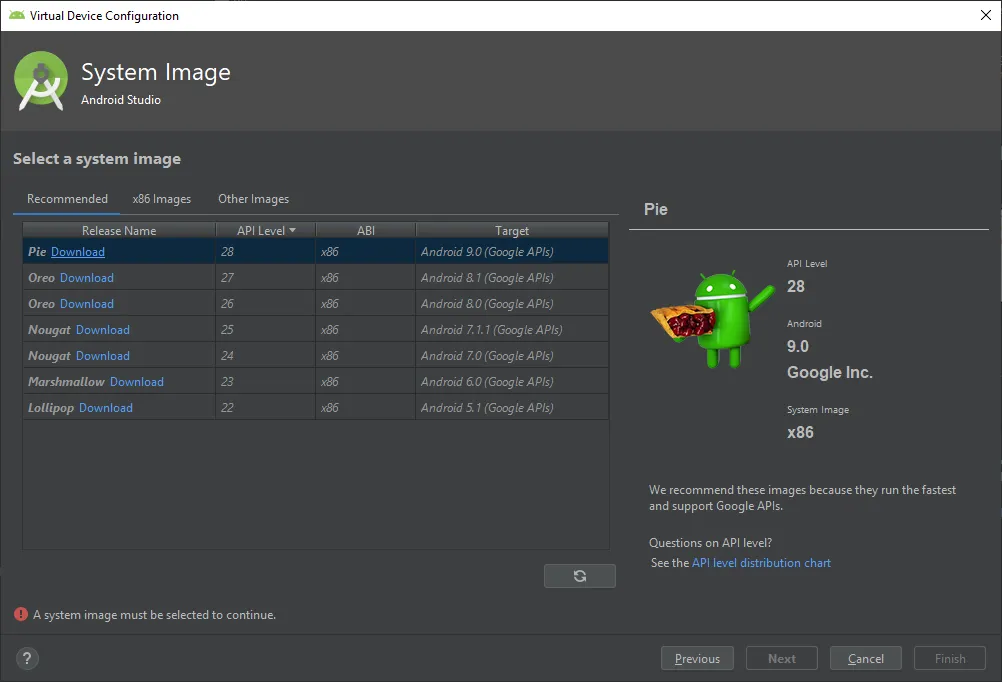
From there, everything loaded just fine.
net::ERR_CACHE_MISS (reference)
Section titled “net::ERR_CACHE_MISS (reference)”You didn’t manifest the Internet permission.
You’re seeing garbled characters
Section titled “You’re seeing garbled characters”(keywords: ¿, upside-down question mark)
![]()
This is because your font can’t display those glyphs, which in this case is supposed to be an italicized underscore. The Hack font has an issue about this (reference). If you’d like to work around this, either:
- Pick a new font from File → Settings → Editor → Font
- Change the color scheme for the language that you’re using so that there aren’t italics (make sure to uncheck “Inherit values from:” in order to be able to override).
The simulator seems to be broken (e.g. stuck on a particular screen)
Section titled “The simulator seems to be broken (e.g. stuck on a particular screen)”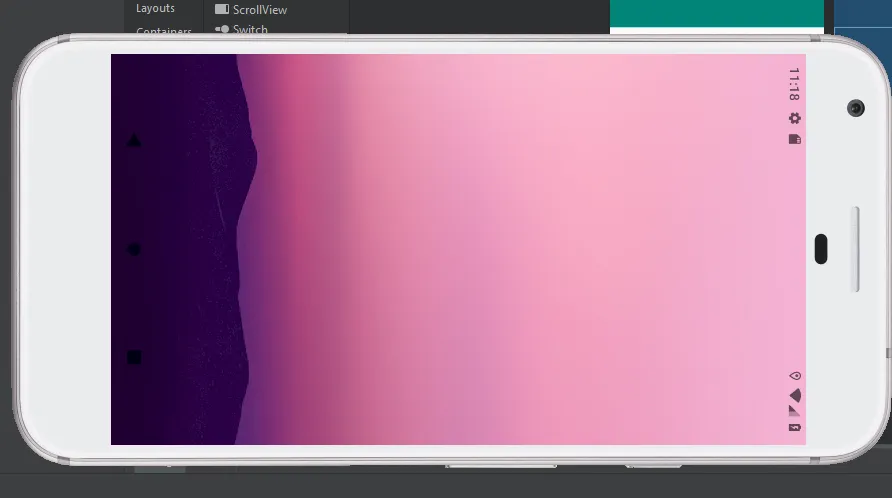
Note: this looks sort of like there’s a graphical glitch, but it turns out that’s just the wallpaper. However, the clock and the home screen’s app icons aren’t showing, which is a glitch.
Note that File → “Invalidate Caches / Restart…” did not work to fix this (at least not in this particular instance). Instead, I created an entirely new virtual device and turned off “instant run” (reference).
A workaround could be to go to the AVD Manager, right-click your AVD and cold-boot it
It’s possible that this also just happens on SDK version 28 a decent amount and that you should use 27.
WebGL doesn’t work in the emulator
Section titled “WebGL doesn’t work in the emulator”Just to be clear:
- I’m testing with this URL: https://get.webgl.org/
- I’m testing on version 28 of the SDK
- It works in the emulator through Chrome, but it doesn’t work through the webview in the app.
It seems like this has been an issue since late 2016: https://issuetracker.google.com/issues/37129533
Apparently it won’t be fixed: https://bugs.chromium.org/p/chromium/issues/detail?id=555116
Workarounds:
- Test on a real device
- Try a different emulator altogether
- HiDeoo found out as of April 19, 2019 that the canary version of Android Studio has some support for this:
- Help menu -> Check for Updates…
- Configureautomatic updates link.
- ReplaceStable ChannelbyCanary Channeland pressOK.
- do not click Updatebut close the update window.
- File menu -> Settings… -> Appearance & Behavior -> System Settings -> Android SDK.
- Select theSDK Platformstab and check theShow Package Detailscheckbox.
- InAndroid Q Preview, check the following:
- Android SDK Platform Q
- Google APIs Intel x86 Atom System Image
- Google Play Intel x86 Atom System Image
- ClickApply.
- Select theSDK Toolstab and make sure theAndroid Emulatorentry is marked asInstalledand notUpdate available(if not, just click the update button).
- Close the Settings window.
- Help menu -> Check for Updates…
- Configureautomatic updates link.
- ReplaceCanary ChannelbyStable Channeland pressOK.
- You can close this window.
- Open the AVD Manager window.
- Create Virtual Deviceor duplicate an existing one.
- Instead ofPie - Android 9.0 x86, change toQ.
- Start the application using this new device and enjoy the graphics.
ERR_CLEARTEXT_NOT_PERMITTED (reference)
Section titled “ERR_CLEARTEXT_NOT_PERMITTED (reference)”This happened when I tried to make a webview that pointed at http://192.168.1.12:3000
Option #1 at the reference link worked for me:
- Make res/xml/network_security_config.xml with these contents
<?xml version="1.0" encoding="utf-8"?><network-security-config> <domain-config cleartextTrafficPermitted="true"> <domain includeSubdomains="true">192.168.1.12</domain> </domain-config></network-security-config>- Modify your application’s manifest to point to that:
<applicationandroid:networkSecurityConfig="@xml/network_security_config">The Play Store is repeating your screenshots across device types (e.g. 7” vs. 10” tablets) (reference)
Section titled “The Play Store is repeating your screenshots across device types (e.g. 7” vs. 10” tablets) (reference)”- https://play.google.com/apps/publish/
- Pick your app
- Store presence → Store listing
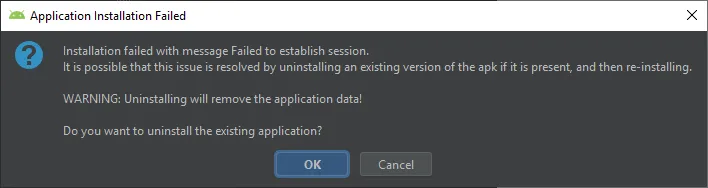
Application installation failed (INSTALL_PARSE_FAILED_NO_CERTIFICATES)
Section titled “Application installation failed (INSTALL_PARSE_FAILED_NO_CERTIFICATES)”
This was because I was trying to install the release version locally. Instead, I needed to change Build Variants to “debug” and then run it.
Test card doesn’t show up (reference)
Section titled “Test card doesn’t show up (reference)”A tester has access to the internal build but sees real payment information instead of this:
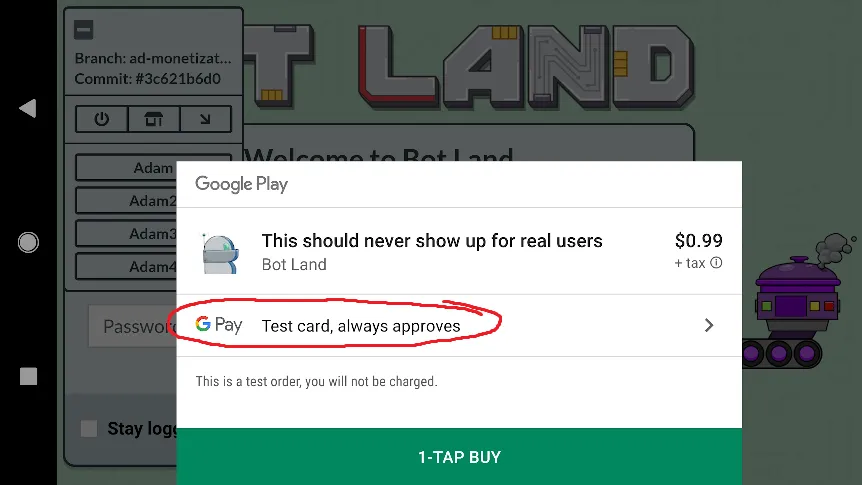
This turned out to be a missing “License tester” email (of all things) (reference). Go to the Console → Settings → Account details → License Testing → add a Gmail account (it apparently has to be a Gmail account, not just an email account).
Cause: buildOutput.apkInfo must not be null (reference)
Section titled “Cause: buildOutput.apkInfo must not be null (reference)”- Build → Clean Project
- Build → Make Project