GIMP
Created: 2014-03-27 10:13:46 -0700 Modified: 2023-10-27 17:14:09 -0700
Basics
Section titled “Basics”- Color picker: shift+click to see the selected alpha component.
Python scripting
Section titled “Python scripting”All functions are described in Help → Procedure Browser (or by clicking “Browse…” in the Python console). You can call them via pdb.foo or pdb[‘foo’], but either way, you need to convert hyphens to underscores (e.g. gimp-image-list becomes pdb.gimp_image_list()). pdb[‘foo-bar’] (with hyphens) is actually valid too.
Some of these functions exist in multiple locations. For example, there’s pdb.gimp_image_list, and there’s gimp.image_list.
Sometimes the in-app help is outright wrong. file-png-save, for example, specifies a run-mode in the documentation, but it doesn’t seem to actually accept this as an argument in Python. In those cases, just look at their GitHub for help (here in this case).
Note: PDB means “procedural database” and technically resides in gimp.pdb.
To get to the console, go to Filter → Python-Fu → Console.
For functions in the “gimp” namespace, reference the documentation.
Get current image
There’s apparently no easy way to do this (reference). gimp.imagelist() gives you all images, then you can index the array based on which title you see. The order of the list is _not the order of the tabs in Gimp.
Get layer of image (reference)
image = gimp.image_list()[0]
image.layers[0]
Saving a plug-in
Section titled “Saving a plug-in”- Find the path of your plug-ins: Edit → Preferences → Folders → Plug-ins
- Mine is: C:Usersagd13_000\gimp-2.8plug-ins
- Save a .py file there
- Follow this general format for the Python file (reference)
- I think you have to relaunch Gimp for it to show up at first in the menu, then you can just make changes to the file on-disk and Gimp will detect the updates.
Debugging
Section titled “Debugging”No clue how you’re supposed to do this. I manually copy/pasted the functions in (removing all blank lines first so that the interpreter wouldn’t get annoyed) and then called them from the console.
Sample plug-in
Section titled “Sample plug-in”I made this to crop an image, then save as three different resized files: 18x18, 36x36, and 72x72. This is for Twitch subscriber icons.
#! /usr/bin/env pythonfrom gimpfu import *import os
def scale_image_square(image, size):  old_interpolation = pdb.gimp_context_get_interpolation()  interpolation_cubic = 2 # the docs gave me this number  pdb.gimp_context_set_interpolation(interpolation_cubic)  pdb.gimp_image_scale(image, size, size)  pdb.gimp_context_set_interpolation(old_interpolation)
def save_image_as_png(image, output_image_dir, base_file_name):  new_image = pdb.gimp_image_duplicate(image)  merged_layer = pdb.gimp_image_merge_visible_layers(new_image, CLIP_TO_IMAGE)  file_name = base_file_name + '.png'  full_path = os.path.join(output_image_dir, file_name)  interlace=0  compression=9  png_chunks = (1, 1, 0, 1, 1) # write all PNG chunks except oFFs(ets)  pdb.file_png_save(new_image, merged_layer, full_path, file_name, interlace, compression, *png_chunks)  pdb.gimp_image_delete(new_image)
def resize_image_to_largest_square(image):  layer = image.layers[0]  smaller_dimension = min(image.width, image.height)  # Resize from upper left corner to the largest possible square  pdb.gimp_image_resize(image, smaller_dimension, smaller_dimension, 0, 0)
def process_sub_icon_for_twitch():  image = gimp.image_list()[0]  source_image_filename = image.filename  output_image_dir = os.path.dirname(source_image_filename)  image_name_only = os.path.splitext(os.path.basename(source_image_filename))[0]  pdb.gimp_image_undo_group_start(image)  pdb.plug_in_zealouscrop(image, image.layers[0])  resize_image_to_largest_square(image)  pdb.gimp_image_undo_group_end(image)  square_sizes = (18, 36, 72)  for square_size in square_sizes:    cloned_image = pdb.gimp_image_duplicate(image)    scale_image_square(cloned_image, square_size)    base_file_name = image_name_only + '_' + str(square_size)    save_image_as_png(cloned_image, output_image_dir, base_file_name)    pdb.gimp_image_delete(cloned_image)
register(    "process_sub_icon_for_twitch",    'Process sub icon for Twitch',    'Crops to a square, then resizes three times and saves each time',    "Adam",    "Adam 2018 MIT do whatever you want",    "2018",    "Process sub icon",    "",    [],    [],    process_sub_icon_for_twitch,    menu="<Image>/Filters/Twitch",)
main()
To use this plug-in (private notes here for Bot Land specifically):
- Make an image
- Export it so that it gets a filename
- Run Filters → Twitch → Process sub icon
Producing images like this
Section titled “Producing images like this”

- Note: what I do below is set up the image with the border so that we have the right size for the non-bordered image.
- First, expand the image a bit so that we’ll have space to show our border.
- Image → Canvas Size
- The border that I’ll add is going to be about 6 pixels given the size of the source image (so that when scaled to
width==100pxit’s about a 2-pixel border), so I’ll increase the size of the canvas by 12 pixels in both dimensions (which means I didn’t maintain aspect ratio here). - Make sure to click the “Center” button so that the offsets get correctly set as 6,6.
- Color the image dark yellow
- Click Windows → Channels (if it’s not there, find it in Windows → Dockable Dialogs → Channels)
- Right-click the Alpha channel and choose “Channel to Selection”. This sets your selection to any non-transparent pixels (you could do Select → Invert if you just wanted the transparent ones)
- I used an external color-picker like ShareX’s to choose the color and get its hex value. You can paste hex colors into GIMP’s color selector under “HTML notation”
- Edit → Fill with FG Color (ctrl+,) to fill the whole selection with the foreground color.
- Color the border
- With your selection the same as before, choose Select → Border and choose your border size. I didn’t pick a feathered border.
- With your other color set up, use either ctlr+, or ctrl+. to fill the selection with that color.
- Scale the image and save it.
- Image → Autocrop Image
- Image → Scale Image
- Save
- At this point, I undid the last few changes to get back to the larger image size without the border being selected, then I colored it gray, repeated the crop/scale and saved it.
To highlight certain parts of an image
Section titled “To highlight certain parts of an image”- Select the part you want to highlight
- Float that layer (Select → Float) and then make a new layer out of it (right-click the floated layer and click “to new layer”).
- Make a new layer in between the original and the new one that is entirely black (Layer → New → Fill with foreground color as long as it’s black)
- Change the black layer to be more transparent.
To make a checkerboard pattern
Section titled “To make a checkerboard pattern”Filter → Render → Pattern → Checkerboard
To make a GIF:
Open gimp, open as layers, pick all gif images. Filters → Animation → Optimize for GIF, then export as gif. That’s it.
Deleting backgrounds
Section titled “Deleting backgrounds”This video is pretty good, but honestly, I’d use something other than GIMP to do the heavy lifting, e.g. this.
This is also built-in to macOS in Finder: 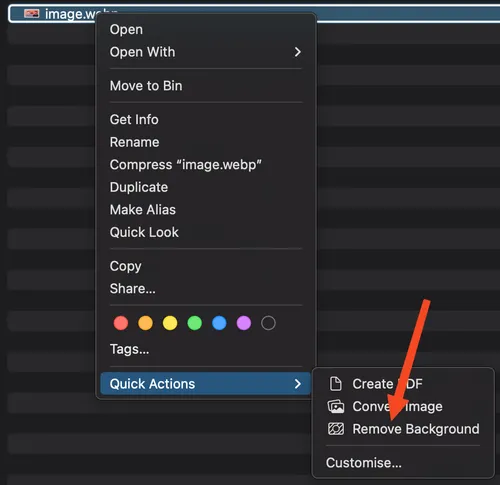
Fuzzy select (U)
Section titled “Fuzzy select (U)”You can change the threshold as you use the tool by clicking the target pixel and dragging the mouse left or right. This updates the threshold in the UI.
To outline text (reference)
Section titled “To outline text (reference)”(note: the instructions below were mine, but the reference link has better instructions)
- Put text on its own layer
- Go to Layer → Layer Boundary Size…
- This step isn’t something you do in Gimp, but pick an outline width right now in your head, which is the number of pixels of border to put around each letter. Let’s call that X.
- Increase width and height by 2X and set each offset to X
- On the text layer, do Layer → Transparency → Alpha to Selection
- (you can also right-click your layer; “Alpha to Selection” is at the bottom)
- If you don’t see your selection, then perhaps View → Show Selection is off.
- Select → Grow
- Grow by X pixels
- Make a new transparent layer (ctrl+shift+n), then place it underneath the text layer (Layer → Stack → Lower Layer)
- Edit → Fill with bg (or fg) color (ctrl+, or ctrl+.)
Tue 01/01/2013 - 09:38 PM
Hotkey list:
- N - pencil
- Shift+b paint bucket
- X - swap colors
- Ctrl+shift+E - export as picture
Do Layer → Transparency → Add Alpha Channel if pressing delete makes the background white and not transparent (it’s because you don’t have an alpha channel).
I think this note invalidates my old note from the original BL days: Select → Float in Gimp to make transparency editing easy. Then, press CTRL+L to view layers (or do windows → dockable diaogs → layers) and change the opacity.
Sat 01/05/2013 - 07:05 PM
To make the selection into a new layer:
- Copy/paste it
- Right-click the “floating selection” layer and choose “To New Layer”.
If nothing shows up in your new layer, then it’s because your source layer didn’t have anything.
You can move the selection to a new layer (instead of copying it) by floating your selection as step 1.
To make a new brush, just copy your selection, then go to Edit → Paste as → New Brush (alt+e, a, b)
Numbers 1 to 5 will zoom 1-5 times.
Troubleshooting
Section titled “Troubleshooting”Can’t find Windows fonts (reference)
Section titled “Can’t find Windows fonts (reference)”Edit → Preferences → Folders → Fonts → Add C:Windowsfonts. After that, I deleted %appdata%.localfontconfigcache (reference) and restarted (although you can also just refresh the fonts rather than restarting)
This didn’t work for locating particular fonts like Lato for some reason.
Misc. issues
Section titled “Misc. issues”12/7/2016 - changing the opacity of the layer is all-or-nothing (i.e. at >50% it is fully opaque, <50% it is invisible). The solution is to do Image → Mode → change it to RGB (it is likely indexed). For more information, this page may help.
10/30/2017 - started running into an issue where buttons just aren’t clickable anymore. I can click a button to put an outline around it, but I can’t actually select the button.
Workarounds:
- Press space after outlining a button to select it
- Give a non-Gimp window the focus, then the next click onto Gimp will work normally