OBS (Open Broadcaster Software)
Created: 2018-07-23 17:21:42 -0700 Modified: 2023-07-28 15:37:11 -0700
Setting up audio tracks
Section titled “Setting up audio tracks”My scenario:
- When live-streaming, I want people to hear my mic and my desktop audio
- When recording (for YouTube), I want all audio tracks to be separate, that way I can edit/level them differently in a video editor.
- I don’t want to keep changing my settings between live-streaming and recording.
Accomplishing this is easy:
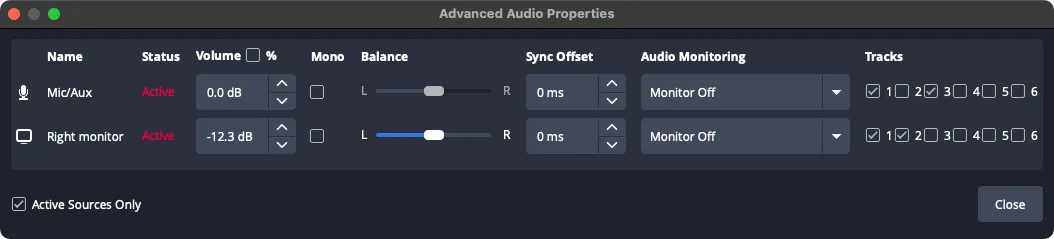
- Click the ⚙️ in “Audio Mixer” and set it up like this:
- Go to Settings → Output → Streaming Settings → Audio Track → choose track 1.
- Go to Settings → Output → Recording → Audio Track → choose tracks 2 and 3.
Notes:
- I believe you can only stream a single audio track.
- VLC and Chrome will just play the first audio track, which in the setup above will be the “Right monitor”. In VLC, you can select the other audio track. I ended up changing the track numbers so that the mic would be on track 2 and the right monitor on track 3
Multi-computer setup (with NDI)
Section titled “Multi-computer setup (with NDI)”This is great if you have a slightly weaker computer that can’t stream on its own without being stuck at 100% CPU usage.
- Download NDI tools on both machines
- Restart both machines
- If you’re not using SLOBS, then you’ll need to download the OBS plug-in for NDI on both machines. No need to restart after this.
- On the source machine, go to OBS → Tools → NDI™ output settings
- Check “Main output”
- Give it a name
- Simply by enabling it on the source machine, you’ll be able to see the output on the stream machine already. On the stream machine, add an NDI source to OBS, then choose from the “Source name” dropdown to match what you did on the source machine.
- Doing all of this changed my default communications device on Windows to be NDI, not my microphone, so to have my microphone still come in from the stream machine, I had to change the default back to the mic in Windows.
Streaming to multiple platforms via OBS directly
Section titled “Streaming to multiple platforms via OBS directly”There’s a plugin that exists for this called obs-multi-rtmp. The benefits of this over a service like Restream:
- You have less latency to each streaming service.
- You don’t rely on another service (e.g. if Restream is struggling, then you may drop frames)
- There’s no automatic branding in your streams
The downside is that it uses more of your own resources (bandwidth and CPU).
Instructions on how to use:
- Download it, unquarantine and approve it if you’re on macOS, then install it.
- In OBS, click the Docks menu and choose Multiple output.
- Think of which stream is your “main” stream (e.g. Twitch) and then set everything else up through the plugin. The main stream is set up through OBS itself as though you were not multistreaming.
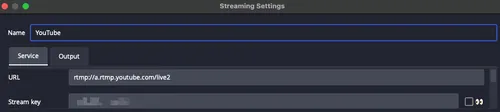
- Fill out the URL as shown below, then make sure to scroll that small section so that you can check “Use authentication” (but don’t fill out the username or password fields that pop up). This step may not be necessary, but I think it was needed in my case…?
-
- If you check the “Sync start with OBS” box, then it should automatically start streaming to that platform when you start streaming through OBS.
- If streaming to YouTube, you’ll need to click the “Go live” button at the top of any page (which brings you to a URL like this), then fill out the stream information and you should be good to go.
Capturing a large mouse cursor on Windows (reference)
Section titled “Capturing a large mouse cursor on Windows (reference)”In short:
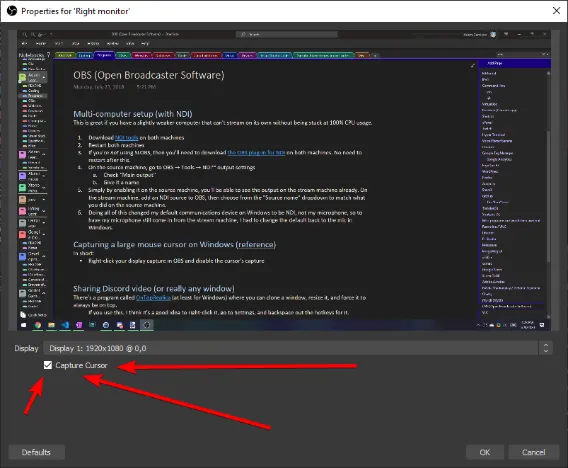
- Right-click your display capture in OBS and disable the cursor’s capture
- Open Windows Magnifier but scale it to 100% (i.e. regular size).
This doesn’t seem to work for full-screened games.
Sharing Discord video (or really any window)
Section titled “Sharing Discord video (or really any window)”There’s a program called OnTopReplica (at least for Windows) where you can clone a window, resize it, and force it to always be on top.
If you use this, I think it’s a good idea to right-click it, go to Settings, and backspace out the hotkeys for it.
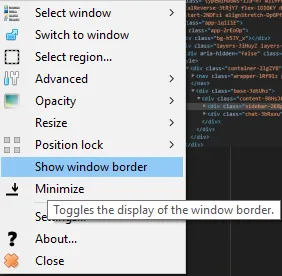
Then, make sure you right-click and turn off the window border:
After that, I think you need the window to be ON your stream as opposed to being captured from another monitor (or at least that was the case with Discord). Also, the source window can’t be minimized.
Also, hide elements in Discord via ctrl+shift+I → ctrl+shift+C → click an element → add “visibility: hidden”.
Using OBS as input for another video program (like Discord)
Section titled “Using OBS as input for another video program (like Discord)”There is a built-in “Virtual Cam” button now.
On macOS, Discord needs some special instructions (note: I added the App Management permission to iTerm and then removed it afterward).
There’s a virtualcam plug-in where you can use OBS as input, so if you have a green screen or overlays, you can share them in another program.
Process priority
Section titled “Process priority”If your CPU goes to 100% and you don’t adjust OBS’s process priority, you may end up lagging even though you don’t drop any frames. I think it’s actually because you’re just producing fewer frames (due to the encoder not being able to catch up). To address this, go to Settings → Advanced → General → Process Priority → Above Normal.
Filters
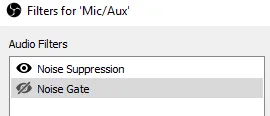
Section titled “Filters”To add an audio filter, click the gear button ⚙ next to the microphone, then click Filters. From here, you can add filters.
You can temporarily disable a filter by using the 👁 button:
Blur a portion of the screen
Section titled “Blur a portion of the screen”See this
Noise Gate
Section titled “Noise Gate”Noise Gate isn’t great for streams without music since it makes it so obvious when it activates, and there’s no way to control the release at the end (there’s just “attack”), meaning after the “noise” stops, it will wait for “release time” ms and then go from whatever volume it was at immediately down to 0. This can be jarring for some people, so I don’t use a Noise Gate on programming streams.
A limiter works by capping the maximum volume outputted from something, so the input/output table will look something like this:
| Input | Output |
|---|---|
| 1 | 1 |
| 2 | 2 |
| 3 | 3 |
| 4 | 3 |
| 5 | 3 |
| 6 | 3 |
In OBS, the lower you set the threshold, the sooner you’ll hit your maximum input level, so set it pretty low if you don’t want much dynamic range. The way you find the value you want is to play/speak quietly and see how many dB you’re registering at in OBS’s meter. Then, set the threshold just a little bit beyond that depending on how much range you want for dynamics.
Other notes about playing a piano through OBS
Section titled “Other notes about playing a piano through OBS”- Make sure the piano input sound is quiet enough so that you don’t get clipping from the source (i.e. play loudly with no filters and see if the audio monitor hits the red in OBS).
Elgato
Section titled “Elgato”I had to disable buffering from OBS for the stuttering to go away

(find this by right-clicking your capture card in OBS and going to Properties)
If you don’t get a signal, just try plugging in the HDMI cable again, not the USB cable (or else you may blue-screen). You don’t need Game Capture open/active for OBS to get the signal.
Controlling OBS through a site
Section titled “Controlling OBS through a site”There are two ways to do this:
- Through the JavaScript API (reference)
- Through websockets (reference)
- Make sure to enable the websocket server via Tools → WebSocket Server Settings. This is also where you can find and/or set your password.
Something that may be helpful is that with any browser source (let alone one that controls OBS), you can right-click it and go down to “Interact” to open the page for manual interaction (e.g. clicking buttons or scrolling): 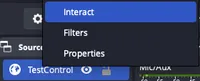
Troubleshooting
Section titled “Troubleshooting”Laptop not displaying properly (reference)
Section titled “Laptop not displaying properly (reference)”Short story: laptops typically have two video cards, so you should use Nvidia’s control panel to pick the right one.
Can’t alt+drag to crop windows (reference)
Section titled “Can’t alt+drag to crop windows (reference)”Right-click the source, edit the transform, and set the bounds to “No bounds”.
”Could not find virtual camera”
Section titled “”Could not find virtual camera””Attempting to start the virtual camera shows this:
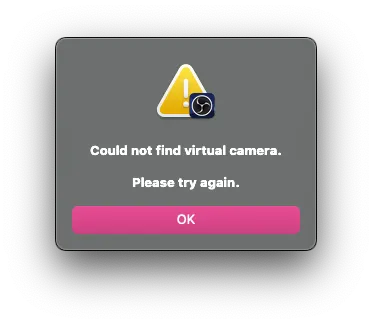 I think I just needed to reboot to fix it.