GitLab
Created: 2020-02-24 11:11:23 -0800 Modified: 2020-04-17 22:36:06 -0700
Basics
Section titled “Basics”- They have a free hosted version and a free self-hosted version. The paid plan names are different based on which version you’re using (e.g. “Starter” vs. “Bronze”) (reference).
- Projects are either public, internal, or private. Internal projects are ones that require you to be logged in to see, but you don’t need any special access granted. Private projects are ones that require someone to actually add you to the project.
- Users can have specific roles that are affected by the project type in some cases (reference).
- Groups are collections of projects. They’re also called namespaces in some spots. You can add an existing project to a group through the project’s settings (reference). By doing this, the group itself becomes the owner.
- Members of a group can see all other members of the group.
- You can’t just toggle the visibility of a project that’s owned by a private group. Instead, you either have to change the visibility of the group, or you have to transfer ownership to a public group and also make the project public.
REST API basics
Section titled “REST API basics”- You can access the API either using a personal access token or a set of OAuth tokens. The personal tokens have an optional expiration date. Also, according to this section, “Personal access tokens are required when Two-Factor Authentication (2FA) is enabled.”
- You can create or revoke tokens here. After creating them, you cannot see them again.
- Add a user to a group
- They will get an email when you add them, but that email is just an alert, NOT a confirmation. That means that as soon as you call the API, they’re in your group.
- Remove a user from a group
- Fetching a user can be done directly in your browser since it’s a GET request: https://gitlab.com/api/v4/users?username=USERNAME (reference)
- Access levels are just numbers (10, 20, 30, 40, or 50) (reference).
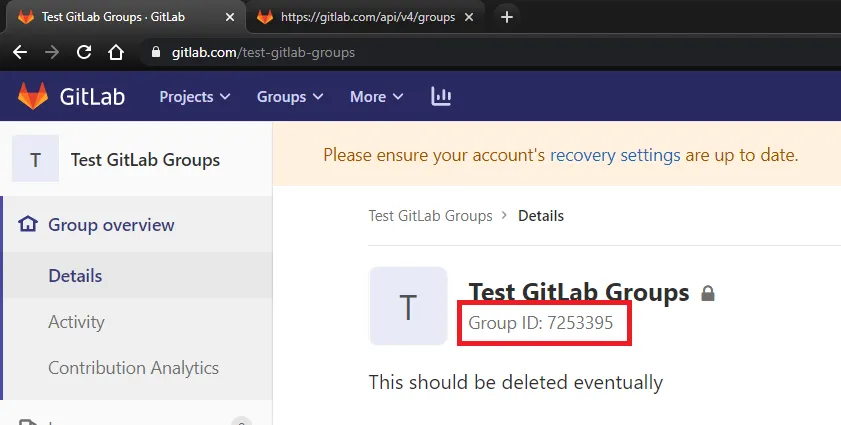
- To get a group ID, you can do so right on the site in Group overview → Details:
- You can also do this by accessing this page in your browser: https://gitlab.com/api/v4/groups
gitbeaker (reference)
Section titled “gitbeaker (reference)”Basics
Section titled “Basics”- This properly abides by GitLab’s rate limit (see some code for this here)
- I think it’s easiest to just look through their TypeScript files to see which APIs are available and how to call them. For example, I wanted to list all of a group’s members, so I went to GroupMembers.ts, found that it’s a simple wrapper around ResourceMembers.ts, then found the all function which mimics the call to the underlying GitLab API that I wanted to call.
Sample code
Section titled “Sample code”Here’s a simple function that will add the specified user to a hard-coded group ID:
async function exampleFnToAddUserToGroup(username) {    const [resp] = await api.Users.all({ username });    const {id: userId} = resp;
    const groupId = '7253395'; // I just got this from GitLab's site itself    const accessLevel = 20; // "Reporter" level    await api.GroupMembers.add(groupId, userId, accessLevel);}
Modifying and then merging merge requests (keyword: pull request, PR)
Section titled “Modifying and then merging merge requests (keyword: pull request, PR)”- Checkout out a merge request
- First, it’s a good idea to make sure that you don’t already have the branch that you’re checking out. When I was doing this, I got an error saying “fatal: A branch named ‘FOO’ already exists.”, so I just did “git checkout master” followed by “git branch -d FOO”.
- See farther down in this note for the good instructions (alternate reference)
- You may want to merge master into the branch (“git pull origin master”) in case the other person didn’t, but this depends on what you expect from the branch.
After making changes, you can’t push back to the original merge request like you can on GitHub (reference). Instead, you have to make a new PR:
- “git push”
- It’ll give you a command for setting the upstream to the branch you’re on; run that.
- It’ll then give you a link for how to make a new merge request (right on the command line). Click that.
- Type “!5” (change the 5 of course) in the new merge request to link back to merge request #5 so that you don’t lose the original discussion.
- It’ll automatically close the original merge request that yours was based on.
- Switch branches back to your original branch so that you don’t keep committing to the merge-request branch
The proper way of doing things is to merge into the original branch and then use the GitLab UI to do this.
- If you get the “detached head” message, then you need to make a branch with the changes that you have, then merge back into master.
- git checkout master
- git merge your-branch-name
Troubleshooting
Section titled “Troubleshooting”remote: The project you were looking for could not be found.
Section titled “remote: The project you were looking for could not be found.”This happened when I used the GitLab-supplied commands for checking out a PR’s branch. I think this is when the user doesn’t make their repo public. I was able to get things working anyway with these instructions:
- Modify ./.git/config in your project to include this alias (note: the “[alias]” block may already exist in your config):
[alias]
mr = !sh -c ‘git fetch 2/head:mr-2 && git checkout mr-2’ -
- Do “git mr origin 6”, where 6 is the number of the merge request.