Docker
Created: 2016-02-08 09:10:13 -0800 Modified: 2023-12-17 15:38:24 -0800
Basics
Section titled “Basics”- Introductory tutorial (reference)
- On macOS, consider installing something like OrbStack or Rancher Desktop, that way you don’t have to run a Docker Desktop kind of thing (and either have a daemon running or run as the root user). Also, apparently Docker is slow on macOS. I wouldn’t recommend using podman (see podman#Using from macOS).
- Docker cheat sheet
- The most important thing when stuck trying to write/debug a Dockerfile is to just build the Dockerfile manually/imperatively. For example, maybe you can’t figure out why an “npm” command isn’t installing the right thing. Instead of changing the Dockerfile, just run “docker run —entrypoint /bin/bash -it node:16” and manually run the npm commands yourself to test it.
- “docker exec” is really helpful
- Similarly, to connect to a container running in a Kubernetes pod, you can use “kubectl exec” (reference)
- Docker Layer Caching is a premium feature (reference). I’m pretty sure you get premium features just by paying any amount of money.
- You can use Dive to explore each layer of a Docker image. I didn’t have much luck with this myself though and haven’t written extensive notes on it.
- “docker stats” will show you CPU/memory/network/disk usage.
- The Docker container runtime doesn’t virtualize the CPU, so container images need to match the architecture of the host.
- To automatically look for a new Docker image to be published and restart using it, you can use Watchtower. Here’s an Ansible configuration that I have for it.
- If all you care about is keeping a container running forever, just make a simple
compose.yamlfile withrestart: unless-stopped.
- If all you care about is keeping a container running forever, just make a simple
- The mechanism by which resources (e.g. CPU, memory, I/O, network) are limited is cgroups (AKA “control groups”) (reference)
- Docker’s versioning itself changed schemes as of 1.13, so they went from 1.13 straight to 17.03.
- The “latest” tag is applied if you don’t specify any other tag, and general guidance is to never rely on it so that you always have to specify a version (reference).
- Anywhere that you find a command that takes container ID, you only need to specify as much of the ID as makes it unique (so “616abcde” could just “616” usually). You could specify the full container name if you’d like, e.g. wonderful_davinci. If you prefer using the name, then you should probably assign a name by yourself at run time (docker run —name foo).
- You can remove a bunch of Docker cruft by doing ”$ docker system prune”
- Simple way to run a shell in an image that you’re unfamiliar with to see what’s installed
- $ docker run —entrypoint /bin/sh -it circleci/terraform:0.11.10
- CE (community edition) vs. EE (enterprise edition) (reference)
- EE is paid
- EE provides slightly more features
- CE can still be used in commercial applications
- Installation on Debian (reference) - the instructions are straightforward, however, you also have to run the post-install tasks (reference)
- The post-install instructions have you add your user to the “docker” group and start Docker on system startup
- Installation on Windows (reference) - this requires Hyper-V to be enabled, which stops VirtualBox from working even for VMs that weren’t created via Docker
- Part of the installation that you’re probably going to want to run is to add yourself to the “docker” group so that you don’t need to run with “sudo” every time (reference). Just keep in mind that if you’re going to do this, you should be aware of the security implications (reference).
- When you run ”$ docker login”, it stores your password unencrypted into config.json. If you don’t want this behavior, then you can set up a credentials-store (reference). I’m going to use “pass” (sudo apt-get install pass).
- Changes to a service can be applied in-place, so for example, if you have 5 tasks running in a service and need two extra tasks, you can change your docker-compose.yml, then rerun “docker stack deploy” and you will only modify two tasks instead of recreating the original five.
- You can parameterize Docker files with build arguments (SO reference, official docs). Here’s a simple example:
FROM node:alpineARG fooRUN echo Foo is: $fooBe careful: if you have an ARG manifested that you don’t actually provide, Docker will not produce an error. To get it to produce an error, you should use “RUN test -n $foo” (reference) (“test” exists even in Alpine). Note that the values of ARGs are reset at the end of every build phase, so to use an argument in multiple phases, redefine the “ARG” in each phase (reference).
To build this Dockerfile with a particular argument, just do the following:
docker build --build-arg foo=bar . -t adam13531/dockertestYou can also test the values of arguments, e.g. like this:
ARG SKIP_INSTALLING_DEV_DEPS=false
RUN if [ "$SKIP_INSTALLING_DEV_DEPS" = "false" ]; then echo "installing"; fi
↑ This is an example of conditional logic (reference)
- “Wrapping” another Dockerfile is easy and typically recommended. For example, at one point, I wanted to add the “zip” utility to CircleCI’s Terraform image, so I only had to write out four lines:
FROM circleci/terraform:0.11.10
USER rootRUN apk --no-cache add zipUSER terraform- You can use one setup to build your code and then use a more production-friendly image to run your code. For example, docker-alpine is a good starting image for most “final” images since it’s 5 MB. Even better could be Distroless to really trim the image size.
- The major reasons to try to trim a image’s size:
- Cost (storage in a private cloud may cost money)
- Installation time (talking about the network traffic here combined with unpacking and installing)
- Security (even cURL has had vulnerabilities!)
- [14:43] M3talstorm: @Adam13531 The thing with alpine is that it uses a different package manager (apk) so you cant just do the normal apt-get … so you are limited by what people stick up there, but most of the time they have the same as things like apt-get. The other thing is it uses a different C compiler and linker, so youll need some/small understanding of that. Alpine wont come with almost every tool you are used to, even ‘low’ level commands
- The major reasons to try to trim a image’s size:
Podman
Section titled “Podman”- Install: “brew install podman podman-compose”
- Run: “podman run hello-world”
- This will get you to set up a machine.
Terminology
Section titled “Terminology”- Image: an executable package with everything needed to run an application: code, runtime libraries, etc. This is typically generated from a Dockerfile.
- Container: what an image becomes in memory (i.e. it has user state in it too).
- Service: defines how containers behave in production. You may have a service for the database, one for the front-end, etc. A service only runs one image, but it figures out how many replicas of the container it should run, on which ports, etc.
- Dockerfile: the configuration file for an image
- Task: a single container running in a service.
- Swarm: a cluster of multiple machines running containers
- Node: a machine in a swarm
- Swarm manager: the node(s) in a cluster that can run Docker commands on other nodes
- Worker: a node that is not a manager
- Stack: a group of interrelated services that share dependencies
- Layer: in a Dockerfile, each instruction that modifies the image is another layer.
Tutorial learnings
Section titled “Tutorial learnings”- You can map a host’s ports to particular ports in the Docker container so that the container can think that it’s running on, say, port 80, when the host exposes it as port 4000.
uid_entrypoint
Section titled “uid_entrypoint”Every once in a while, you may see this being used as an entrypoint, e.g. here. It corresponds to this script, and the reason for its existence is:
HiDeoo: Adam13531 Because the user ID of the container is generated dynamically, it will not have an associated entry in /etc/passwd. This can cause problems for applications that expect to be able to look up their user ID like Verdaccio does HiDeoo: Basically, they create /etc/passwd at the end
Connecting to MySQL on the host machine from inside a container (reference)
Section titled “Connecting to MySQL on the host machine from inside a container (reference)”This was very easy to do:
- Run the container that you want to connect from, that way you can inspect it.
- $ docker inspect <container-id-or-name> | grep Gateway
- Use the IP address that you see (e.g. 172.24.0.1) as the MySQL host.
That’s it! That should work. You may need to change the IP address if the docker-compose network ever changes (although I didn’t seem to have to between runs of the service, but maybe after rebooting…?).
Docker in Docker
Section titled “Docker in Docker”The official Docker image has a “Docker in Docker” version (AKA “dind”, so the image is docker:dind). The warning about TLS was not clear to me that it’s now on by default for newer versions, meaning it listens on port 2376 via https. If you want to listen on 2375 via http, specify a DOCKER_TLS_CERTDIR of "" (empty quotes).
Connecting two related services using docker-compose
Section titled “Connecting two related services using docker-compose”For some reason, I couldn’t connect when I tried specifying “localhost”. The Docker host’s IP address (e.g. 172.24.0.1) worked and so did the name of the service that I was trying to connect to, e.g.
version: '3'services:  overseer:    image: 212785478310.dkr.ecr.us-west-2.amazonaws.com/botland/overseer:1.0.68    networks:      - overlay    ports:      - '8080:8080'  game-server:    image:      212785478310.dkr.ecr.us-west-2.amazonaws.com/botland/game-server:0.0.57    networks:      - overlay    environment:      overseerRestHost: overseer
networks:  ? overlay
Note: if you ever had to specify something like “overseerFullUrl”, you could do “https://overseer:8080”.
[11:06] itsboek: so each container has its own localhost. When you use the ip address of the docker host it’s just accessing the container through the host / exposed ports. Docker-compose creates /etc/hosts entries for all the containers
Connecting to a MySQL container using docker-compose
Section titled “Connecting to a MySQL container using docker-compose”I just borrowed EJ’s docker-compose.yml and made some changes:
version: '3'services: overseer: image: botland/overseer:1.0.58 ports: - '8080:8080' depends_on: - mysql environment: some_env_key: some_env_valuemysql: image: mysql:5.7 ports: - 33306:3306 environment: MYSQL_HOST: localhost MYSQL_DATABASE: botland MYSQL_ROOT_PASSWORD: password MYSQL_USER: Adam MYSQL_PASSWORD: password volumes: - /storage/docker/mysql-datadir:/var/lib/mysqlEJ also had this section for MySQL that isn’t actually needed (“until it is needed Kappa”):
command: - --sql-mode=NO_ENGINE_SUBSTITUTION - --max_connections=9999Notes:
- The reason I didn’t use this for my local testing for Bot Land is because I would’ve needed to setup database creation/migration.
- While “depends_on” will wait for a container to start, it doesn’t necessarily mean that the database is ready to be used, in which case you may want to use this resource: https://docs.docker.com/compose/startup-order/
Health checks
Section titled “Health checks”Frequently, you may think to use curl to do health checks on a URL inside your container. This isn’t the worst, but if you’re running Node inside your container, you should probably look at this. They suggest writing a Node health-check client instead of using curl for image size and portability.
As for performing health checks on the command line, you can do something like this:
docker run \--env-file .env.development -e databaseHost=172.24.0.1 \--health-cmd "curl -f http://localhost:8080/test" \--health-interval 1s \--health-retries 2 \--health-start-period 5s \--health-timeout 2s \-it 212785478310.dkr.ecr.us-west-2.amazonaws.com/botland/overseer:latestKeep in mind that unhealthy Docker containers are not automatically killed unless they’re marked as “essential” in a swarm. To see if a container is unhealthy, just do “docker ps” and you’ll see it in the “Status” column. To view more about the health checks, use this command while the first container is running
docker inspect --format "{{json .State.Health }}" <container id> | jq
For something like PostgreSQL, someone made a repo specifically to demonstrate its health checks.
Alpine Linux
Section titled “Alpine Linux”I made a separate note about this here.
Installing a NodeJS module on top of an existing Docker image
Section titled “Installing a NodeJS module on top of an existing Docker image”I was in a situation where I wanted to put a plugin into the Verdaccio image. I originally tried using “yarn add”, but then I would need to copy the entirety of node_modules (not just the target plug-in since it had dependencies), so I instead cloned the whole repo inside the plug-in directory.
Common commands
Section titled “Common commands”- Keep in mind that there are shortened versions of some commands, e.g. “docker container stop” is the same as “docker stop”. However, “docker container ls” is not the same as “docker ls” (it’s instead “docker ps”).
- See what’s using space: $ docker system df
- List all containers: $ docker ps [-a]
- “-a” will list even stopped containers
- Remove stopped containers from the list: $ docker container prune
- Remove all containers: (docker ps -a -q)
- To clean up all images: docker image prune -a
- This requires that you don’t have containers (even stopped containers) using those images, so you can do “docker container prune” to get rid of the stopped containers.
- Check statistics of a container like RAM usage and CPU: ”$ docker stats”
- Delete stopped container:
- $ docker rm {hash or image name}
- You can stop and delete a running container with “-f” (to force stopping it).
- Just stop a container: $ docker stop {hash or image name}
- Stop all containers: docker stop $(docker ps -a -q)
- Stop an entire stack: $ docker stack rm {name of stack}
- (you can list the stacks with $ docker stack ls)
- Building, pushing, etc. (reference)
docker build -t botland/verdaccio:latest . # Create image using this directory’s Dockerfile and tag with “latest”
docker tag <image> username/repository:tag # Tag <image> for upload to registry
docker login # Login to the registry so that you can push
docker push username/repository:tag # Upload tagged image to registry
docker run username/repository:tag
Random tips
Section titled “Random tips”- You can change the format of “docker ps” via config.json (reference)
- To SSH into a machine that docker-machine created, just do something like $ docker-machine ssh myvm1
- General guidance is that you should never run as PID 1 (reference). To stop doing this, simply call “docker —init run” instead of just “docker run”. There is no need to add ENTRYPOINT as long as you’re on a new enough version of Docker (>2017 I believe).
This is supported in AWS via initProcessEnabled (reference1, reference2):
"linuxParameters": { "initProcessEnabled": true },To use this from Terraform, you have to add it to your container definition though (reference)
Getting started with a brand new container that you want to test
Section titled “Getting started with a brand new container that you want to test”…if you have a Docker image somewhere already that you can pull
Section titled “…if you have a Docker image somewhere already that you can pull”Whenever you see a “docker pull” command on a GitHub repo or something, I think these steps can be helpful to go through:
- Create a VM to run the container: $ docker-machine create —driver virtualbox myvm1
- Ensure that it’s running: $ docker-machine ls
- If it isn’t running but it was created, then start it (this is helpful if you know that you created it but had stopped it): $ docker-machine start myvm1
- To make it easier to execute commands, run the Docker machine shell environment: $ docker-machine env myvm1
- Make sure to copy/paste the last line from the output of that command.
- Ensure that the last step worked: $ docker-machine ls
- You should see a * next to myvm1.
- If this doesn’t work or you ever need to run a command on a different machine, you can do this: $ docker-machine ssh myvm1 “docker container ls”
- Alternatively, you can do “docker-machine ssh myvm1” with no command following it to just SSH into the machine and set some things up for yourself.
- Run the “docker pull” command from GitHub or the instructions page that you’re following
…if you have a Dockerfile
Section titled “…if you have a Dockerfile”- Build the image: ”$ docker build -t botland/verdaccio .”
- Run the image: ”$ docker run -p 8080:80 botland/verdaccio”
- Note: the “-p” is to expose ports from the host, so 8080 would go to 80 in the container.
- On Windows, note that the IP address of the container doesn’t matter; just connect via localhost with the port you specified.
Writing Dockerfiles (tips, reference)
Section titled “Writing Dockerfiles (tips, reference)”Quick guide
Section titled “Quick guide”- A simple way of seeing what a particular directory looks like is just to add
lsdirectly into Docker:RUN ls -lah, then run yourbuildcommand with--progress=plain. This is especially helpful if your build is failing so that you can figure out what the filesystem looks like.- Alternatively, you could trim the steps down to the successful ones and then run that image on its own.
- The
--entrypointargument will let you quickly jump into a shell:docker run --entrypoint /bin/sh -it circleci/terraform:0.11.10- (note: the shell’s name may be
ashorbash)
- (note: the shell’s name may be
Basics of writing Dockerfiles
Section titled “Basics of writing Dockerfiles”- Dockerfiles are a series of layers that are run in order. Docker builds try to locally cache intermediate images since images are just formed from other images combined with layers one at a time. Because of this, you’ll want to put the commands that will change least frequently at the top of your Dockerfile so that you can cache layers (and then reuse the cached layers) for as long as possible.
- Only ADD and COPY instructions are going to compare the actual results of the instructions (reference). For example, if you say to ADD from a GitHub repo and the repo gets updated, then the cache will also be updated. However, if you say to “RUN apt-get -y update”, then it will fetch from the repo, but it won’t update the cache because “RUN” is not “ADD” or “COPY”. In those cases, you may want to specify “—no-cache=true” when running “docker build”.
- When you call “docker build”, the working directory is considered the build context. I believe that if you were to run, say, a COPY command from inside the Dockerfile that ”/” would refer to the build context.
- Rather than using “CD” from inside the container, just set WORKDIR and act based on that (reference). Nothing is run from the client machine (reference). The paths for WORKDIR should always be specified as absolute paths (but then when you use them, they’re still relative, e.g. “WORKDIR /foo/bar” “COPY baz ./”). The WORKDIR will be created if it doesn’t exist. WORKDIR can exist multiple times in the same file and most commands (e.g. RUN and CMD) will be based on the last WORKDIR that you set.
- .dockerignore works like how .gitignore does (some info here). I assume it’s helpful for when you are copying directories that may have cruft or secrets that you don’t want in the image.
- Don’t include anything unnecessary, e.g. a text editor for a database image.
- Keep each container to one purpose. E.g. don’t have the web server and the database be in the same container. This helps horizontal scalability.
- Sort multi-line arguments, e.g. “foo \ —bar \ —baz \ —qux”.
- FROM: try to include official images as your basis.
- LABEL: you can use as many as you want. They’re just key/value pairs. You can use them for things like a version, release-date, etc.
- RUN: split into multiple lines with backslashes to make them more readable (reference). Note that in the reference, you see just backslashes with no ”&&” because those are arguments, not multiple commands.
- Also, when possible, combine multiple similar RUN statements (e.g. several “RUN apt-get”) so that you only produce one cache layer.
- Keep in mind that “RUN” is run on the container. Only COPY/ADD are run from the host.
- APT-GET (reference): there are some gotchas here to read through if you find yourself using “RUN apt-get”.
- Always combine “apt-get update” with installations, e.g. “RUN apt-get update && apt-get install -y package-bar”
- Note that if you’re doing “apk update” and then “apk add —no-cache” that you should instead be doing “apk add —update —no-cache” since the update itself will leave a cache in /var/cache/apk.
- Always combine “apt-get update” with installations, e.g. “RUN apt-get update && apt-get install -y package-bar”
- PIPES: be careful about piping failure values since it may not work how you expect. Read more here.
- COPY vs. ADD: they suggest just using “COPY” when possible. “ADD” can be used to auto-extract TAR files.
- COPY: it’s suggested that you explicitly copy files that you expect to change frequently (reference). For example, if you’re going to copy all of “./” to the container, but “./requirements.txt” is going to change a lot, then you should do “COPY ./requirements.txt /”, then maybe use that file with a RUN command, then make another COPY line like “COPY ./ /“.
- ENTRYPOINT (reference): this can be used to just let you launch an image like “docker run game_server” and just have it start automatically.
- Be careful about running Node applications as PID 1, which is how ENTRYPOINT works by default (reference).
- USER: when you don’t need specific privileges, make a new user with this command. Be careful about doing this before commands like “RUN apk —no-cache add curl” as it will change who you try to install packages as.
- If the base image that you sourced via “FROM” already specified the user and you have to do something as root, then do “USER root” before your command, then revert with “USER foo” afterward.
- ENV (reference): these persist even when the container is run
Multi-stage builds (reference)
Section titled “Multi-stage builds (reference)”The general concept here is that you use multiple “FROM” statements—first, you make something like a foundational image that has your application’s dependencies. This may include build resources that aren’t actually needed by your final image. For example, suppose you do “RUN apt-get install foo”; this could cache build artifacts that you clearly don’t need in your final image. So you do something like “FROM scratch” and then copy your application’s resources (e.g. code/assets), but by doing so, you won’t have the build cruft from the first “FROM”.
Multi-stage builds let you include tools and debug information in intermediate phases but not bake those into the final image. For example, you could run your tests while you’re producing the image. For another example, if building a Node program, you would likely want to clear dev dependencies from node_modules.
When using multi-stage builds, you will likely have to make certain things explicit like “USER” or “WORKDIR” as opposed to assuming that they’ll carry over
You can copy directly from another image if you’d like so that you don’t need to add another “FROM” command (reference):
COPY --from=nginx:latest /etc/nginx/nginx.conf /nginx.confThe “scratch” image
Section titled “The “scratch” image”This is essentially nothing, as in it’s not even an OS that’s going to get installed. This means that there are no CA certs, so if you want to use HTTPS requests from inside the container, you’d need to copy the CA certs into the container’s image (reference).
Sample Dockerfile that I wrote (with lots of help)
Section titled “Sample Dockerfile that I wrote (with lots of help)”The goal of the Dockerfile was to add a plug-in to Verdaccio called verdaccio-s3-storage. My original hunch was to just add some “yarn add” commands to the base image, but that wasn’t a good idea because they expect /verdaccio/plugins/name/node_modules, so I’d need to copy all deps to the proper location and the actual lib folder to /verdaccio/plugins/name/lib, the package.json to /verdaccio/plugins/name/package.json, etc. It was a mess.
thesbros99 talked about this:
[15:09] thesbros99: Downloading an npm module into a folder, pushing it to vcs and mounting it into the container doesn’t sound like great practice
[15:09] thesbros99: But that’s what the verdaccio docs suggest..
[15:11] thesbros99: The verdaccio example says you should just npm install your plugin in a folder and then mount that as a volume.
What we settled on in the end was cloning the Git repo for the Node module, installing dependencies (“yarn”), building (“yarn build”), and then copying all of the build products to the correct directory. In order to facilitate this, I used a multi-stage build; I start from node:alpine so that we have Node/Yarn. I install “git”, then run the steps above. Then, when we do “FROM verdaccio/verdaccio”, we won’t have anything in the image from the first stage of the build. Thus, we need to copy from the first stage into the current stage.
FROM node:alpine as NODE_ALPINE_STAGE
USER rootWORKDIR /verdaccio/pluginsRUN apk --no-cache add gitRUN git clone https://github.com/Remitly/verdaccio-s3-storage.git
WORKDIR /verdaccio/plugins/verdaccio-s3-storage
# Their yarn.lock is messed up. At the very least, it points to an internal NPM# registry for a TGZ file.RUN rm yarn.lock
# This will never fail because it's a fresh container.RUN mkdir libRUN yarn && \    yarn build
FROM verdaccio/verdaccioUSER rootWORKDIR /verdaccio/pluginsCOPY --from=NODE_ALPINE_STAGE /verdaccio/plugins/verdaccio-s3-storage ./verdaccio-s3-storage
RUN apk --no-cache add curlUSER verdaccioWORKDIR /verdaccio/conf
COPY --chown=verdaccio:verdaccio htpasswd config.yaml ./
Docker and NodeJS
Section titled “Docker and NodeJS”I made a separate note about this: Docker-and-NodeJS.
If you find yourself using “-v” when running Docker, you’ll [likely] be using “bind mounting” to mount a directory on the host from inside the container (for full disclosure: apparently you can use “-v” even with volumes, but they suggest using “—mount” for that; see syntax example below). While this generally works, there are a bunch of benefits explained at the reference link for using volumes. You can only use “—mount” with standalone containers as of Docker 17.
Remember that volumes will get created on the host (which, if you’re using docker-machine, is not necessarily your top-level OS). By doing ” docker inspect name_of_volume”, you can see where it’s mounted from on the host. If you SSH into the host, you can then check out that directory to see everything just like how the container would see it (although you may need to use “sudo su” to be able to see everything without having to use “sudo” every time).
Bind syntax: host:container, e.g. -v ~/path/on/host:/path/on/container
Mount syntax: docker run —mount src=”$(pwd)“,target=/foo,type=bind IMAGE_NAME —input /foo/some_file.txt
↑ if your local directory has “some_file.txt”, it’ll now exist in “/foo” in the container.
PID-1 processes and --init
Section titled “PID-1 processes and --init”Here’s a reference link:
If you find that you can’t press control-C to kill your Docker container, then it’s probably because the signal isn’t being sent to your process. Docker runs your main process as PID 1. If that process is a shell script that starts another process (e.g. node main.js), then signals won’t be propagated to the child process.
Originally, you would have to use something like tini for addressing this, but it’s now built-in to Docker with the --init flag. However, you may still need the -i (“interactive”) and -t (“TTY”) flags so that the signal is processed, and in that case, the --init flag isn’t needed at all. If, at some point in the future, I’ve made sense of this with more examples, then I should modify these notes.
Docker on macOS
Section titled “Docker on macOS”--net=hostdoes not work (reference)! You can either map ports with-p 3000:3000, or you can make a network and pass that around everywhere (reference).
Basics
Section titled “Basics”The tutorial for swarms has you configure two VMs and then access either of them. The docker-compose.yml file specifies a load-balanced overlay network (which is the default network when you just say ”? webnet” in the YAML file):
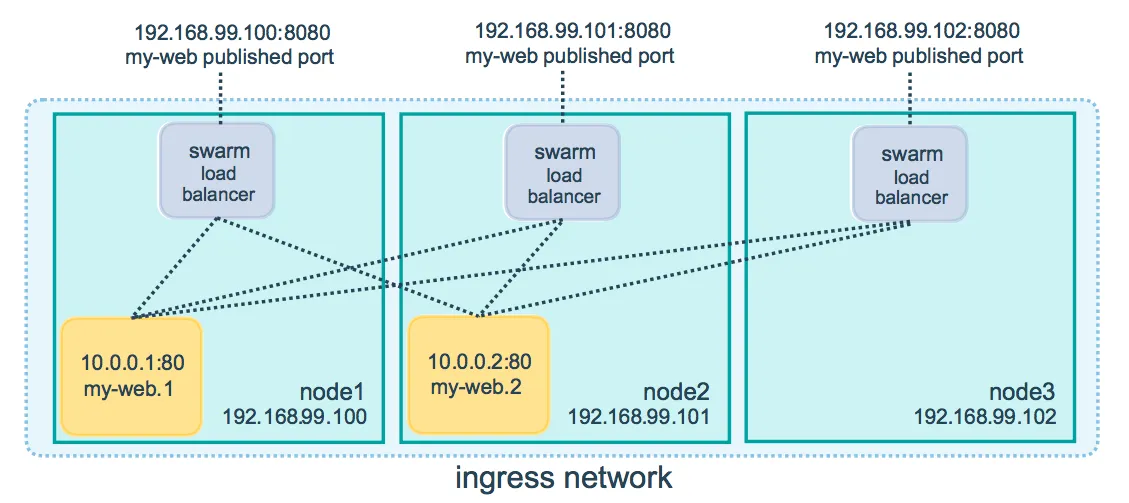
This is what allows you to contact any of the VMs and have all of the different nodes get hit.
One of the things that I learned through this tutorial is how exactly a particular service like Redis will persist data. Redis is an in-memory cache that can persist to disk. In the tutorial, they have you set up two nodes where one is a manager. The manager is given Redis and persists to the host’s disk as opposed to the container’s. This allows redeploys of the application to pick up right where it left off. However, this incurs certain constraints:
- The Redis service always needs to run on the exact same node, not just on the manager. That means that if you made myvm2 into the manager, it would no longer have the same folder set up for Redis.
- Likewise, if you have multiple managers, it would be up to the service to figure out how to communicate such that it’s using the “correct” filesystem.
When I talked to chat about this, there were various responses:
14:06 DigitalSparky this is where kubernetes and tools like supergiant.io work well, as they can remount EBS/network volumes automatically
14:06 smu4242 in kubernetes there is some kind of tagging (forgot what it’s called) which u can use to force service to run on a particular host
14:07 DigitalSparky on AWS and DigitalOcean for example, it automatically mounts the volume, then starts the image.. when the image is stopped it unmounts
14:08 hoeindoe For kubernetes there is diffrent volume types, ones that only last lifetime of node, others that are backed by persistent storage and move with the node, but they are obvs slower to read/write.
[14:09] DigitalSparky: if you have multiple managers, you’ll need to use NFS type filesystems, or have the application use out of band file storage like s3
[14:09] turup12: Ideally you shouldn’t depend on host storage and instead use a cloud storage plugin.
[14:10] DigitalSparky: so if you’re relying on redis 100% for storage, then you start multiple redis instances that write locally, and then cluster them together
Summary of the above: when using this in production, you’re probably going to be spinning up and down VMs via orchestration software, so you aren’t going to rely on a particular folder on a particular host any longer since you’ll likely be storing something in the cloud. You can still use the filesystem (either in the container or the host) for temporary storage.
Secrets in a swarm: read this.
docker-machine (reference)
Section titled “docker-machine (reference)”This is a tool used to create another machine for use by a swarm. It doesn’t have to be VirtualBox backing it; it could be a cloud platform. Note that when you do this, the created machine (e.g. the VM) is considered “the host”, not the operating system from which you ran docker-machine. This makes sense when you think about it from a cloud perspective, but it may be less obvious when you’re running on your own computer.
For example, the “-e” argument sets an environment variable on the target
The “-v” argument binds to the filesystem of the host
However, one thing that’s a little bit tough is environment variables in the shell. For example, suppose I’m on Windows and I use docker-machine to create a VM that is supposed to run a container. If I type something like “docker run -it —rm —name verdaccio -p 4873:4873 -v %this_is_a_windows_env_var%/conf:/verdaccio/conf”, then this will actually expand the environment variable in the shell (which is on Windows), so you would set it ahead of time with “set this_is_a_windows_env_var=foo”.
I was mostly running Docker from inside VirtualBox (on Linux VMs), but in order to test swarm functionality from the tutorial, I needed to have docker-machine from outside of VirtualBox. This meant installing Docker on Windows, which FYI does not let you customize the installation path. It asked me to log out after installing, but I ignored that and instead configured my PATH variable to have C:Program FilesDockerDockerresourcesbin in it.
Running commands on another machine/container (AKA “connecting to a machine”)
Section titled “Running commands on another machine/container (AKA “connecting to a machine”)”To run commands on a target machine, you typically do something like this:
docker-machine ssh myvm1 “docker node ls”
However, you can also do
docker-machine env <machine>
This gives you a command that you have to run (just copy/paste the last line and execute that). To test if it worked, do ”$ docker-machine ls” from the host.
If you’re going to do this, you’ll need to know that you’ve done it so that you don’t shoot yourself in the foot, e.g. by trying to run a “build” command from within a container. In Command Prompt on Windows, you can just do something like “set PROMPT=whale ^> ”, and in all other environments, look at something like this. For Windows, I wrote a quick script to do this:
@echo offif "%1"=="" goto :error
docker-machine env %1
set test= hset space=%test:~0,1%set PROMPT=docker-env %1^>%space%
echo Don't forget to run the last command that just printed out.
goto :EOF
:errorecho You need to type the name of the machine to connect to.
You can reconfigure a shell to talk to a different machine by simply rerunning the command.
If you don’t even have a machine necessarily (e.g. Docker on Windows), you can just run a shell in the container:
docker exec -it {container ID} /bin/sh
(remember: “/bin/ash” is the shell on Alpine Linux, not “sh”)
Alternatively, to log in as root, you can do this
docker exec -it -u 0 {container ID} /bin/sh
If your container is dying before you can run that command, then try this:
docker run -p 4873:4873 -it botland/verdaccio /bin/sh
This won’t exit immediately because sh is running in it.
If your container won’t start up due to its entrypoint, then you can override the entrypoint via the command line (reference):
—entrypoint /bin/bash
↑ Make sure to put that BEFORE you specify the image in “run”, e.g.
docker run —entrypoint /bin/sh -it circleci/terraform:0.11.10
Setting up an AWS EC2 instance to use a Docker image
Section titled “Setting up an AWS EC2 instance to use a Docker image”If you ever have a Docker image in AWS’s ECR and you want to launch it on an EC2 instance for testing, you can run the following steps:
- Launch an EC2 instance. I chose the AMI that had “Docker” in the description, but apparently there’s an ECS-optimized image that may be a better candidate (reference).
- Get your credentials on the machine so that you can pull from ECR: ”$ aws configure”
- Install Docker: ”$ sudo yum install docker”
- sudo service docker start
- sudo usermod -aG docker $USER
- Log out and log back in to the machine
- Log in to ECR:
- $(aws ecr get-login —no-include-email —region us-west-2)
- docker run -it foo/bar:latest
Troubleshooting
Section titled “Troubleshooting”File didn’t copy to the target machine (typically a dotfile or hidden file) AKA “COPY failed”
Section titled “File didn’t copy to the target machine (typically a dotfile or hidden file) AKA “COPY failed””This is almost certainly because your .dockerignore is ignoring the file. There’s no obvious way to figure this out short of looking at your .dockerignore.
.dockerignore doesn’t seem to be working
Section titled “.dockerignore doesn’t seem to be working”There are several potential issues:
- You didn’t specify the right root directory; the .dockerignore file is pulled from the root that you specify in “docker build”, e.g. “docker build ../.. Dockerfile”. To see if you’re specifying the right directory, you could try making your entire .dockerignore file be a single asterisk, that way EVERYTHING is ignored. If you don’t see it copying 0 MB over, then you are clearly choosing the wrong file.
- You are running into a bug like this one where Docker simply doesn’t allow including paths with wildcards in the middle, e.g. !packages/*/package.json
If .dockerignore is being used and you’re just not sure if you’re matching the right paths, you can use this Dockerfile to inspect quickly:
FROM alpine
WORKDIR /context
ADD . .
# You can also replace the CMD by ["find"] but this would list everything on stdout.CMD ["/bin/sh"]
Cannot login
Section titled “Cannot login”I had login issues and originally thought that I needed to use my email address to log in, but I found out that I either typed my username in all lowercase or they force all-lowercase names, so the solution is to just type your username in lowercase whenever you log in.
Note: on Windows, there’s the whale icon in your system tray that you may need to use to login before being able to type “docker login” and have it autocomplete.
Can’t push repository
Section titled “Can’t push repository”I had this fail on me probably because I wasn’t logged in correctly, but there was no error message, and the “success” message looks exactly the same as when it fails. I had probably tried to login with a capitalized name instead of a lowercase name.
Some notes:
- You should see your pushed repository immediately on Docker Hub (or wherever you’re hosting your repos).
- On Docker Hub, you don’t need to manually create a repository for it to be able to show up from the “push” command.
Ports already allocated on Windows 10
Section titled “Ports already allocated on Windows 10”Update: you can just stop the container with “docker stop <image>” (so use “docker ps” to get the container ID).
[13:03] NainFaux: @Adam13531 If one day with Docker you hit an issue about ports already allocated with unknown reasons, restart Docker ! Just spent 4h on it… Win10 fast boot issue it seems
To restart via the UI: right-click the whale icon and choose “Restart”. Alternatively, quit this completely and restart by typing “Docker for Windows” into the start menu.
To restart via Windows UI: win+R, services.msc, right-click the service and restart
To restart via [elevated] command line: net stop com.docker.service && net start com.docker.service
If restarting gives you an issue about elevation, then maybe take a look at this.
Alternatively, you could just specify a different port.
”Waiting for SSH to be available…” on Windows
Section titled “”Waiting for SSH to be available…” on Windows”This likely means that you didn’t create a new virtual switch in Hyper-V (reference).
”Unable to query docker version” on Windows
Section titled “”Unable to query docker version” on Windows”Unable to query docker version: Get https://192.168.1.27:2376/v1.15/version: x509: certificate is valid for 127.0.0.1, not 192.168.1.27
I don’t know exactly how this happened (I think that I had to cut off the original provisioning process from “docker-machine create”), but it was easy to fix:
docker-machine regenerate-certs myvm1
API error (500): linux spec user: unable to find user bldeploy: no matching entries in passwd file (reference)
Section titled “API error (500): linux spec user: unable to find user bldeploy: no matching entries in passwd file (reference)”I don’t know how to fix this yet, but by using the root user, I worked around it.
Caching issues
Section titled “Caching issues”First of all, to see if Docker even used the cache, it will tell you for every instruction (see bolded part below):
Step 7/22 : COPY packages/overseer/src src ---> 2fbb0a1434bcStep 8/22 : RUN yarn build ---> Running in 5d77422584e9
 Step 10/22 : WORKDIR /app ---> Using cache ---> ec803fbeaad8
There was one time on CircleCI where it looked like was bypassing the cache completely even though I ended up with the same code (reference to issue in my notes). I chalked this up as a CircleCI problem, but while it was happening, I worked around it by adding “—no-cache” to my “docker build” command.
API error (500): linux spec user: unable to find user bldeploy: no matching entries in passwd file
This is the result of not adding the user before writing the “USER” directive (reference).
On Alpine, it’s a little more complex than just “adduser -S bldeploy” since you’ll probably also want it to have the correct group. Group IDs are used when mounting volumes from the host, so you may want to specify an ID as well. The final set of commands looks something like this:
# Note: 1000 is the first UID assigned to a non-root user on Linux. Depending on your image, a user may already exist as 1000. You can check this just by doing "more /etc/passwd" and looking at the names. Similarly, "more /etc/group" has the group information, and "groups [USER]" will show you a particular user's groups.RUN addgroup -g 1000 -S bldeploy && adduser -u 1000 -S bldeploy -G bldeploy
# Become that userUSER bldeploy
# Switch to the home directory so that we can create the "app" directory as bldeploy. If we did "WORKDIR /home/bldeploy/app", then "app" would be owned by root.WORKDIR /home/bldeployRUN mkdir app
# Switch to that as the working directoryWORKDIR /home/bldeploy/app
# Make sure any COPY commands have "--chown" passed to it with your username and group.COPY --chown=bldeploy:bldeploy .npmrc_for_docker .npmrc
Random errors when building using node-gyp inside a container (reference)
Section titled “Random errors when building using node-gyp inside a container (reference)”I got errors about Python, make, and something else, and I think it was just dependencies that were missing. To fix this, try the following in your Dockerfile:
RUN apk --update --no-cache add python make gcc g++If that works, consider making a separate Docker image that already has those things installed since they’re apparently +100-200MB.
Temporary error (try again later) (reference)
Section titled “Temporary error (try again later) (reference)”This happened to me from something as simple as the following commands:
$ docker run --entrypoint /bin/ash -it node:8.12-alpine$ apk add curl↑ This was run inside the container of course
fetch http://dl-cdn.alpinelinux.org/alpine/v3.8/main/x86_64/APKINDEX.tar.gzERROR: http://dl-cdn.alpinelinux.org/alpine/v3.8/main: temporary error (try again later)WARNING: Ignoring APKINDEX.adfa7ceb.tar.gz: No such file or directoryfetch http://dl-cdn.alpinelinux.org/alpine/v3.8/community/x86_64/APKINDEX.tar.gzERROR: http://dl-cdn.alpinelinux.org/alpine/v3.8/community: temporary error (try again later)WARNING: Ignoring APKINDEX.efaa1f73.tar.gz: No such file or directoryERROR: unsatisfiable constraints: curl (missing): required by: world[curl]To fix this, just restart the Docker service, which on Linux looks something like this
systemctl restart docker
If that doesn’t work, try using the host’s network:
docker build —network host —other-options-here
Permission denied (reference)
Section titled “Permission denied (reference)”docker: Got permission denied while trying to connect to the Docker daemon socket at unix:///var/run/docker.sock: Post : dial unix /var/run/docker.sock: connect: permission denied.
To fix this, just add your user to the “docker” group:
- sudo groupadd docker
- sudo usermod -aG docker $USER
- Log out and in to update group membership
- You can type “groups” to see if the membership “took”
DNS error (reference)
Section titled “DNS error (reference)”error An unexpected error occurred: “http://npm.bot.land:4873/@botland%2faws: getaddrinfo EAI_AGAIN npm.bot.land:4873”.
I ended up fixing this by creating /etc/docker/daemon.json with these contents:
{
“dns”: [“8.8.8.8”]
}
Then you run ”$ sudo service docker restart”
To ensure everything is working, run this:
docker run busybox nslookup google.com