VirtualBox
Created: 2016-03-04 10:39:27 -0800 Modified: 2018-09-27 13:20:27 -0700
Basics
Section titled “Basics”VirtualBox:
- Host key is “right ctrl” by default
- Host + home will show the menu bar
- Host + C will go into Scaled Mode.
Installing a new Debian VM
Section titled “Installing a new Debian VM”- Download an ISO from here (there are torrent links on the bottom left and ISO links on the bottom right). Note that I linked to the netinstall, which is a smaller image since it downloads everything in the process. You can get the full images here if you want.
- Create a new VM. You should probably give it at least 100 GB of space so that you don’t run into resize issues. Make sure the disk is virtual so that it doesn’t actually use the 100 GB until it’s needed (although then it can’t shrink, which is probably fine).
- Right-click the new VM, go to Settings, and set number of cores to 2.
- Start the machine. This will ask about the start-up disk. Provide the ISO from step 1.
- Run through the steps in the graphical install.
- Set hostname
- No domain name
- Set password
- User name = “Adam13531”
- User account name = “adam”
- Just hit continue continue continue until you’re done
- After ~1 minute, it’ll ask about a package manager. Say “no” since you don’t have an extra one, then continue continue continue. 😜
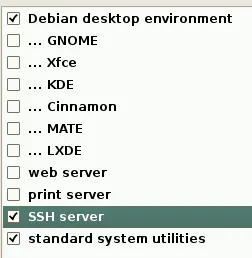
- When it comes to choosing what to install, I customized it like this:
- Right after choosing that, you can (and should) go eat some food.
- When you get back, it’ll ask about the boot loader with straightforward options (install it), then you’re done and it’ll reboot.
Allowing SSH without needing a password
Section titled “Allowing SSH without needing a password”On the VM:
- Edit ~/.ssh/authorized_keys
- Add in the contents of %userprofile%\sshlocal_vms.pub (or, if you don’t have a key, generate a keypair)
On the host machine:
- Modify ~/.ssh/config to add something like this
Host 192.168.1.17
User adam
IdentityFile ~/.ssh/local_vms
Static IP addresses (reference)
Section titled “Static IP addresses (reference)”Note: none of the steps below worked. I couldn’t figure it out after about half an hour of trying. Instead, I just went into my router and added an address reservation for my VM’s MAC address
- Make a host-only network if you don’t already have one
- File → Preferences → Network → Host-only Networks → Click the + button
- Configure the DHCP Server on it by editing it, going to DHCP Server, then choosing Enable Server.
- Server Address: 192.168.50.100
- Server Mask: 255.255.255.0
- Lower Address Bound: 192.168.50.101
- Upper Address Bound: 192.168.50.254
- Shut down your VM that you want a static IP for
- Assign a bridged adapter as Adapter #1 in Settings → Network
- Assign the host-only network as Adapter #2 (not sure if this is necessary)
- In Windows, go to Control PanelNetwork and InternetNetwork Connections
- Open the properties of your VirtualBox Host-Only Ethernet Adapter
- Open the TCP/IPv4 properties
- I set IP address to 192.168.50.2 (this can be found by examining your host-only network in VirtualBox, although I think by updating it here, you update it there too), subnet mask as 255.255.0.0, default gateway as 192.168.50.1, and preferred DNS as 192.168.50.1.
- Boot up the VM and try pinging 192.168.50.2 (which should be your new static IP for the VM).
- If you need help finding your IP, you can look at your router’s attached devices and you should see the host name that you set up.
Resizing disk images (reference)
Section titled “Resizing disk images (reference)”- FYI: I never got the disk image to go beyond 8GB. I think you need to do something at bootup time as opposed to while it’s running. Instead, there are two options:
- Install another SATA drive
- Make a new VM altogether: https://www.debian.org/CD/netinst/
- Install another SATA drive
- Right-click a VM, go to Settings —> Storage, click the VDI and inspect its location.
- Make sure your VM is off - you may want to take a snapshot before doing anything
- Run this
- VBoxManage modifyhd <path to VDI> —resize 46080
- (note: VBoxManage is at “C:Program FilesOracleVirtualBoxVBoxManage.exe” for me)
- This gives you 45GB of space
- VBoxManage modifyhd <path to VDI> —resize 46080
- Resize the partition on Debian (reference)
- sudo fdisk -u /dev/sda
- Type “u” until you’re displaying units in sectors.
- Type “p” to see the current size in a nice dtable. For me, it showed:

Device Boot Start End Sectors Size Id Type
/dev/sda1 * 2048 15988735 15986688 7.6G 83 Linux
/dev/sda2 15990782 16775167 784386 383M 5 Extended
/dev/sda5 15990784 16775167 784384 383M 82 Linux swap / Solaris
- In my case, I can’t expand sda1 without overlapping sda2, so I deleted all partitions by typing “d” three times.
- I did “n” to add a new partition.
- Primary
- Partition number: 1
- First sector: 2048
- Last sector: +17G - value out of range
Troubleshooting
Section titled “Troubleshooting”On 3/3/2016, I had upgraded my motherboard CPU, then I enabled Intel Virtualization Technology and VT-d in the BIOS, but I couldn’t find VT-x, and I was constantly getting errors about VT-x when attempting to start 64-bit VMs. In fact, I couldn’t even create a new 64-bit VM because VirtualBox thought VT-x was disabled. The solution was to turn off Hyper-V. After that, I just created new VMs using the existing disk images (VDIs) and everything worked fine.
When doing that, make sure you change from NAT to Bridged Adapter in the network settings of the VM.
No local IPv4 address
Section titled “No local IPv4 address”If doing “sudo ifconfig” doesn’t show you an ipv4 address, then it’s likely that VirtualBox is what’s configured incorrectly. You need to make sure that you’ve given VirtualBox access to the right network adapter on the host machine. For example, when I ran into this problem on 7/5/2016, I had switched to using a Wi-Fi dongle instead of CAT5, so I needed to expose the Netgear adapter in VirtualBox instead of Intel Ethernet. Making this change doesn’t require a reboot of anything.
No Internet connection after host OS wakes up from sleep
Section titled “No Internet connection after host OS wakes up from sleep”I’m nearly positive this has to do with time skew on the guest OS. I saw this on 8/13/16 when my Windows machine would wake up, but the VM said it was 8/12/16 at a totally different time. Rebooting the VM showed the correct time/date. I think time sync needs to be installed/configured, but I haven’t done that yet.