Godot UI
Basics
Section titled “Basics”- If you’re seeing a Control node in world space, then it’s likely because you didn’t use a canvas layer (reference). Don’t make your UI a child of a Camera (reference).
- Containers are intended to be used to size/position children.
Controlnodes themselves sort of break this. I don’t think that addingControlnodes is generally a good solution. It’s probably better to position using more containers when possible. E.g. one time, I wanted a “Close” button at the upper right of a dialog, so I put the first item in the dialog into anHBoxContainer, that way the “Close” button could live in that container.- If you want a container to shrink to the size of its children, then you probably just need to wrap your container inside one that does shrink to its children, e.g. a
VBoxContainer. E.g. if you’re making aLabelorRichTextLabelthat you want to shrink for a tooltip, your tree should probably beVBoxContainer→PanelContainer→MarginContainer→Label.- If it’s still not shrinking, then perhaps the anchors are setting a minimum size without you realizing it. Changing to “Custom” anchors will show the offsets, and if they’re
>0, then it could be why your control isn’t shrinking.
- If it’s still not shrinking, then perhaps the anchors are setting a minimum size without you realizing it. Changing to “Custom” anchors will show the offsets, and if they’re
- As an example, at one point, I wanted to make a GridContainer with highlightable rows, so I thought I would use a
ColorRectin conjunction with the grid. But due to how container positioning works, it was actually much easier to overrideDraw(reference).
ContentScaleFactorcan let you upscale your entire game. Note that this can cause blurriness even in the simplest of cases. E.g. imagine you have a sprite that is 64x64 whose underlying texture is 64x64. When you setContentScaleFactor == 2, the sprite will render at 128x128, but its texture can’t support that many pixels, so unless you are okay with the filtering that gets applied, then you’ll simply need a larger texture. For SVGs, this is trivially easy (see Godot UI#Using SVGs).- You have to mark input as handled (reference), e.g. call
AcceptEvent()from_GuiInputand callGetViewport().SetInputAsHandled()from_UnhandledInput. Without this, I think you may see strange behavior where an event seems to be consumed twice. TextureProgressBarhas an “over” texture; it’s for some texture that should cover the entire lifebar. If you want to use it for a border, I think you would need to do more than just provide a solid, filled rectangle (e.g. you would need a proper border graphic or use a 9-patch rect).- Alternatively, you could add a flat border by making your hierarchy be
PanelContainer→MarginContainer→TextureProgressBar, then set the panel’s background to aStyleBoxFlatand theMarginContainer’s margins to anything>0.
- Alternatively, you could add a flat border by making your hierarchy be
- Line spacing with labels
Labelhas aline_spacingproperty that defaults to3, whereasRichTextLabelhas aline_separationproperty with a default of0. They don’t quite have the same behavior, though;line_separationwill makeRichTextLabels bigger even if they’re only a single line long. The only workaround I found for now is to throw the next UI element into aVBoxContainerwith a negativeseparationproperty. Note that I asked about this in the Godot Discord here, but I didn’t get a response, so I filed an issue.
- If a
ScrollContainerisn’t sizing properly along one axis, then perhaps you have that axis’s scroll mode set toAutoinstead ofDisabled. - Primer video on anchors
- If you position something with an anchor and it doesn’t work how you expect, consider adding that thing to a
Controlnode with size0,0and positioning theControlnode where you want it.
- If you position something with an anchor and it doesn’t work how you expect, consider adding that thing to a
Placeholder elements
Section titled “Placeholder elements”You may find yourself in a situation where you want to show what a particular node/control will look like if it had children. E.g. we had a PartySection component in Skeleseller that held PartyMembers, and whenever using PartySection somewhere, it would be nice to see it with some fake party members just to understand the look and feel of it.
The caveats here are:
- The placeholder nodes likely aren’t “real”. E.g. our
PartyMembernodes never got initialized with adventurers, meaning if you ever tried interacting with them, they might break. - Calling
QueueFree()on the placeholders in_Readystill allows them to live for a single frame, which is long enough for, say, a mouse handler to be triggered on them. - Calling
Free()is discouraged (reference) and likely causes a bug in this case (see my repro here).
Thus, I think the best solution if you want placeholders is to call RemoveChild() and then QueueFree() from _Ready(). This should prevent most events from triggering on a placeholder with incomplete state, but remember that in C#, Dispose won’t be called until the free actually happens.
Making elements clickable (reference)
Section titled “Making elements clickable (reference)”In general, if you find yourself trying to write code to detect if the mouse is within a rectangle yourself, then you’re likely doing things wrong.
E.g. I originally tried to use global_position and global_scale to figure out a Rect2 so that I could call has_point on it with event.position. However, this didn’t take the Camera2D’s bounds into account, so it would mess up whenever I moved the camera, and probably would have been a pain to maintain anyway.
Instead, the “right” way to do things is to add an Area2D and CollisionShape2D to your object, then use the Area2D’s input_event signal:
func _on_input_event(_viewport: Node, event: InputEvent, _shape_idx: int) -> void:if event is InputEventMouseButton and event.pressed: # do something get_tree().set_input_as_handled()Then, the issue I ran into was that my CanvasLayer was consuming clicks (reference). I had a Control under the CanvasLayer whose mouse_filter I needed to set to IGNORE. If you want to figure out which Control is getting clicks, run your game from Godot, then click Debugger → Misc to see the last-clicked Control (and keep in mind, it’s a Control specifically since it’s presumably acting off of gui_input): 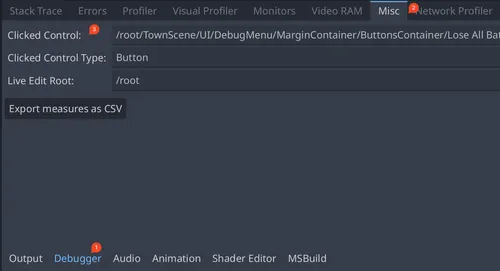
If you’re working with Node2Ds and not Controls, e.g. Area2D, then you need to rely on physics picking. See Input event handling for more information.
If you still can’t figure out why a node isn’t receiving input, add this code to the node:
public override void _UnhandledInput(InputEvent @event){ GD.Print(@event.AsText());}…if it doesn’t print a bunch of Mouse motion at position messages while hovering over the component, then something must be consuming the events before it.
- Use Debugger → Misc to figure out which component is being clicked.
- Turn off visibility of nodes directly in the editor while the game is running. Eventually, your component should get the events, meaning you’ve found the offending node.
- If you haven’t, it’s possible that a parent
Controlhas a mouse filter set toStop, in which case try changing ancestors’ mouse filters toPass
- If you haven’t, it’s possible that a parent
- Consult this page of the documentation for more information about how input handling works.
For example, I had this scene tree at one point:
VBoxContainer GameSubViewportContainer Container- withDisable Inputoff andObject PickingonSubViewportSprite2D
…the sprite was getting UnhandledInput for mouse events as expected, but Game wasn’t. It’s because SubViewportContainer was propagating the right-click event to the SubViewport, which I needed to stop with this code:
public override bool _PropagateInputEvent(InputEvent @event){    if (        @event is InputEventMouseButton inputEventMouseButton        && inputEventMouseButton.Pressed        && inputEventMouseButton.ButtonIndex == MouseButton.Right    )    {        return false;    }
    return true;}
However, understanding this particular scenario for mouse clicks is quite difficult. At least in Godot 4.3, if I have this setup:
- Override
_UnhandledInputin all four nodes to print the event - Set mouse filter on
ContainertoPass - Set
Disable InputonSubViewporttofalse
…I get this output when I right-click:
[UNHANDLED] Right-click in Sprite2D[UNHANDLED] Right-click in SubViewportNote that it matters where you right-click. E.g. you may have black bars around your game due to the aspect ratio and window size. In that case, the output you get when you click can change based on where the mouse was.
Anyway, it’s strange to me that Game doesn’t get to process the click as unhandled input. My thought process is this: the click isn’t handled in a child node, so I would expect it to propagate up the scene tree. It’s also strange that SubViewportContainer doesn’t print anything.
If I take that same setup and override SubViewportContainer’s _PropagateInputEvent so that right-click isn’t propagated, I get this output:
[UNHANDLED] Right-click in SubViewportContainer[UNHANDLED] Right-click in GameIn other words, now the SubViewport doesn’t get the input at all (since it’s not propagated), and the Game gets a chance to handle the input. This seems to be the same behavior you can achieve by setting Container’s mouse filter is Ignore (although that will affect all mouse events, not just right-click).
I can’t explain this though. 😢 When right-click events are propagated to the SubViewport, why doesn’t SubViewportContainer or Game get the clicks as unhandled input?
I think it may just be how SubViewports handle inputs. If you put this code in the SubViewportContainer:
public override void _UnhandledInput(InputEvent @event){  if (    @event is InputEventMouseButton inputEventMouseButton    && inputEventMouseButton.Pressed    && inputEventMouseButton.ButtonIndex == MouseButton.Right  )  {    GD.Print("[UNHANDLED] Right-click in SubViewportContainer");  }
  ((Viewport)GetChild(0)).PushInput(@event);}
…then after the SubViewportContainer gets the input, it will pass it to the SubViewport and you’ll see this:
[UNHANDLED] Right-click in SubViewportContainer[UNHANDLED] Right-click in Sprite2D[UNHANDLED] Right-click in SubViewportThe important part is that the Game still doesn’t trigger its unhandled input at all, meaning the SubViewport must be consuming the event. I don’t see code for this in the Godot engine itself.
Either way, here are my conclusions:
- I don’t fully understand why mouse clicks don’t propagate up through unhandled input. Something must be marking it as handled even in my minimal repros which have no such calls to mark it handled. I filed a bug on this.
- None of this unusual behavior would happen if you turn
Object Pickingoff. However, then you wouldn’t be able to click anything with a collider (e.g. an item or NPC in your game). - If you use a
SubViewportContainerand aSubViewportand can’t get the parent of those nodes to process input, then consider overriding_PropagateInputEvent(or maybe callingPushInputon theViewportdepending on what you need)
Another consideration for clickability
Section titled “Another consideration for clickability”At one point, I ran into this situation with my game:
- I wanted a horizontal
ScrollContainerto contain up to three elements. - The elements would be centered on the bottom of the screen.
- If the game window wasn’t wide enough room, you would scroll the container either via the scroll wheel or by clicking and dragging one of the elements.
The problem I had with this was that the ScrollContainer was set to always take up the entirety of the screen, so when there were no elements, there would just be an invisible Control consuming mouse inputs.
I tried a bunch of stupid things like redirecting input events before realizing two key things:
- The
ScrollContainersimply shouldn’t be taking up the full screen if there aren’t visible elements within it. - The
ScrollContainershould be in charge of the clicking and dragging. E.g. one of the problems I ran into when trying to have the elements handle it was that there was padding between the elements that the elements couldn’t know about and thus couldn’t have an event handler for.
Input event handling
Section titled “Input event handling”This page of documentation has the order that input handling works. It’s important to note that clicks happening from colliders are considered part of the final step, physics picking. This is not sorted by default, although that’s possible via physics_object_picking_sort, which has an “expensive computational cost”. You can’t just rely on Control nodes for Node2D because they won’t be affected by the 2D transforms of their parents. This issue is sort of similar to everything mentioned here.
Thus, if your input events aren’t happening in the right order, you essentially have two options:
- If it’s just physics picking that’s in the wrong order, enable
physics_object_picking_sort. - If it’s across several different types of input events, then you need to use a different event entirely. For example, suppose you have an object that requires picking, but you can’t wait until the physics-picking step. In that case, you can “promote” it to an input event:
- Keep track of a
bool _isMouseOver - Connect to
MouseEnteredandMouseExitedto set that boolean properly - In
_Input, make sure_isMouseOver == truewhen you click something
- Keep track of a
Note that for _Input, events are first fed to the lowest node in the entire scene tree and then work their way up vertically (depth isn’t considered, just position in the list). From the documentation:
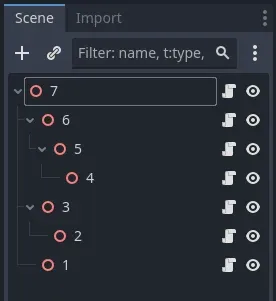
In general, I think it’s best to keep all of your non-GUI input handling in _Input. Then, for any drag-related events, it’s probably a good idea to keep all of the drag code in one spot and have it know about any drag-related systems. For example, in Skeleseller, we allow for dragging items and for dragging the camera. There are special scenarios that couple these behaviors together:
- Scenario 1: you press mouse-down on an item and move the mouse. This should drag the item, not the camera.
- Scenario 2: you’re holding an item and mouse-down to drag the camera. This should not try placing the item where you click.
- Add your TTF font to res://assets/fonts (not required, but a good convention)
- Choose “New FontFile” and drag your file onto it
- Alternatively, you can set it everywhere via Project Settings → GUI → Theme → Custom Font.
- Keep in mind that any characters that don’t appear in your font will follow the fallback rules, which you may not want since the fallback fonts could be system fonts, which would be different across different machines and operating systems. Try to only use glyphs that are in your font or curate the list of fallback fonts. See this for more information.
- E.g. we ran into a bug with Skeleseller where we tried using the
●character, and it was changing the size of the container it was in on Windows. - To change any of the fallback settings, select your font in Godot and click the “Import” tab. There, you’ll see “Allow System Fallback” and “Fallbacks” (an array of fonts you can set).
- E.g. we ran into a bug with Skeleseller where we tried using the
Using SVGs
Section titled “Using SVGs”- SVGs are rasterized as soon as they’re loaded into Godot whether you’re in the editor or running your game.
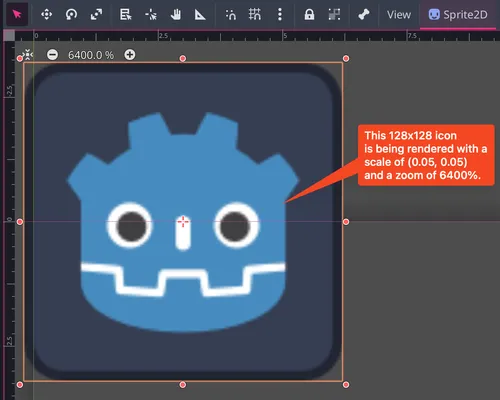
- Zooming in through the editor may make them look like they can scale infinitely, but that’s essentially a trick of the editor. E.g. if I take the default Godot icon and shrink it so that it should only take up ~6 pixels according to the guides at the left and top, we can clearly see more than 6 pixels in any straight line of the resulting image. That’s because it’s still sampling the underlying 128x128 texture.
-
- Zooming in through the editor may make them look like they can scale infinitely, but that’s essentially a trick of the editor. E.g. if I take the default Godot icon and shrink it so that it should only take up ~6 pixels according to the guides at the left and top, we can clearly see more than 6 pixels in any straight line of the resulting image. That’s because it’s still sampling the underlying 128x128 texture.
- SVGs are just XML blobs, and the root level
<svg>element haswidthandheightattributes.- Changing those will affect the size that Godot uses to rasterize the graphics. E.g. if I modify the XML of an SVG to be
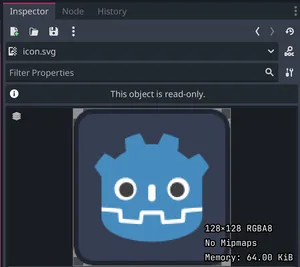
<svg id="Layer_1" xmlns="http://www.w3.org/2000/svg" version="1.1" viewBox="0 0 512 512" width="96" height="96">, then Godot will see the texture as 96x96. - The default Godot icon that ships with the engine is rasterized at 128x128 for that reason (because the
widthandheightare both 128), and you can see this when inspecting the texture: -
- You can also see how much memory the texture will use. If you know your icons will never at super large sizes, then you can cut down the memory used by doing one of the following:
- Modify the SVG file directly to change the
widthandheightproperties. - Select the SVG in the FileSystem tab of Godot, then click “Import”. Modify the
svg/scaleproperty and click “Reimport”.
- Modify the SVG file directly to change the
- The
viewBoxelement in thesvgtag essentially controls the drawing canvas of the SVG itself and should not be modified for the sake of Godot. Doing so will probably make only a portion of your SVG render correctly.
- Changing those will affect the size that Godot uses to rasterize the graphics. E.g. if I modify the XML of an SVG to be
SubViewport and SubViewportContainer
Section titled “SubViewport and SubViewportContainer”For Skeleseller, I ran into an issue where icons within a SubViewport looked blurry. I filed the issue here, which is when GitHub user kleonc explained that the blurriness is due to downscaling a ViewportTexture only to later upscale it again. This led me down a tremendous rabbit-hole that I wanted to explain here:
Explanation of what’s causing the blurriness
Section titled “Explanation of what’s causing the blurriness”- SVGs vs. PNGs have nothing to do with this (but I learned a lot while testing this; see Godot UI#Using SVGs).
- The downscaling kleonc mentioned is obvious: a 128x128 texture is going into a 64x64
SubViewport. The upscaling was not obvious to me; it’s because I was doing this on a high-DPI display macOS where the editor has a defaultContentScaleFactorof 200%. This is controlled in the Editor Settings viainterface/editor/display_scaleandinterface/editor/custom_display_scale. In other words, everything is getting scaled up by a factor of 2x when I’m using the editor.- If I reset both that scale and the zoom to 100%, then the icons look identical:
- …however, if we zoom in, then we’re applying upscaling again, and kleonc’s comment comes into play:
-
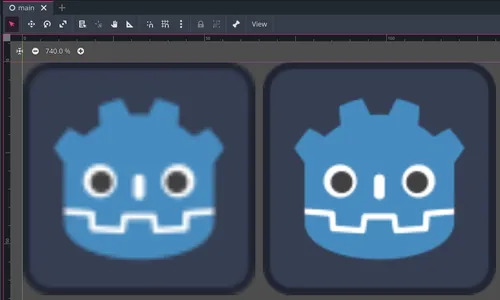
- ↑ The image on the left image is blurry, but one on the right is crisp.
-
- If I reset both that scale and the zoom to 100%, then the icons look identical:
Fixes you can apply
Section titled “Fixes you can apply”- ⭐️ Option 1: Render your
SubViewportContainerlarger than what’s needed and then scale it down. - Option 2: Render your UI outside of a
SubViewportContainer.- This feels hacky because it means that a scene will need to own UI in another part of the scene tree.
- Option 3: Never upscale (i.e. don’t ever set
ContentScaleFactor).- For accessibility reasons, you may want a game-scale slider that simply modifies
ContentScaleFactor, in which case this isn’t really an option.
- For accessibility reasons, you may want a game-scale slider that simply modifies
Here’s what option 1 looks like:
- Suppose you have:
- A 128x128 icon that you want to render in a 32x32
TextureRect(this means you’ll be able to render crisply whenContentScaleFactor == 4). - This scene hierarchy:
SubViewportContainerwith aSubViewportas a child and aTextureRectas a grandchild.
- A 128x128 icon that you want to render in a 32x32
- …you would set these properties on the three nodes in the scene:
SubViewportContainer- We’re going to render at 4x the size we need, so set the size to 512x512 and the scale to the inverse (
0.25).
- We’re going to render at 4x the size we need, so set the size to 512x512 and the scale to the inverse (
SubViewport- Size 2D Override: 32x32. This matches the size you want for your
TextureRect.- It’s incredibly hard to find useful information about
size_2d_overrideonline, but it’s pretty apparent how it works when you change the value directly in the editor. E.g. in Skeleseller, we want to render battles in a 512x288 window.- When
size_2d_override == 512x288: -
- When
size_2d_override == 1024x576(i.e. 2x original size):-
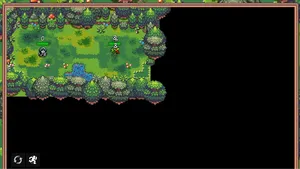
- We only see the upper left of the battle and the icons are smaller, but the icons are still anchored in the correct location
-
- When
size_2d_override == 256x144(i.e. ½ original size)-
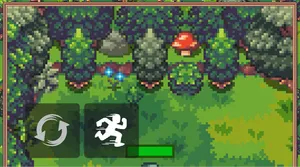
- We can’t see the full battle, and the icons are bigger, but they’re still crisp because the underlying SVGs get rasterized at a large enough size to render cleanly.
-
- When
- It’s incredibly hard to find useful information about
- ✅ Size 2D Override Stretch
- Size 2D Override: 32x32. This matches the size you want for your
TextureRect- Use a texture whose size is at least 128x128
- Custom Minimum Size: 32x32
- This is the size you want to render the icon at.
Other notes:
- Small textures that use the
Nearestfilter (e.g. pixel art) will seem immune to this blurriness, but it’s only because you can infinitely upscale pixel art without it looking bad. E.g. if you draw a 1x2 texture with a red pixel and a blue pixel and then zoom to 1000000x withNearestfiltering, it’ll still look like a red pixel and a blue pixel, they’ll just be really large “pixels”.- To prove that small textures aren’t immune, here’s the opposite of the solution; I’ve scaled the
SubViewportContainerup and then decreased the size that it renders at. Everything looks terrible. (◕‿◕✿) -
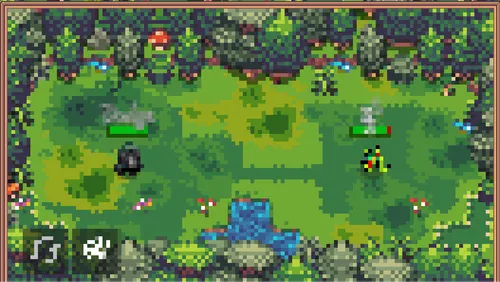
- As shown above, fonts and text also aren’t immune; the whitish-gray blurs are text blobs.
- To prove that small textures aren’t immune, here’s the opposite of the solution; I’ve scaled the
- To minimize the impact to other scenes, try to just scale the
SubViewportContainerdirectly, which means breaking it out of any parent containers with aControlas its parent. - The larger you make your
Viewport, the more memory you’ll use. With RGBA8 encoding, I assume it’ll bewidth * height * 4, so a 2048x2048 viewport will be 16 MiB.- Remember: you only need to size and scale your
SubViewportContainerto the amount that you’ve offset your upscaling. So if you’re on a low-DPI display withContentScaleFactorset to 1, you don’t have to do anything special whatsoever.
- Remember: you only need to size and scale your
RichTextEffect
Section titled “RichTextEffect”You can make custom text effects. I just wanted to include how to do it in C# since it wasn’t super obvious (for GDScript, you can just copy/paste the matrix code from here as RichTextMatrix.gd and not need to worry about global scripts):
- Save this script:
using Godot;
namespace Game.Src.UI.RichTextEffects;
[Tool][GlobalClass]public partial class TwistText : RichTextEffect{// Note: this #pragma is just to stop my linter from telling me that the variable is unused#pragma warning disable SX1309 // Field names should begin with underscore    private string bbcode = "twist";#pragma warning restore SX1309 // Field names should begin with underscore
public override bool _ProcessCustomFX(CharFXTransform charFX) { charFX.Color = new Color(1, 0, 0, 1); return true; }}- Rebuild
- Make a new scene and add a
RichTextLabelwith the text[twist]hello[/twist] - Expand the label’s
Markup→ “Custom Effects” section in the Inspector - Click “Add Element”
- From the dropdown, select “New TwistText”.
If this worked, the word “hello” should be in red. If you make updates to the script, you may have to retype a character of the label just to get it to update in the editor.
Focused buttons
Section titled “Focused buttons”A common problem I ran into is that buttons should have a focused state (so that keyboard/controller support is more obvious what you’ll be pressing), but the button itself could be enabled or disabled, meaning its styles/focus StyleBox shouldn’t cover the whole button (otherwise it would need be conditional).
What I settled on is making styles/focus represent a border in itself. You could do this with a StyleBoxFlat that simply outlines the edges of the button, but I think it’s better to make a texture that matches the shape of the underlying button.
The result is something like this: 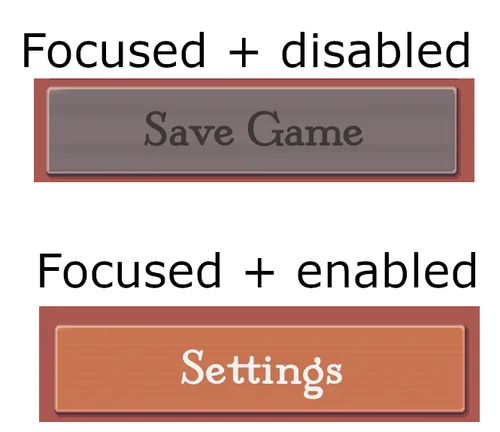 (notice the faint white outline around each button despite that one is disabled and the other is enabled)
Buttons with custom children
Section titled “Buttons with custom children”I didn’t find a lot of information online about this. In short, I wanted a Button whose label was a RichTextLabel instead of a regular Label, that way I could use multiple fonts or multiple icons or even just multiple colors within the label.
I think there are a few general approaches here:
- A
Buttonwith aRichTextLabelas a child. Caveats:Buttonisn’t a container, so you would need to manually size theButtonso that it’s at least as big as its children, otherwise the clickable area won’t align with the contents of the button.- Many properties/functions in
Buttonare notvirtual, so you won’t have proper behavior when all you have is aButtonreference and not your customRichTextButtonreference. E.g. imagine this code:Button b = GetNode<Button>("%MyRichTextButton"); b.Text = "Click me";. This won’t update the text of theRichTextLabel, nor could it be made to. You would have to have aRichTextButton b = GetNode<RichTextButton>(...)for it to work.
- ⭐️ A
Containerwith two children: aButtonand aContainer, and theContainerhas any arbitrary contents. Caveats:- Same as above that
Buttondoesn’t havevirtualproperties/functions. However, since aContaineris now the root of the scene, you wouldn’t even haveButtonreferences; you would haveButtonWithCustomChildrenreferences.
- Same as above that
- A
RichTextLabelthat acts like a button. Caveats:- You would need to handle clicks yourself, which is easy.
- You would need to handle styles yourself, which is slightly more involved. I assume you would actually have a
PanelContainerwith aRichTextLabelunder it, and thePanelContainerwould have styles like aButtondoes that are applied dynamically. You would accomplish this via[Export]parameters. - Callers/users wouldn’t be able to benefit from having
Buttonreferences. E.g. you couldn’t do something likeGetChildren().OfType<Button>()and to fetch your button.
- This is a bit out-there, but you could have a
TextureButtonwhose texture is aViewportTexture, then you throw whatever you want into the viewport. Caveats:- This feels hacky, so I didn’t look into this too much.
I think the best idea is the starred one above. E.g. I did this for a button that looked like this:
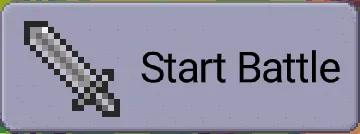
The scene tree for this is:
MarginContainer- this can’t be something likeCenterContaineror it wouldn’t allow the button to resize itself.PanelContainercould work, but it would need to have no panel since theButtonwill act as the panel.Button- this is set to fill the container both horizontally and vertically so that it doesn’t need any custom sizing logic.MarginContainer- this is a container for any arbitrary children, e.g. aRichTextLabel. I happened to need a texture and a label, which is why I have a container beneath this with both of those.HBoxContainerTextureRectLabel
The script on the root has a function like this to make sure that only the button is clickable:
protected void MakeAllChildrenIgnoreMouse(){    Queue<Node> nodesToChange = new(_childrenContainer.GetChildren());
    while (nodesToChange.Count > 0)    {        Node node = nodesToChange.Dequeue();        if (node is Control control)        {            control.MouseFilter = MouseFilterEnum.Ignore;        }
        IReadOnlyList<Node> children = node.GetChildren();        foreach (Node child in children)        {            nodesToChange.Enqueue(child);        }    }}
Tweens
Section titled “Tweens”Tweens vs. AnimationPlayer
Section titled “Tweens vs. AnimationPlayer”Tween code can get ugly pretty quickly. It may be better to use an AnimationPlayer, especially because then you can play the animations directly in Godot rather than having to build/run/test your tweens repeatedly.
Tweening a label’s font size
Section titled “Tweening a label’s font size”Callable tweenFontSize = Callable.From<int>(TweenFontSize);sizeTween.SetLoops(0);sizeTween.TweenMethod(tweenFontSize, 19, 25, 1);sizeTween.TweenMethod(tweenFontSize, 25, 19, 1);
private void TweenFontSize(int value){ _label.AddThemeFontSizeOverride("font_size", value);}Notes:
- I tried tweening a
Label’s scale, but it sort of jittered the position. - The font size is an integer, so tweening it may still look sort of jittery.
- I got around that by making the font huge (~300px) and then setting the scale to ~0.06 (for an effective font size of 18px). However, this caused several problems (all fixable):
- When I updated the pivot via code, the label would move down and right. I fixed this by making sure I had the correct pivot set in the editor.
- When I increased the label size, the text would move depending on its anchor. I fixed this by making the size of the label large enough to accommodate the biggest font size that would be applied.
- The outline and shadow needed to be scaled up, too. However, whenever you update the outline, you may also need to change the MSDF Pixel Range of the font (in the Import settings) since it’s always supposed to be at least 2x the largest outline used (reference).
- I got around that by making the font huge (~300px) and then setting the scale to ~0.06 (for an effective font size of 18px). However, this caused several problems (all fixable):
Maximum size of a container
Section titled “Maximum size of a container”I ran into a situation where I wanted to set a maximum size of 0px so that I could animate a container growing. However, the container itself had a minimum size of 27 px because of a button with a label in it. I didn’t want to have to hide every child with a minimum size, so I concocted this solution:
- Make a
SubViewportContainerwith aSubViewportunderneath it - Add your container to the
SubViewportand set its anchor to “Full Rect” - Set the minimum size of the
SubViewportContainerto the maximum size that you wanted originally (you can do this through code) - If the
SubViewportContainerhas a sibling, then make sure its container sizing has “Expand” turned off
There are other solutions out there which may be helpful, e.g. this GitHub repo.
Centered menus
Section titled “Centered menus”This is on Godot 4.4 (not that it requires 4.4). I wanted a game menu that would:
- Be centered
- Expand no bigger than the size of its children
- Shrink when the game window got to be too small
- Be scrollable when it shrinks
I ended up with this scene tree: 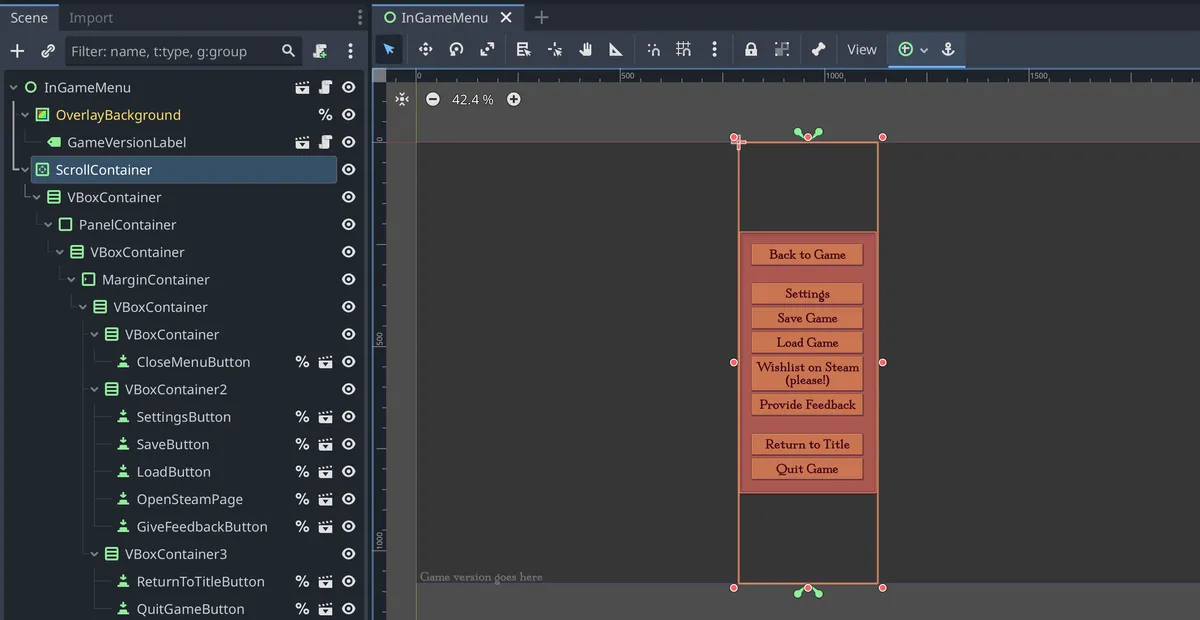
Notes:
- The
ScrollContainerhas an anchor ofVCenter Wide- The problem with this though is that it’ll either absorb mouse clicks in the blank area or not be able to handle scroll-wheel events. The only way I could figure out how to work around this was to add a script to the
ScrollContainerto forward the clicks to another control:public partial class ScrollContainerForwardingClicks : ScrollContainer{public event Action? OnClick;public override void _GuiInput(InputEvent @event){if (@event is InputEventMouseButton b && b.ButtonIndex == MouseButton.Left){OnClick?.Invoke(); // then, my InGameMenu listens for this and acts like the background was clicked (i.e. it closes the menu)}}}
- The problem with this though is that it’ll either absorb mouse clicks in the blank area or not be able to handle scroll-wheel events. The only way I could figure out how to work around this was to add a script to the
- The
VBoxContainerjust beneath has “shrink center” and is set to expand vertically - There may be some nodes or general structure that is superfluous; this is just the first thing I got to work and I wanted to take a note on it.
Visibility
Section titled “Visibility”- A
CanvasItemmay have itsVisibleproperty set totruebut still not actually be visible in the tree (reference). You have to useIsVisibleInTree()for that. - To find out when a
CanvasItemis shown or hidden even due to a parent being shown or hidden, use theVisibilityChangedsignal.
Spritesheet sprite in a TextureRect
Section titled “Spritesheet sprite in a TextureRect”- To use a single sprite from a spritesheet as a TextureRect, use an AtlasTexture.
- Make a new TextureRect
- In the Inspector, make a new AtlasTexture
- Expand the AtlasTexture so that you can see the “Atlas” property
- Drag a spritesheet onto the “Atlas”
- Set the region below it
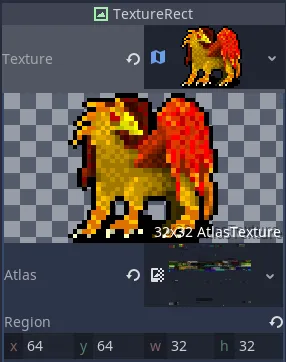
- If you end up using the AtlasTexture a lot, you can save it as a file and share it between controls.
- Note: I had found a much more complicated way of doing this with a ViewportTexture in the TextureRect, then a sibling Viewport in the scene with a Sprite child of that Viewport, but then the Sprite size had to be doubled for some reason and I couldn’t figure out why.
Centering an AtlasTexture sprite in a layout
Section titled “Centering an AtlasTexture sprite in a layout”To achieve something like this:
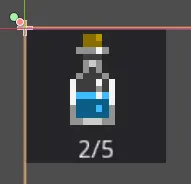
…my scene tree looks like this:
- Panel
- GridContainer
- TextureRect
- CenterContainer
- Label
- GridContainer
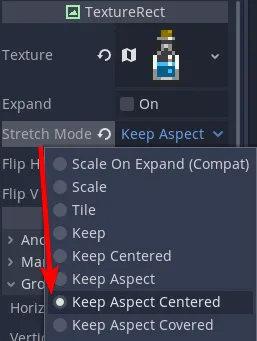
The TextureRect has “Keep Aspect Centered”:
Center elements in a GridContainer
Section titled “Center elements in a GridContainer”This is sort of like “justify-content: space-between” in CSS:

How I accomplished this was with this scene tree:
- Container
- CenterContainer
- Label (“Row 1”)
- GridContainer (or HBoxContainer if you want)
- Label (“Row”)
- Label (“Two”)
- Label (“Here”)
- CenterContainer
The GridContainer has 3 columns and has the “fill” and “expand” size flags for “Horizontal” (the scripting constant for this is SIZE_EXPAND_FILL). Each child label has the same horizontal size flags and also “Align: Center”.
To get closer to “justify-content: space-between”, I think you’d just set the middle label to SIZE_EXPAND_FILL, not the left/right labels.
Overlapping problems with containers
Section titled “Overlapping problems with containers”I kept running into issues like this:
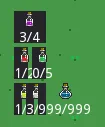
This is a scene tree that looks like this:
- VBoxContainer
- CenterContainer
- HBoxContainer
- Item
- HBoxContainer
- CenterContainer
- HBoxContainer
- Item
- Item
- HBoxContainer
- CenterContainer
- HBoxContainer
- Item
- Item
- HBoxContainer
- CenterContainer
…where “Item” was itself another scene whose root node was a Panel:
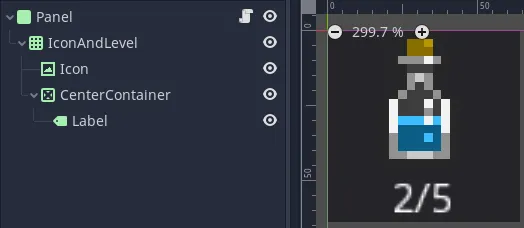
My issue ended up being that I didn’t set a minimum size on the Panel in Item. Without that, a CenterContainer can’t know how big the Panel should be, so it sets the size to (0, 0).
Alternatively, you could be running into this issue where dynamically laying out a container’s children isn’t straightforward.
MarginContainer (reference)
Section titled “MarginContainer (reference)”A MarginContainer is like the “padding” style in HTML; it puts extra space inside the container. This is not to be confused with the “Margin” properties on all Control nodes! MarginContainer’s properties are here:
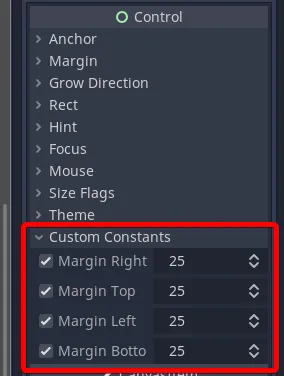
Here’s a MarginContainer with a Panel as a child:
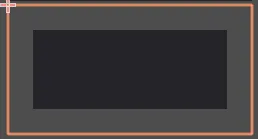
As you can see, the panel is “pulled away” from each edge by 25 pixels.
Positioning labels or other UI through code
Section titled “Positioning labels or other UI through code”Making a Label and setting its text doesn’t immediately update its size (reference). Call get_combined_minimum_size() instead of size, and if that still doesn’t work (e.g. the CanvasItem was only just shown in the scene tree), then wait for process_frame, e.g. await ToSignal(GetTree(), SceneTree.SignalName.ProcessFrame); (reference).
Notes:
- The reason why you have to get the combined minimum size is because
MinimumSizecan report a size a smaller thanCustomMinimumSize, soCombinedMinimumSizeis the larger of the two, which is the actual minimum size. I don’t understand whatMinimumSizeactually represents (the documentation says it’s the “internal minimum size”). - Invisible nodes may not ever have their proper sizes reported, in which case you would have to make them visible first.
- There’s still an oddity on Windows sometimes where the size of something is reported as 0 even after waiting for the next frame. I didn’t have time to investigate, but if everything is working fine on macOS but not on Windows, then consider just calculating the size of that thing yourself. I don’t have anything to link to due to the lack of an investigation on this. Private Skeleseller code is here.
- Maybe this has to do with trying to wait for the next frame from
_Readyspecifically as mentioned here?
- Maybe this has to do with trying to wait for the next frame from
- There are some issues that talk about this (e.g. 12058 and 20623). Some people do comment on having to wait two frames. In some of those cases, you could maybe find a built-in way of accomplishing your task, e.g. centering text inside a label is just a property of the label itself.
- 102096 is a somewhat specific case involving a
Containerand aRichTextLabel.
- 102096 is a somewhat specific case involving a
Coloring button backgrounds
Section titled “Coloring button backgrounds”Go to Theme Overrides → Styles → Normal → Make a StyleBoxFlat
To do this through GDScript (reference) (WARNING: this may cause Godot to freeze/crash on exit due to this issue (which should be fixed by this PR, but if not, consider keeping references to styleboxes from GDScript)):
var new_stylebox_normal: StyleboxFlat = $MyButton.get_theme_stylebox("normal").duplicate()new_stylebox_normal.bg_color = Color.DARK_GREEN$MyButton.add_theme_stylebox_override("normal", new_stylebox_normal)# Later, you can remove the stylebox override:$MyButton.remove_theme_stylebox_override("normal")Screen coordinates
Section titled “Screen coordinates”When working with 2D scenes, the UI isn’t just automatically placed in screen coordinates. I believe this is what you’d use a CanvasLayer for (reference). follow_viewport_enabled should be off in that case.
Theme editor
Section titled “Theme editor”If you want many components in a UI to use the same theme, make a theme in the inspector, then modify it using the “Theme” button at the bottom of the editor: 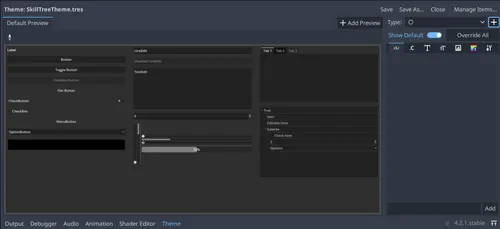
To use this: 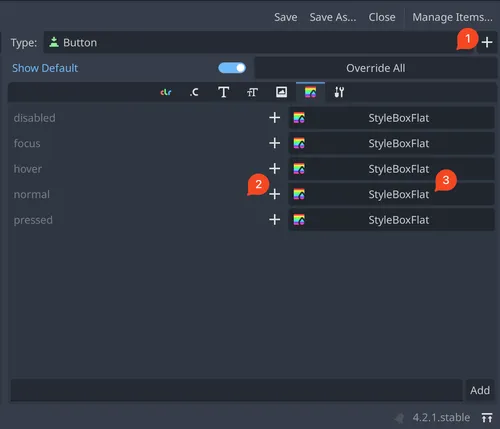
- Start by clicking the ➕ button at the upper right and selecting something like “Button”.
- From there, you can customize all of the shared properties of a button. This still isn’t the most straightforward though.
- Click the ➕ button to the left of one of the style boxes to add a new one
- Select “New StyleBoxFlat”
- Click the StyleBoxFlat that you just made to change the inspector to that style box
You can apply a theme to a control node and it will be inherited by all children.
Also, you can apply a default theme across your whole project using Project settings → GUI → Theme → Custom (it’s literally just the name “Custom” for right now).
Theme inheritance
Section titled “Theme inheritance”If you want variations for a single control (e.g. a different Button style), you should use theme type variations. They even support multiple levels of “inheritance”, so you can have Button, BlueButton, and LargeBlueButton if you want.
However, suppose you need variations for multiple controls. Let’s say you have a PanelContainer with some Buttons underneath, and you want:
- A green panel with green buttons
- A blue panel with blue buttons
You have a few options:
- Make a whole new theme
- You could just duplicate everything into a new theme. The downside is that any common properties (e.g. font size) would need to be modified in multiple locations.
- You could use a base theme with common properties and override only what’s needed:
- Add a
Controlabove yourPanelContainerand assignBaseTheme.tres.BaseThemewould define common properties like the font, font size, etc. - Set the theme of your
PanelContainerto be eitherBlueTheme.tresorGreenTheme.tres. These themes would only need to define overrides, e.g. colors and styles. The fonts and font sizes would still be pulled from the base theme. - Downsides of this approach:
- You need an extra
Controlin your scene just to set the base theme. - When previewing the theme that has the overrides, it won’t show with any of the common properties. E.g. if
BaseTheme.tresis the only place where the font is declared, then the preview ofGreenTheme.treswill show with the basic Godot font.
- You need an extra
- Add a
- Add variations for each control (
PanelContainerandButton) and set those through code. The downside here is that any controls added at runtime need variations set on them sincetheme_type_variationonly affects a single node and not the descendents. Themes, on the other hand, automatically get applied to any descendent as well. - Wait for this proposal on
Resourceinheritance (which is this PR)
I opted for making a whole new theme while waiting for the PR.
SpinBox
Section titled “SpinBox”This is Godot’s number picker. If you want to add keyboard handlers, you just need to make sure to call GetLineEdit:
spinBox.GetLineEdit().GuiInput += (inputEvent) =>{    if (inputEvent is not InputEventKey keyEvent)    {        return;    }
    if (keyEvent.IsActionPressed("ui_up", allowEcho: true))    {        spinBox.Value += spinBox.Step;        AcceptEvent();    }    else if (keyEvent.IsActionPressed("ui_down", allowEcho: true))    {        spinBox.Value -= spinBox.Step;        AcceptEvent();    }};
NinePatchRect with children
Section titled “NinePatchRect with children”It’s best to make a PanelContainer and override its style to have a StyleBoxFlat with your nine-patch texture: 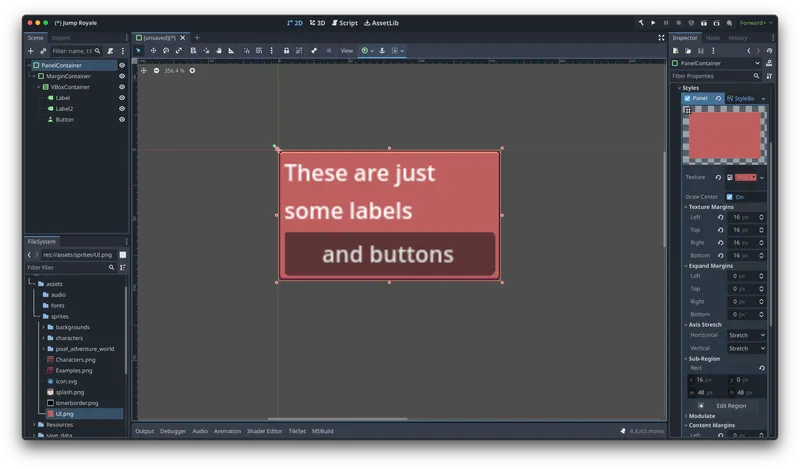
As shown, I’m using only a specific region within UI.png which is 48x48. Because there are 9 tiles inside that 48x48 region, I set the texture margins to 16x16 (since 48*48 == 9*16*16).
If the borders of your graphic are stretching, then it means that you didn’t set the texture margins correctly.
Troubleshooting
Section titled “Troubleshooting”Input events being hit multiple times
Section titled “Input events being hit multiple times”I hit this issue and I’m nearly positive it’s just due to having a QMK keyboard. Read this comment for more details.
Graphical tearing/glitching
Section titled “Graphical tearing/glitching”E.g. this:

I believe this is caused by having the margins larger than your texture in a StyleBoxTexture. For example, the stack-of-papers image above (which is tearing) has a size of 402x429 but margins of left==217, top==144, right==186, bottom==222. As you can see, left+right > width, so you just need to lower the margins to fix this.
This will not necessarily repro on every platform or graphics card, which can make it very hard to find.
A mouse-up event is being consumed by a disposed node
Section titled “A mouse-up event is being consumed by a disposed node”I had this scenario:
- Left-clicking allows you to drag windows in my game.
- The contents of the windows can change while you’re dragging them.
- Some of those contents that could change had a mouse filter of
MOUSE_FILTER_PASS, meaning they would propagate events upward.
This meant that you could hit the following scenario:
- Mouse-down on a node that will propagate the event upward.
- Have the node get disposed.
- Let go of the mouse button.
At this point, the mouse-up event would seemingly go nowhere. The solution that I found in these cases is to set the ephemeral node’s mouse filter to “Ignore” so that the drag source could get all of the events; I assume Godot is doing something so that a node which propagates a mouse-down will be the handler of the corresponding mouse-up (which doesn’t work if that node ceases to exist).
TextureProgressBar has a height of 1px
Section titled “TextureProgressBar has a height of 1px”This is probably because you need to check this the “Nine Patch Stretch” box. If not for that, then your container sizing or containers may be wrong (or just the size of the component is wrong if it’s not in a container).
Text problems
Section titled “Text problems”Blurry text
Section titled “Blurry text”See this; you generally just need to set the stretch mode to canvas_items in the project settings. However, that mode isn’t recommended for pixel art due to how it scales.
If you can’t do that, then turn on theme/default_font_multichannel_signed_distance_field in the project settings and make sure each label/button/whatever’s filter setting is “Linear”, not “Nearest”. This isn’t perfect though. It’s just really, really hard to get font settings to look good in a pixel-art game. Perhaps consider using a bitmap font.
If the blurry text only appears inside a tooltip, then I think that’s just a bug.
A font has “holes” or weird artifacts
Section titled “A font has “holes” or weird artifacts”
This is caused by the font having overlapping glyphs (reference). The official documentation even talks specifically about using MSDF and Google Fonts.
Misaligned glyph baseline
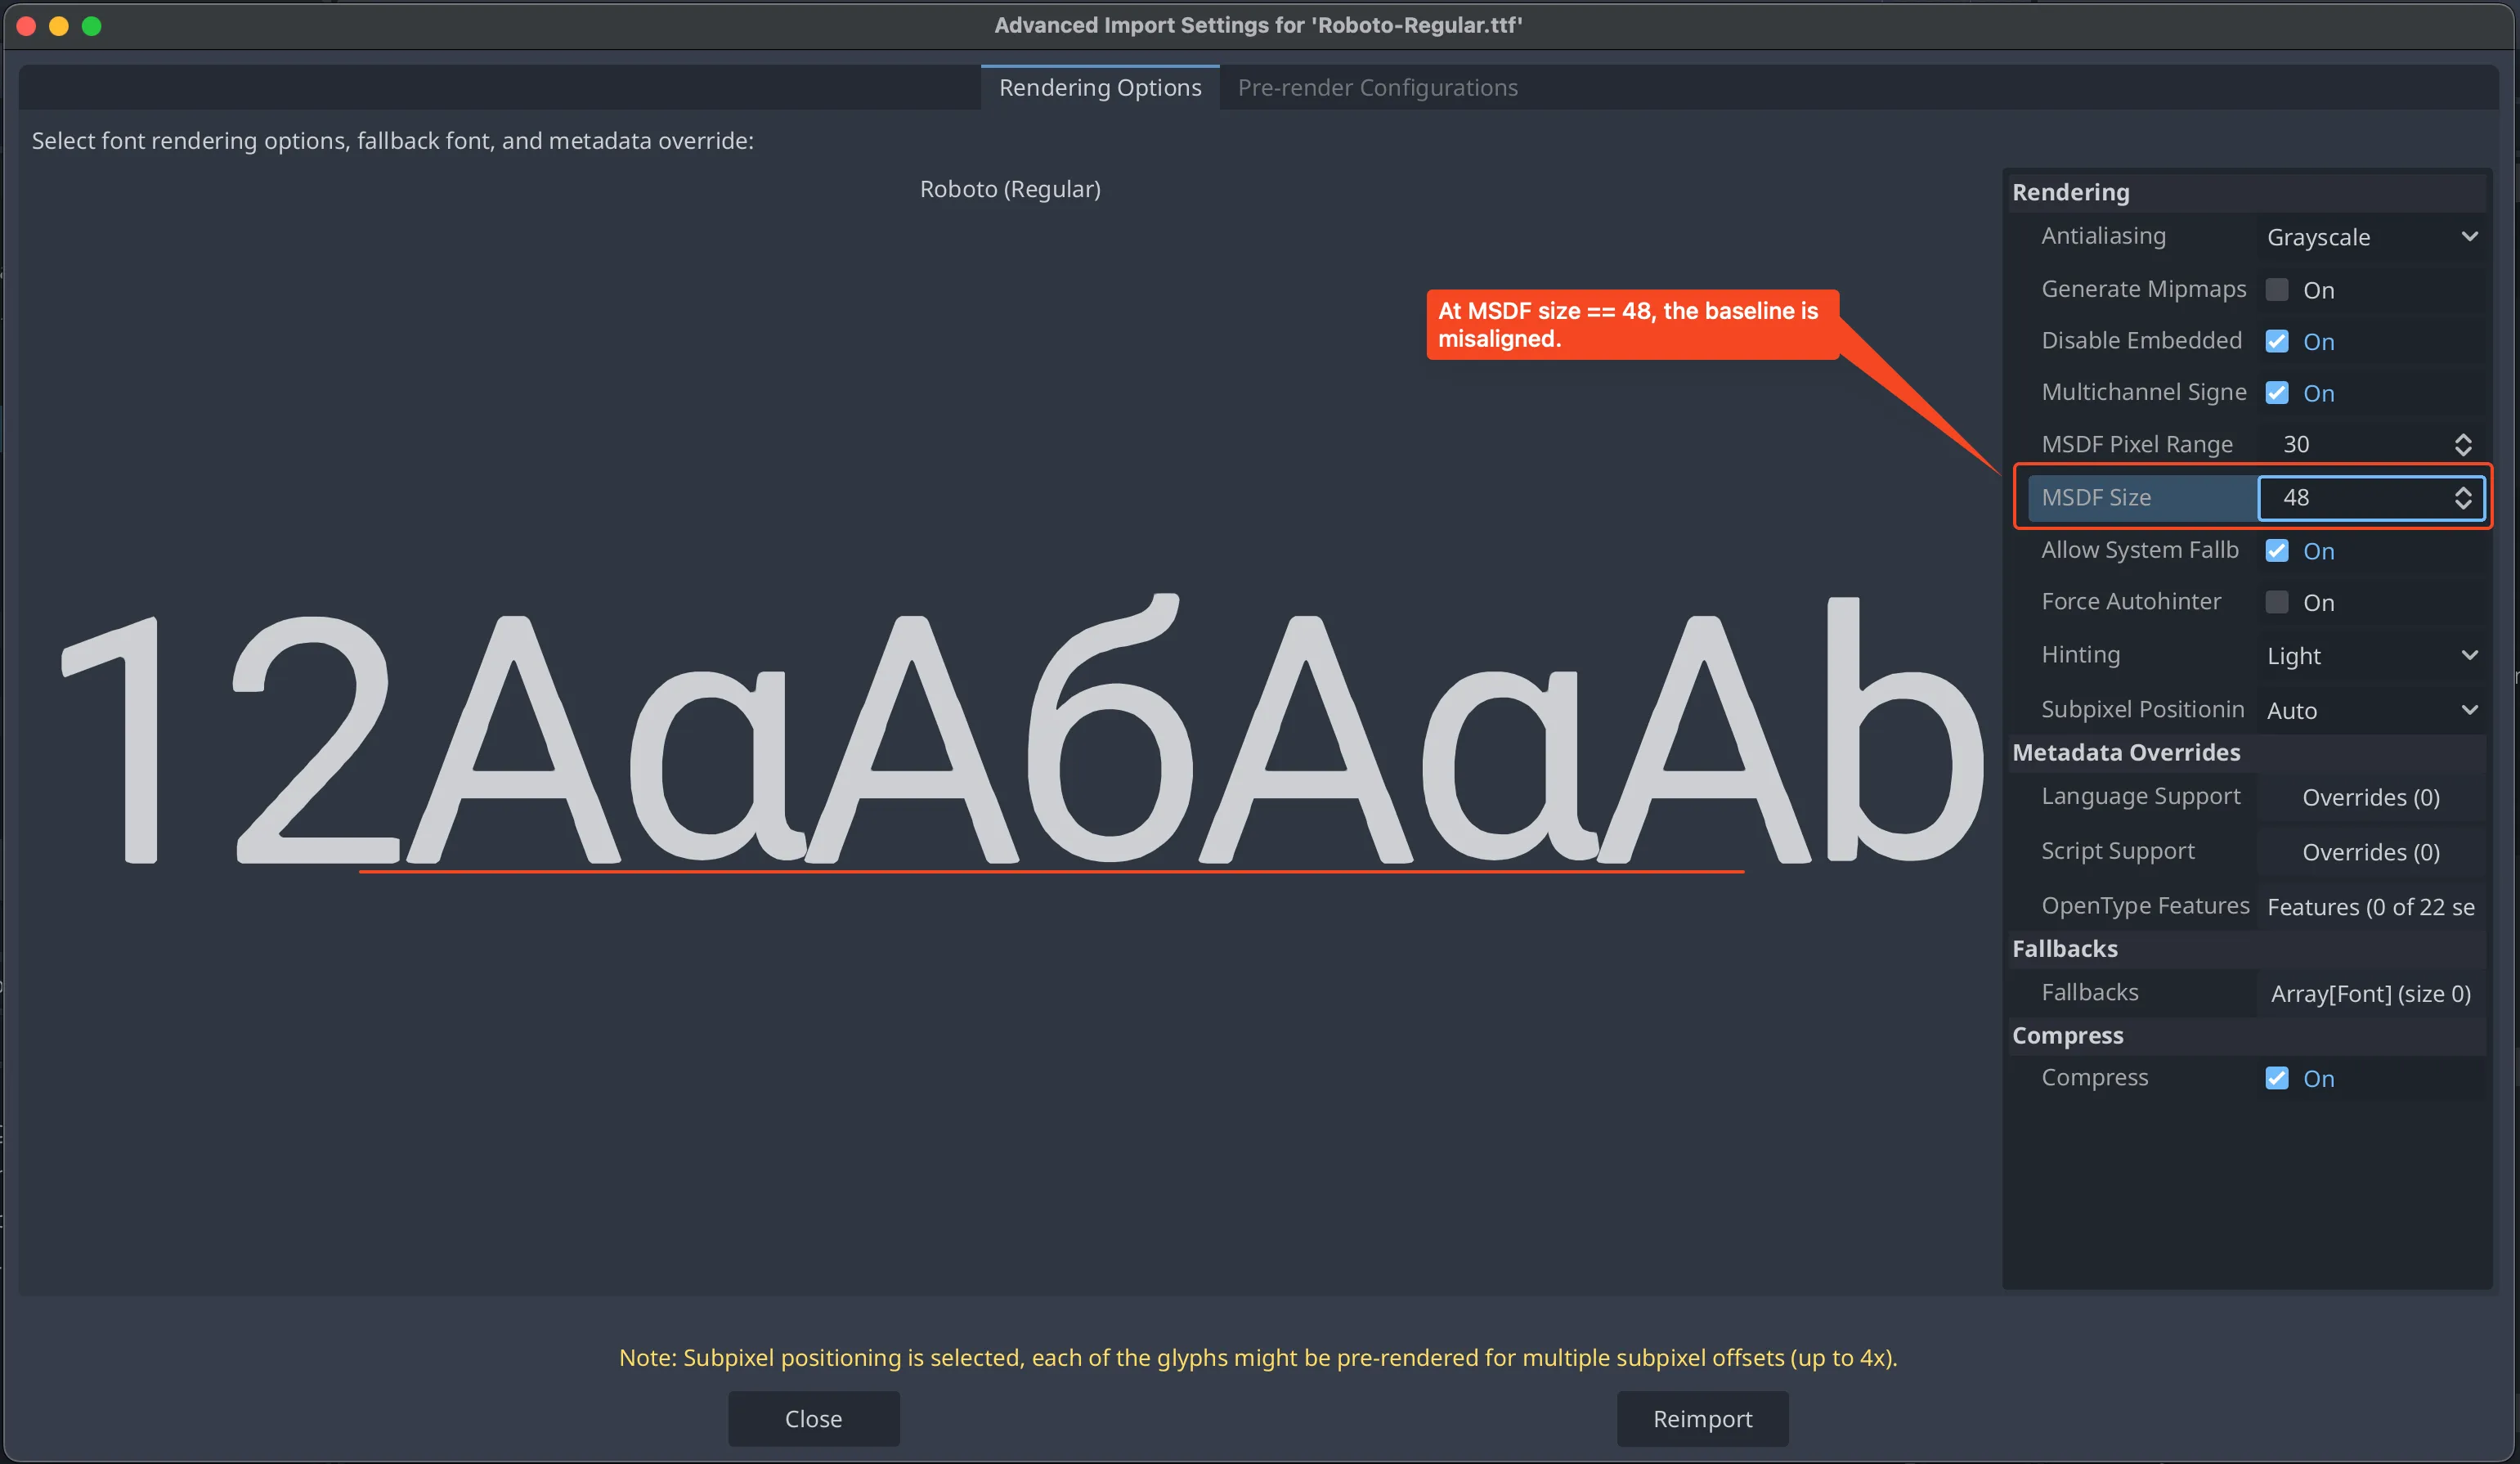
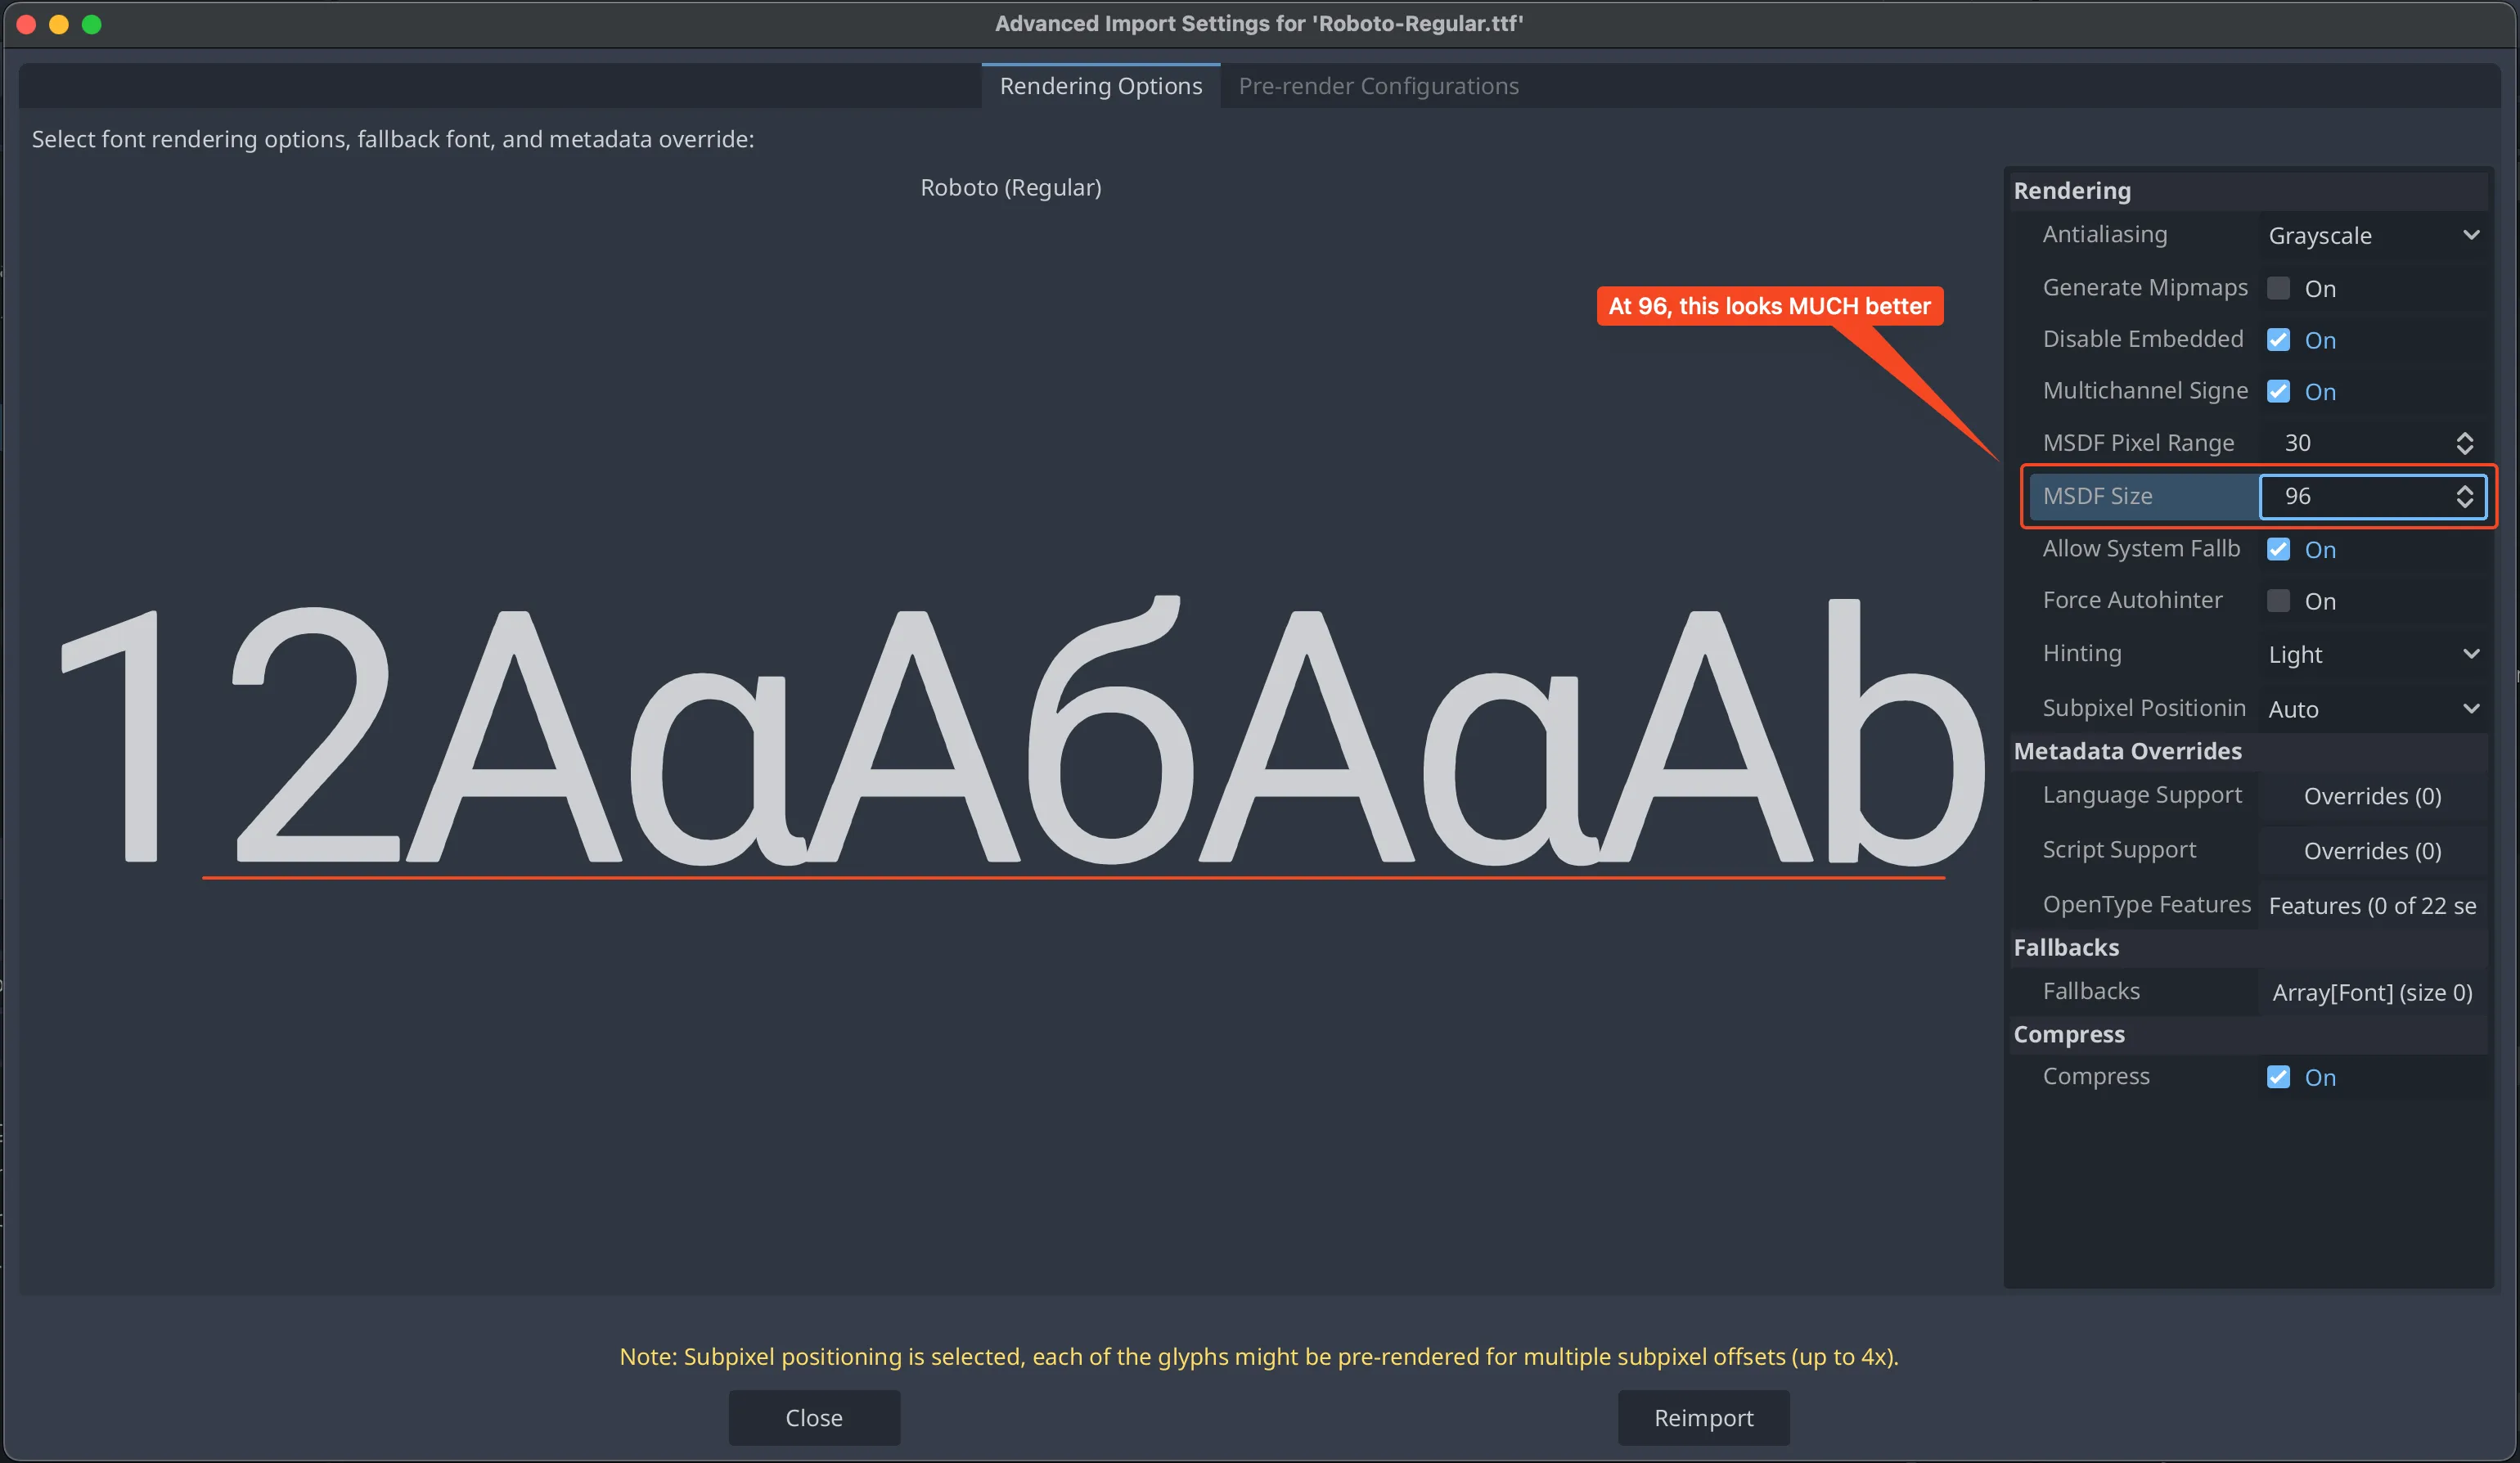
Section titled “Misaligned glyph baseline”In this picture, see how the word “battle” has its characters misaligned vertically? 
This is caused by a combination of the hinting property, which snaps glyphs to integral coordinates (reference), and the MSDF size (if MSDF is enabled), which is a feature used to pre-generate textures for different font sizes. It should not be caused by gui/theme/default_font_subpixel_positioning, which only affects horizontal positioning. It’s much clearer if you select a font in Godot, click “Import” at the upper left, then click “Advanced…” and just try changing some settings:
