FL Studio
Basics
Section titled “Basics”- At the top of the Playlist (shortcut=F5), there’s a dropdown to select a particular pattern.
- The Drumpad plugin is free and has a decent amount of percussion choices.
- ⭐️ If you’re using multiple monitors, click the ”↓” at the upper left of any window and choose “Detached”. It helps SO much.
- For a GREAT explanation on ADSR (attack, decay, sustain, and release), check out 8m04s in this video
- If you’re just looking for a passable synth, Sytrus is built-in and has some good presets. FLEX is also pretty good.
- Notes that FLEX has many percussion/drum samples in each “pack”, they’re just on different notes.
- SpitFire Audio also has some free packs you can use.
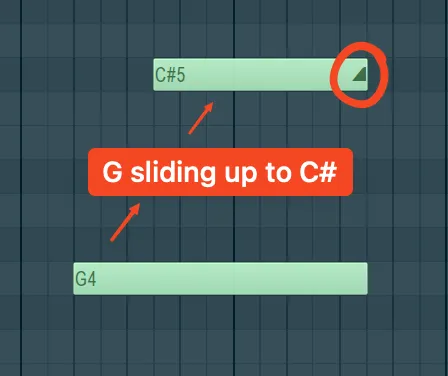
- To slide a note (kw: pitch bend), have one note playing normally, then add the note you want to bend to, double-click it, and choose “slide” (see circled symbol in the picture below for which icon it is). Alternatively, you can have a note be inputted with the “slide” option ahead of time, but I think that’s more annoying.
- If you shorten the slide note, the effect happens faster.
- A very common thing I find myself wanting to do is to strum a chord (which I internally call “arpeggiating” and some people call a “rolled chord”). There’s the “Strum” tool (⌥S) to do this. It’s a little bit funky, but just tinker around with it and it’s straightforward. You can even have it change the velocity of notes.
- To input individual notes using a MIDI keyboard, enter “Step editing mode”, which will input a note at the playhead. The sustain pedal will advance the playhead.
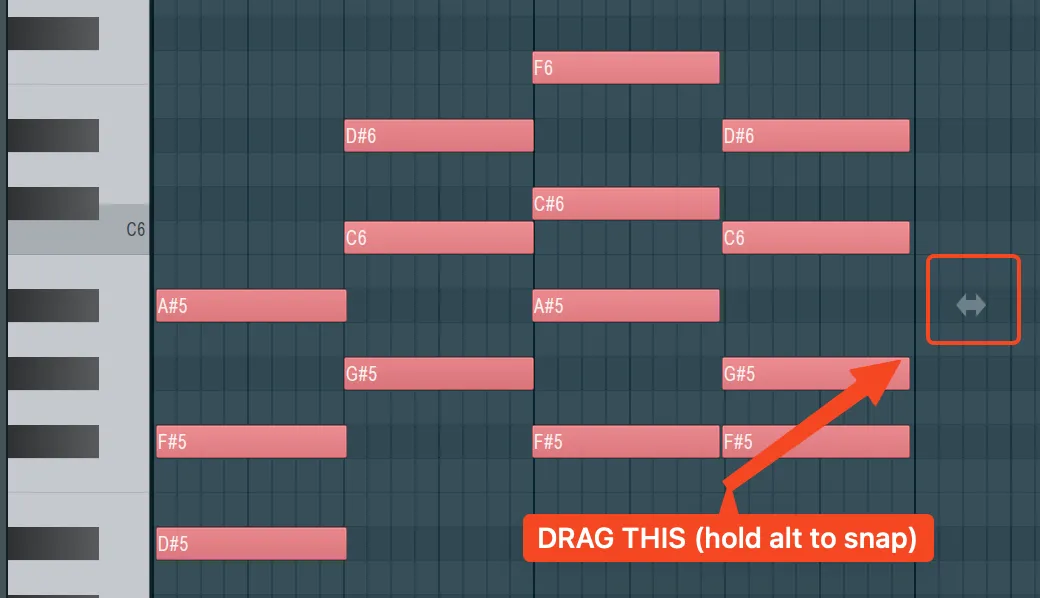
- After doing this, if you want to proportionally extend all of the notes:
- After doing this, if you want to proportionally extend all of the notes:
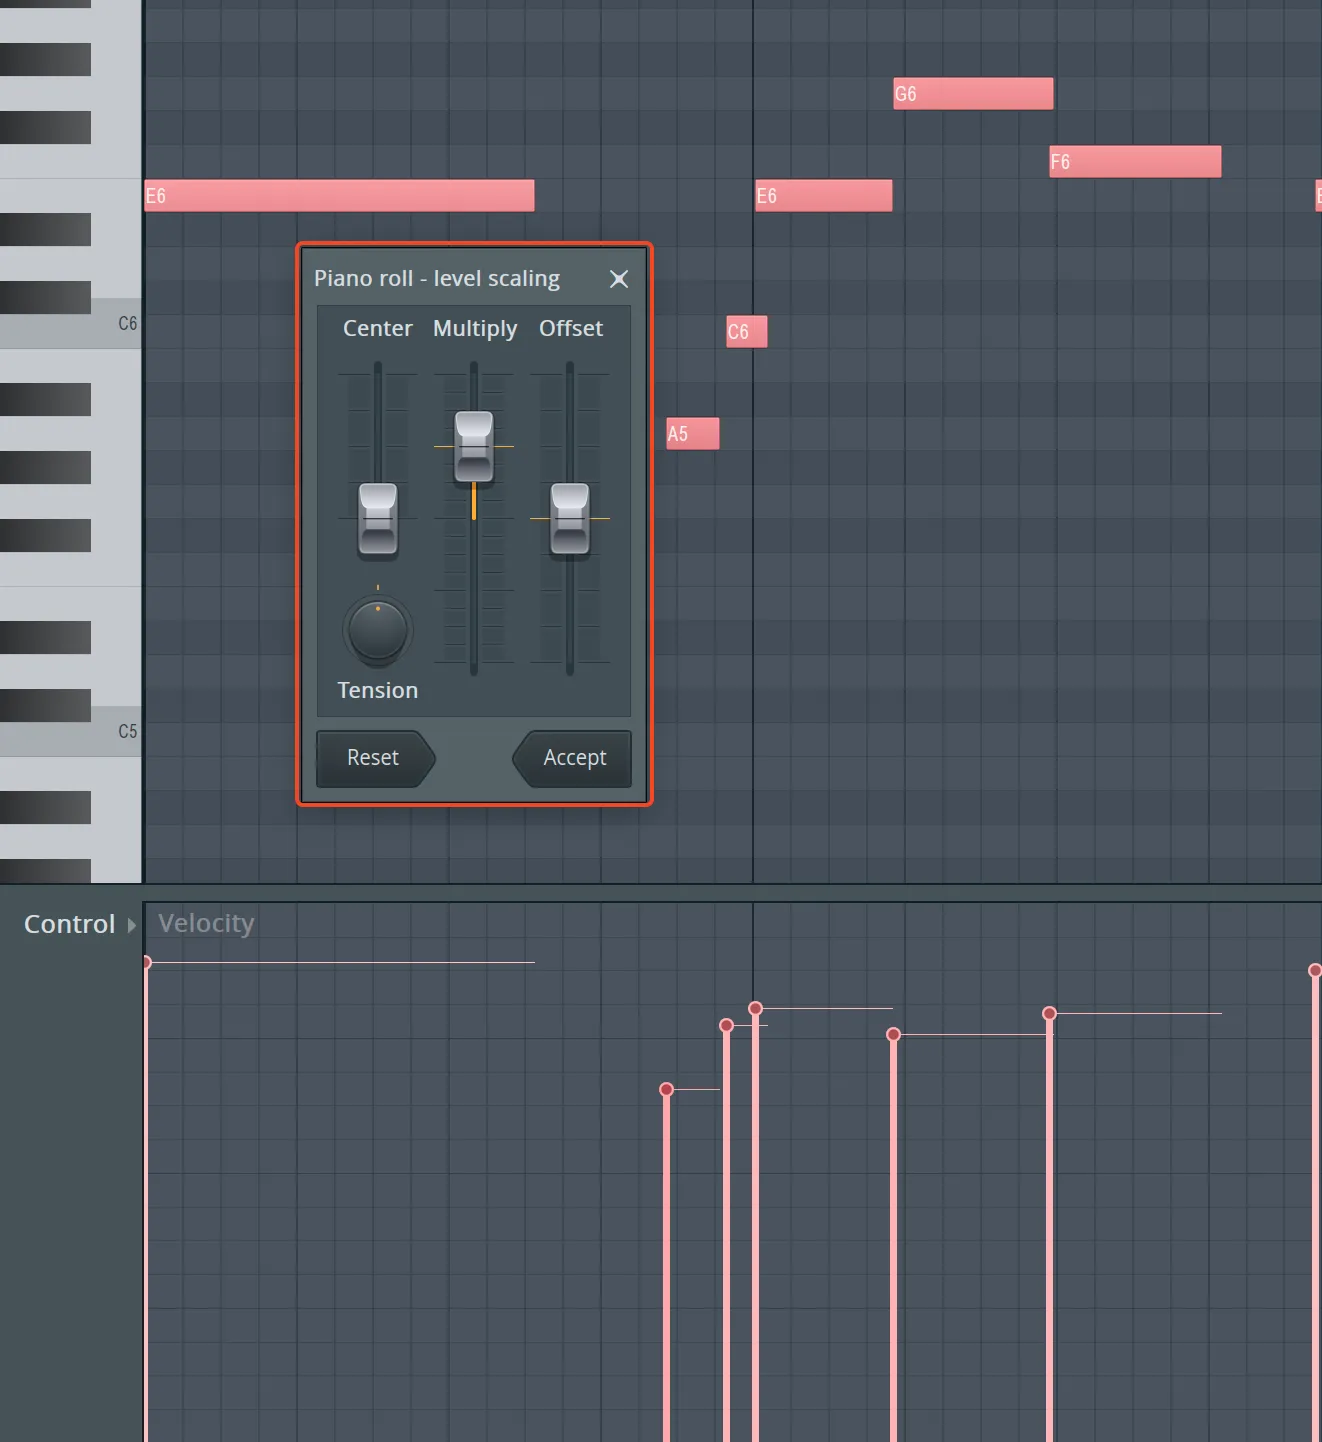
- To scale velocities proportionally, select a bunch of notes and press ⌥X. It’ll open “level scaling”:
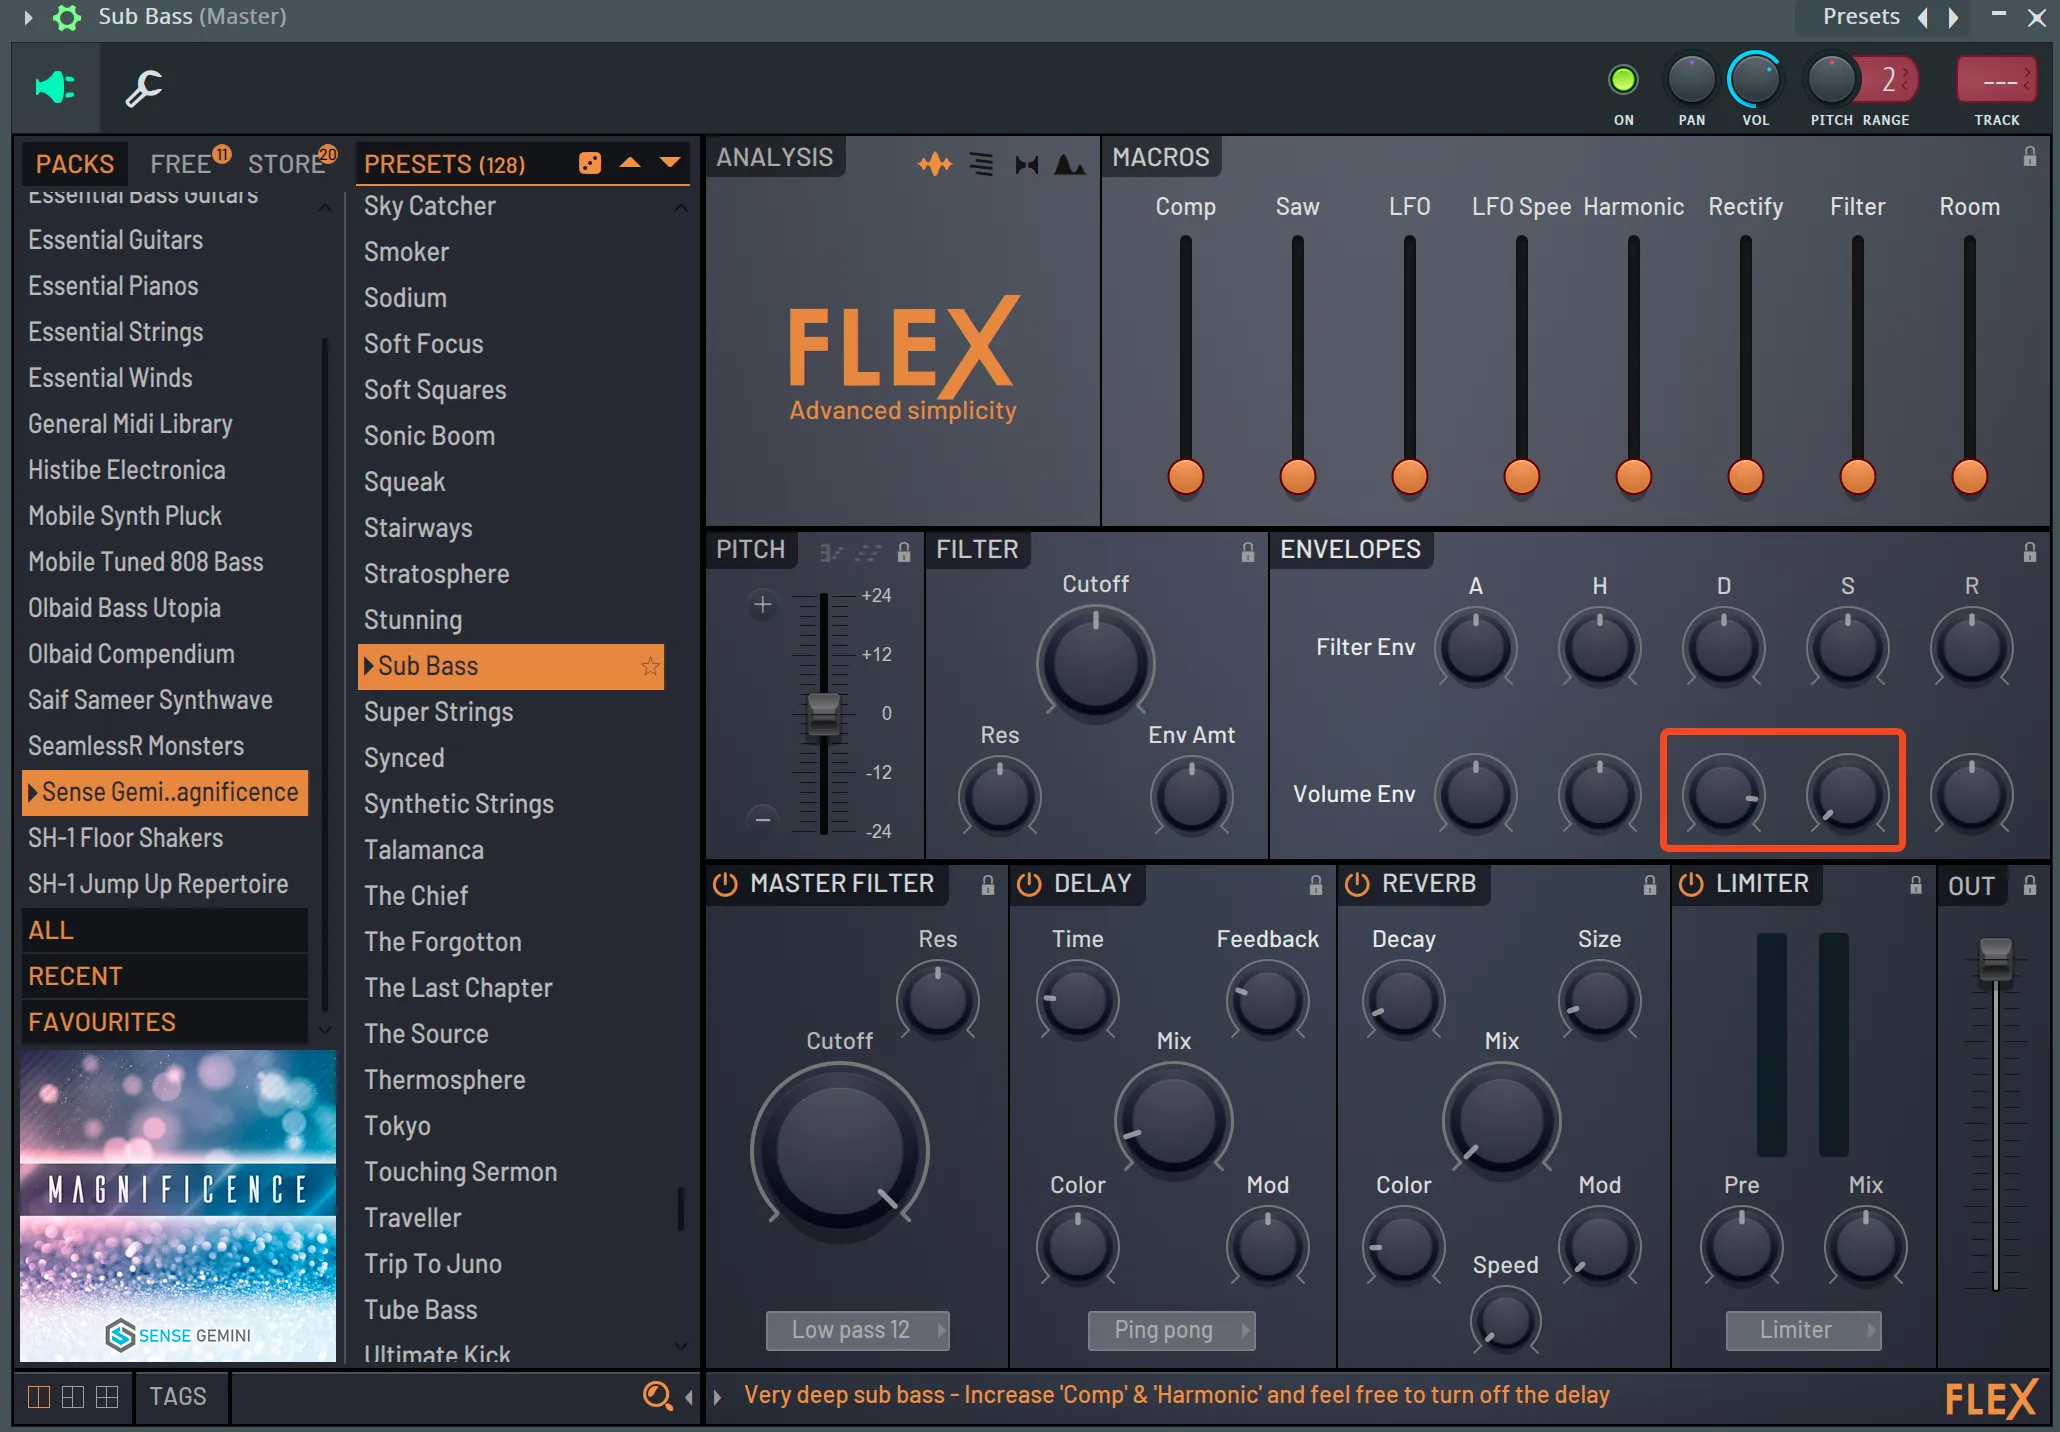
Simple example of a real-world task I had: “Sub Bass” is a sound that is sustained forever, but I wanted it to gradually get quieter down to nothing. I simply made the decay longer and the sustain 0:
Getting my Nektar SE 25 to pause/play FL Studio
Section titled “Getting my Nektar SE 25 to pause/play FL Studio”(reference) This is sort of ridiculous. If you press the pause/record buttons together on the Nektar SE 25, you’ll send special codes to FL Studio, but it won’t know what to do with them, so you need a custom MIDI script. Here’s what I did on macOS:
- Make
~/Documents/Image-Line/FL Studio/Settings/Hardware/Testeroni/device_testeroni.py(the name has to start withdevice_) with these contents:
#name=Testeroni Testeroni Testeroni Testeroni Testeroniprint("Loaded my Testeroni MIDI script")
import midiimport uiimport transport
BUTTON_PLAY = 0x6ABUTTON_RECORD = 0x6BBUTTON_REWIND = 0x67BUTTON_FAST_FORWARD = 0x68
def OnMidiMsg(event): print("On midi msg", event.midiId, event.data1, event.data2) event.handled = False if event.midiId == midi.MIDI_CONTROLCHANGE: if event.data2 > 0: if event.data1 == BUTTON_PLAY: if transport.isPlaying(): transport.stop() else: transport.start() event.handled = True elif event.data1 == BUTTON_RECORD: transport.record() event.handled = True elif event.data1 == BUTTON_REWIND: ui.previous() event.handled = True elif event.data1 == BUTTON_FAST_FORWARD: ui.next() event.handled = True- Reopen FL Studio (you would think that “Update MIDI scripts” would help, but it didn’t seem to)
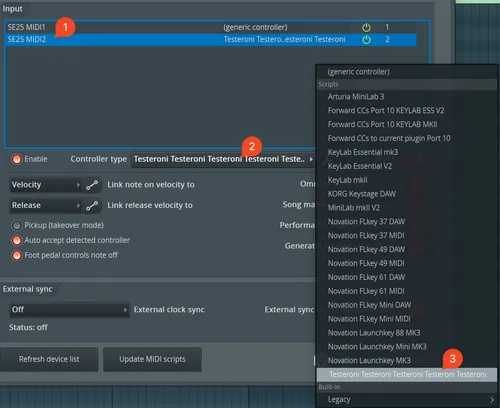
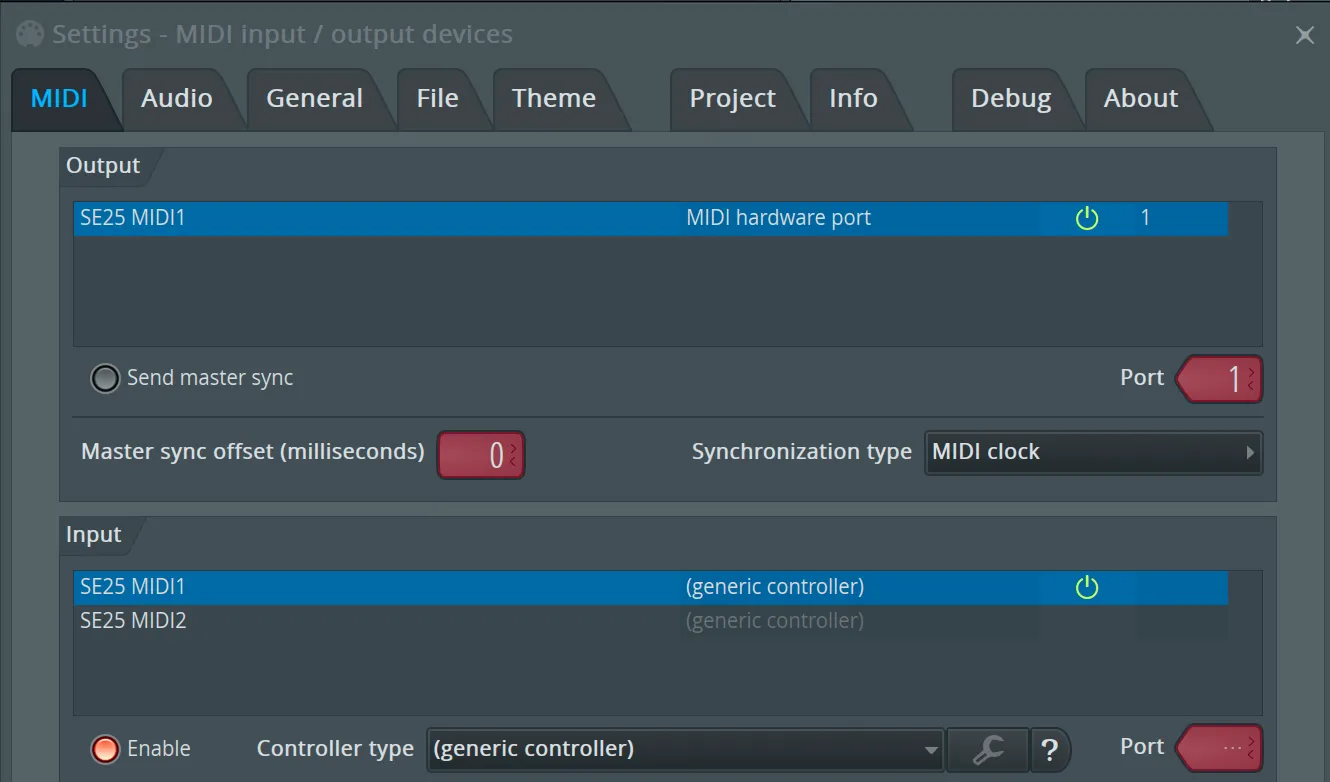
- At this point, in Options → MIDI settings, you should be able to set your controller to use your script (set it to SE25 MIDI2 since that’s the one that sends CC messages, not MIDI1):
-
- Select it and confirm that it worked via View → Script output
- This is also how you’ll reload your script after making changes (using the “Reload script” button)
- Options → Debugging log can show you which codes are being sent so that you don’t need to log them all:
- Play button press: control change BF 6A 7F
- Play button release: control change BF 6A 00
- Record button press: control change BF 6B 7F
- Record button release: control change BF 6B 00
- Rewind button press: control change BF 67 7F
- Rewind button release: control change BF 67 00
- FF button press: control change BF 68 7F
- FF button release: control change BF 68 00
Note: for my Mac, I have to use Kontakt from this plugin:

However, as of ~April 2024, all of the instruments are stuck in demo mode (see this thread). I guess Kontakt 5 has been discontinued. I’m not going to bother trying to get it to work.
IL Remote (“Image-Line Remote”)
Section titled “IL Remote (“Image-Line Remote”)”This is crazy. I downloaded the app on my Android phone, pressed “tap to connect” on the setup screen with FLStudio open on my computer, and that was it (i.e. ~5-second setup). After that, you can use it to control FLStudio on your computer from your phone: pause/play, input notes on a virtual piano, etc.
If you press and drag the pencil icon at the upper right toward the left, you can make a new layout. I added a pad, tapped it to customize its function from “Mode: note” → “Mode: syscmd”, left its message as “pause/play”, then double-tapped the pad itself to make it huge. Of course, adding a “stop” button is also good (resizing is a bit tough; try dragging from farther inside the pad than on the edge or outside).
Keyboard/mouse shortcuts (reference)
Section titled “Keyboard/mouse shortcuts (reference)”Super useful:
- Window management
- ⭐️ Tab: switch through the open windows
- ⭐️ Enter: maximize the current window if it’s possible
- Piano roll
- Shift+scroll with notes selected will move them horizontally without snapping. Great for when you don’t quite want to quantize notes.
- Shift+clicking with notes selected will automatically duplicate them and let you move them around - This should prevent you from having to use ctrl+C, ctrl+V most of the time
- Ctrl+drag will let you select many notes at once
- Middle-click-drag will pan the current view
- Alt+right-click+drag will let you play the immediate notes in the view
- This will let you listen to patterns too in the playlist, but you have to drag over a particular track
- J/H: select lower/higher channel with note data
- Ctrl+right-click will zoom-to-fit so that everything is visible.
- Ctrl+G: glue selected notes together to form one note
- Ctrl+middle-click-drag: vertical zoom
- Page up|down: change horizontal zoom
Helpful
- Hold right-click and scroll in the playlist window: select a different tool
- Shift+clicking an empty note in Paint mode will place a note and immediately start customizing its duration. This is helpful if you find yourself painting notes in that don’t snap any longer; it’s because the duration of the note you place is equal to the last one selected.
- Shift+clicking something with a name (e.g. a pattern or track) will rename it.
- After having placed a note, alt+scroll will change its velocity, and shift+scroll will change its timing.
- Numpad - and + will shift between patterns.
- Pressing backspace changes grid snapping, so if it’s ever off, press backspace again.
- Back+forward buttons (used for browser navigation) can change channels or patterns quickly and visually
- Alt+middle-click-drag: right and left will scroll, up and down will zoom
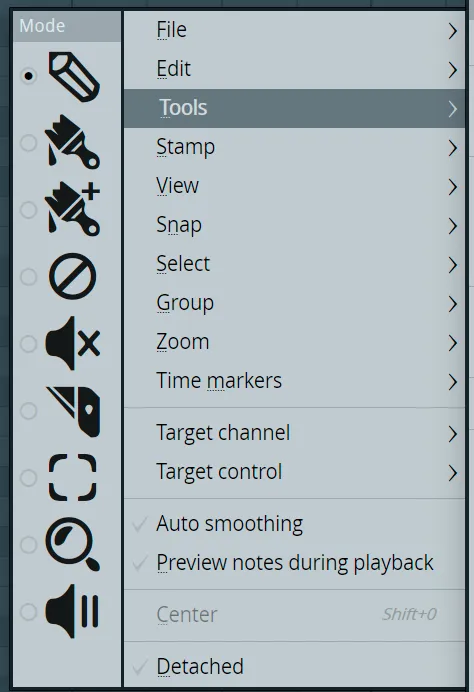
- Hold middle-click and then either left- or right-click: show this menu:
Not very helpful, but still shortcuts:
- Shift+alt+right-click (in playlist view): play track from beginning
Managing automation clips
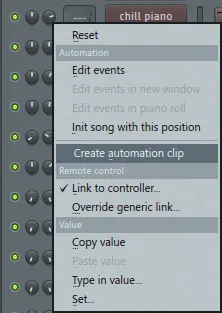
Section titled “Managing automation clips”Some instruments don’t have reliable enough velocity control, so you have to add an automation clip for the track’s volume. First of all, to add an automation clip, you just right-click practically anything in FL Studio and choose “Create automation clip”:
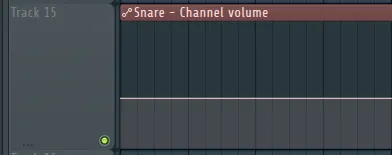
It’ll put a clip into the playlist:
The first thing you should do is cut this (the “C” key on the keyboard activates that tool) down to as small a size as you need (and delete the extra piece that’s created by cutting), that way it’s more manageable.
If you ever shrink an automation clip (via dragging its ends), then keep in mind that only what’s visible will affect the thing that you’re controlling. For example, suppose you draw lots of peaks and valleys over 50 measures, then you shrink the clip to just one measure. Whatever value is set at measure 2 will be set forever after.
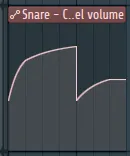
So now you have a clip where you can draw linear shapes:
If you want to reuse this, you can shift-click+drag its title bar:
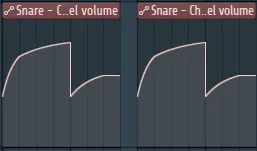
These are actually references to the same clip, so making a change to one will affect both of them. That’s where you can click the icon at the left side of its title bar and choose “Make unique”:
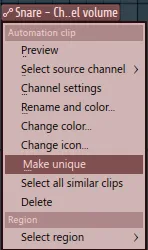
Now, changes you make to the unique one will not affect anything else.
As for setting specific values, as far as I can tell, there’s no easy way to do this. I always right-clicked a dot and either chose “Copy value” (or “Type in value”) to get the specific value that I wanted, then I’d right-click another dot and paste in that value.
When you drag a dot around on an automation clip, it may end up shifting/sliding all other dots out of the way. This is controlled by this checkmark in the playlist:

⭐️ Holding shift while dragging a dot around will keep its value the same while only changing its timing. Holding ⌘/ctrl will change just the value without the timing.
Voltage Modular (reference)
Section titled “Voltage Modular (reference)”Basics:
Section titled “Basics:”- This isn’t really part of FL Studio, but it’s free at the time of writing, and I’d never used a modular synth before.
- Awesome tutorial video
- From this video, I learned how to connect a few modules to get basics sounds outputting:
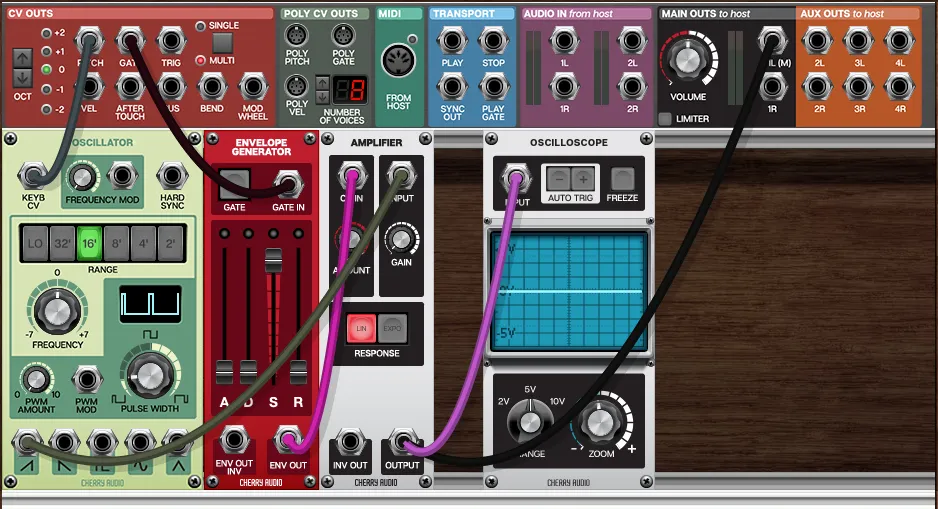
- Shown above:
- The “CV OUTS” (control voltage outs) are feeding the pitch into the oscillator to produce a waveform, then the gate into the envelope generator to control the ADSR properties. The pitch CV will let you play specific notes via MIDI input, and the gate will let you control the velocity.
Small tips
Section titled “Small tips”Colors: track colors can be nice, but ing them is tedious unless you settle on the same colors for every song you make. You can right-click a track and choose “random color”.

Undo history: ctrl+Z by default seems to just undo/redo the same single change. If you right-click the “undo” button though, you get to the browser history (which you can also open via alt+F8 and then click “history”).
Switching instruments in the piano roll: use the menu at the top to switch instruments quickly without having to change windows:

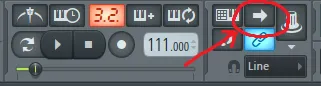
Auto-follow the playbar
Section titled “Auto-follow the playbar”It’s this button
Auto-locating channels
Section titled “Auto-locating channels”If you’re using numpad minus and plus to change between tracks, it can be really helpful to choose “Auto locate” from the channel dropdown at the top of the piano roll:
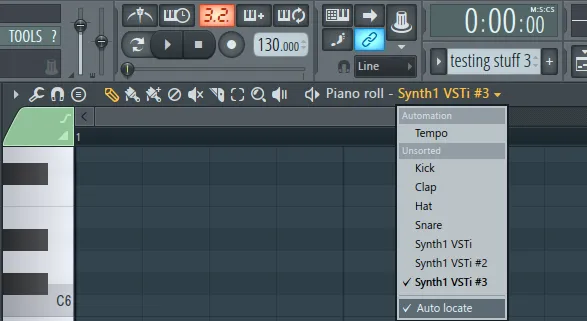
By doing this, it’ll automatically select the first non-empty channel, and if you’re like me and only have one channel per track, then this’ll save you some time.
Changing song tempo via automation (reference video)
Section titled “Changing song tempo via automation (reference video)”- Right-click the tempo control in the top toolbar and click “Create automation clip”
- Right-click the tempo control in the top toolbar and click “copy value”.
- Right-click a point in the track created for tempo automation and click “paste value”.
Controlling 3rd-party VSTs with a MIDI controller (reference video)
Section titled “Controlling 3rd-party VSTs with a MIDI controller (reference video)”I had no idea this was possible until 7/16/2017…
- F8 to open the browser
- Choose “Generators”
- Pick your 3rd-party VST (if there are multiple then you can find the name at the upper left of the VST’s window)
- You’ll now see all of the VST’s controls, and from here you can link them to your MIDI controller by right-clicking just like you would a 1st-party VST.
- Note: clicking a control in the VST window will highlight it in the browser so that you can tell what’s what.
Using my Novation Impulse
Section titled “Using my Novation Impulse”Just go to the MIDI settings, choose “Novation Impulse” (NOT “MIDIIN2 (Novation Impulse)”) and then click “Enable”. There’s no need to set a port. You should immediately be able to press keys and hear the result in whatever track was last selected; no need to restart anything.
The stop/play buttons on the keyboard directly remember where you are in the song. If you press stop twice though, it’ll bring you to the beginning. The rewind and fast forward buttons can change where the stop button resets to.
Right-clicking practically any knob/fader in FLStudio and choosing “Link to controller…” will let you be able to control a component from the keyboard. After choosing “Link to controller…”, adjust the corresponding knob/fader on the keyboard and they’ll become paired.
Linking channels to the mixer
Section titled “Linking channels to the mixer”Note: a channel is just an instrument basically, e.g. a kick or a snare. The mixer (shortcut=F9) is where you can control the volumes of these from one central place.
Easiest way: in the Channel Rack (shortcut=F6), you can see a number picker to the left of the channel name. Just choose a mixer track there or ”---” for master.
Another way: select the channel in the Channel Rack (shortcut=F6), then in the mixer, right-click an insert and choose “Channel routing” → “Route selected channel(s) to this track”.
Another way: click the name of the channel in the Channel Rack, then click the tiny arrow at the upper left and choose “Assign free mixer track”.
NOTE: there’s no concept of removing a channel from the mixer altogether; it at least has to go to Master. When you assign a channel via some methods, it will automatically color/rename the mixer insert, but “un-assigning” it by using the Channel Rack’s number-picker won’t change the color/name, so it can be confusing sometimes.
Edison
Section titled “Edison”If all you’re hearing is white noise from your microphone, it means Edison is enabled in your mixer. Press F9 to open the mixer, then click the “REC” track and choose “(none)” on the right side. If you still hear static, then it’s probably because you RECORDED static and Edison has it saved as a waveform. In that case, in the “REC” track, click Edison on the right side and delete the waveform.
Editing audio waveforms
Section titled “Editing audio waveforms”- To silence a section, select it, click Edit → Clear.
- To save the edited audio, you must save-as, which means you should probably name all of your files such that they make sense. It’s probably a good idea not to overwrite your original recordings so that you can always revert changes to them.
FPC (Fruity Pad Controller)
Section titled “FPC (Fruity Pad Controller)”If you have a drum pads on your MIDI controller, adding an FPC will let you play samples when you hit the pad on the controller. To map notes, there are three general methods:
- [configures all] Click to the right of “Midi Note” and choose “map notes for entire bank”. Then just press the pads on your MIDI controller (it helps if the pads on the controller are sending unique notes). If you run out of notes, you can just tap some keys on the high end of the keyboard.
- [configures one] Tap a pad to configure in FL Studio, then click to the right of “Midi Note” and choose “Learn”. Then press the pad on your MIDI controller.
- [configures one] Tap a pad to configure in FL Studio and see which note it’s set to, then change your MIDI controller to output that particular note from the pad.
I use Synth1 (official site here; it even has a Wikipedia page!) for some chiptune sorts of sounds.
8/29/2017 - 2:41 Popcultur: are you looking for 8-bit sounds because the best i’ve found is one called tb_peach
5/21/2018 - tons of extra presets for Synth1 here (how to install: go to synth1, click “opt”, browse to a “zipbank” folder with all the zips/rars, then wait for it to scan them all, then click “00:soundbank00” and choose “External”). Best presets I found:
- Alfmeister’s Magic Cracker
- 74: Above the Clouds
- 77: Space Keys MW
- Art Institute Vol 2 (lots of other random good ones too)
- 6: Voyabass
- 7: Bass soft
- 31: clavia
- 32: brass
- 37: Trumpet toy
- 41: piano rhodes
- Azur Studio 2
- 1: Barrel bass
- 22: Aquamarine
- 24: Water piano
- 39: Unknown Machine - cool for just ambient sound
- 78: Talk Robots - probably great for Bot Land
- Azur Studio 3
- 46: CB4 (cool when holding lots of notes)
- BIGTONE
- 5: BT old stage pno
- do_androids_dream Bladerunner
- 61 - 63: kicks
- Bryan Lake
- 2: Bottleneck
- Rydsound
- 12: hi hat
- VitaminD The Definitive Bank
- Decent drums in the green section
- Vivolator
- 3: BS Nymphette (mw,at)
- Wavephonic
- 69: child in time
- Teksonik 1 - lots of good stuff here: 54, 93
Kontakt
Section titled “Kontakt”Installing on macOS
Section titled “Installing on macOS”You have to reboot after giving Native Access and its daemon full disk access, otherwise the installations will keep failing.
Sending MIDI input to an instrument
Section titled “Sending MIDI input to an instrument”Choose the “MIDI Ch[annel]”
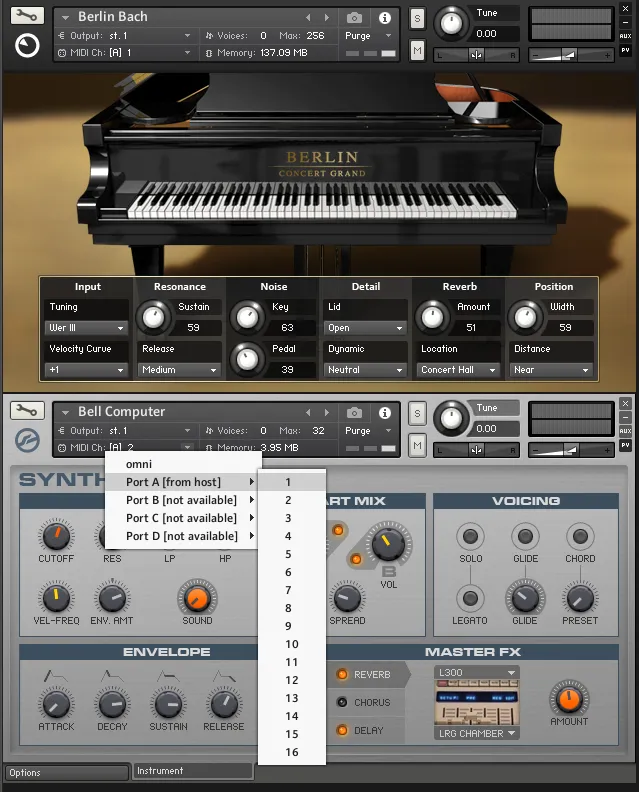
If this doesn’t work, make sure your MIDI device is enabled:
Troubleshooting
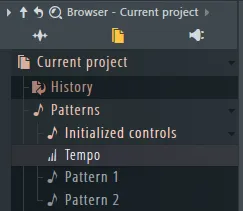
Section titled “Troubleshooting”Tempo keeps resetting (reference)
Section titled “Tempo keeps resetting (reference)”Delete Browser → Patterns → Initialized controls → Tempo
Speaker whine/buzz/noise even when OS is muted
Section titled “Speaker whine/buzz/noise even when OS is muted”This happened to me on macOS:
- I had just gotten new speakers.
- It worked fine everywhere else (e.g. Chrome + YouTube).
- Opening FLStudio produced a high-pitch whine through the speakers even when the OS itself was fully muted.
- Changing the audio output in FLStudio to “None” immediately fixed it.
The solution was something I never would have thought of (thanks, AI!):
- Open Audio MIDI Setup through Spotlight
- Add an Aggregate Device
- Choose the output you want FLStudio to use (e.g. your speakers or DAC)
- Note: if multiple entries show in “Audio Device”, make sure you choose the one with a number > 0 in the “Out” column.
- In FLStudio, go to Options → Audio settings, then select “Aggregate Device”
- If it doesn’t show, then restart FLStudio.
- Still make your OS use the speakers or DAC, not the Aggregate Device. If you have the OS use the Aggregate Device, you won’t be able to control the volume.
Headphones sounding choppy
Section titled “Headphones sounding choppy”Change the buffer size in Options → Audio settings.
Delete pattern controls
Section titled “Delete pattern controls”The easiest way I found to do this is to right-click a pattern and go to “Open in project browser”, then expand the pattern in the project browser and you should see the control that you want to delete.