Godot Engine
- They have a step-by-step getting-started guide here
- If you don’t want an extra console window when you start the engine, then start it from an existing CMD
- A list of all global constants is here
- If a node in a scene has a non-obvious purpose (e.g. it’s just used for positioning or for a theme), it could be worth adding a comment in the form of the Editor Description.
- Prefer
queue_free()overfree().free()frees a node immediately, which can cause issues as severe as crashes. - Visual assets like sprites or 3D models are typically provided by sites like OpenGameArt or itch.io
- To measure the framerate of a particular scene, play the scene/game, click “Debugger” in the bottom panel, then click “Monitor” and show the FPS. You can disable vsync in the Project Settings if you want it to be uncapped.
- You can color folders by right-clicking them in the editor and choosing “Set Folder Color…“. This is surprisingly helpful for easily differentiating scenes/assets/source (I went with green/red/orange).
%NodePath(kw: percent sign) - shorthand for getting a uniquely named node. You can set this on any node by right-clicking it in Godot and choosing “Access as Unique Name”. If doing this through code, you also need to set the owner:button.unique_name_in_owner = true; # UniqueNameInOwner in C#button.name = "ThisIsUnique";some_parent.add_child(button);button.owner = some_parent;- Note: if you instantiate a scene and make its children editable, then changes to the original scene’s
unique_name_in_ownerwill not affect the instantiated one. As of Wed 04/30/2025, you have to modify it by editing the.tscnfile (or toggling “Editable Children”, which will undo any changes you made).
- Note: if you instantiate a scene and make its children editable, then changes to the original scene’s
- The building blocks in Godot are nodes, and they form scenes, and scenes can be instanced just like a node so that you manage all of the components more easily.
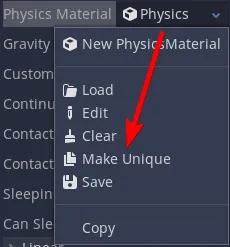
- When modifying instances of a scene, you’re modifying just that instance except in the case of shared resources like a material. In that case, making a new material will just affect the single instance. If you want to alter the material’s properties without making a new one, then select “Make Unique” using the arrow next to the resource:
- Keep in mind that shaders also need the “Resource → Local to Scene” checkbox set or else they’ll share uniforms (I think this is the reference)
- When modifying instances of a scene, you’re modifying just that instance except in the case of shared resources like a material. In that case, making a new material will just affect the single instance. If you want to alter the material’s properties without making a new one, then select “Make Unique” using the arrow next to the resource:
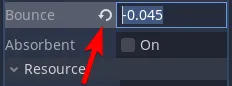
- When a modification from the source scene exists, you’ll see a gray “revert” button:
- When saving anything, you can only save to the project itself, so you’ll see special paths like res:// (reference).
- Project settings are saved to project.godot, but the editor has a GUI for it via Project → Project settings.
- You can also save custom properties here for use in your game if you want (sort of like environment variables)
- Design language: Godot says that their design language is what separates them from other game engines (reference). They say to apply these steps
- List every entity that your game has that would be visible to a player (e.g. projectiles, players, features like a store)
- Draw a diagram indicating “ownership”
- Make scenes out of each entity represented
- They support four scripting languages: GDScript, VisualScript, C#, and C++.
- Z-index (kw: ZIndex) can be relative to a parent. If it is, then the Z-index is added to that of the parent. If it isn’t, then the parent’s Z-index is completely ignored.
- Localization is supported directly through the editor (see Project Settings → Localization). If you dynamically set up a string through a script, then you’ll need to use the tr function.
- To add arbitrary keyboard keys as input, go to Project → Project Settings → Input Map → Add. It’s easy to set up.
- There’s a concept of groups that you can use for ease of coding in your game. This can be done through scripting or through the UI itself. A group could be for something like alerting enemies that you’ve entered their zone (reference).
- add_to_group(“players”)
- is_in_group(“players”)
- Basics of scripts
- If you ever have a scene with just a single node, and that node has a script, then the scene doesn’t really need to exist; you could instead just make a member variable whose type is the same as the script, e.g. var stats:Stats = Stats.new(starting_stats)
- You can only have one script per node.
- Folder structure (this is not enforced at all, but this seems like a good convention)
- root
- assets
- sprites
- fonts
- audio
- scripts
- scenes
- assets
- root
- If you want to scale your entire game, I don’t think Project → Project Settings → Display → Window → Stretch → Shrink is a good idea because you may end up chopping off parts of your UI/game. Instead, use Project → Project Settings → Display → Window → Size → Test Width / Height. This will change the size of the window, not the viewport. You may also want to change the Stretch properties so that you scale appropriately.
- Beyond that, you can add a Camera and modify its zoom property.
- In general, you’ll want a Sprite to be a child of its RigidBody2D or Area2D.
- Most issues that you run into with the editor itself can usually be fixed by going back to the Project List (ctrl+shift+Q) rather than restarting Godot completely.
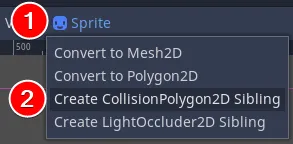
- If you want to draw a collision polygon, use a
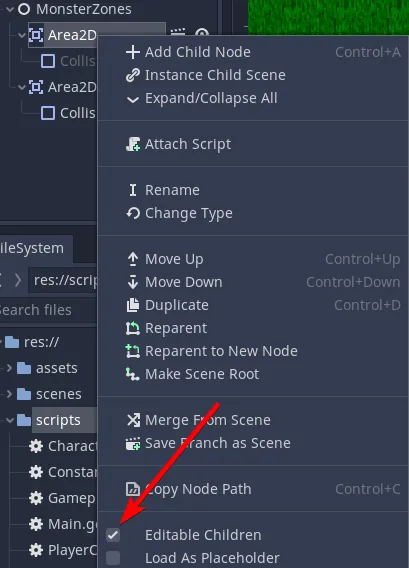
CollisionPolygon2Dinstead of aCollisionShape2Dwith aConvexPolygonShape2Dunderneath it. Then, the editor will show you these controls: - If you want to instantiate a scene and still modify its children, e.g. to customize a collider, you can right-click the instantiated scene and toggle “Editable Children”.
- Tween easings don’t always exactly match easings.net, so someone made a chart
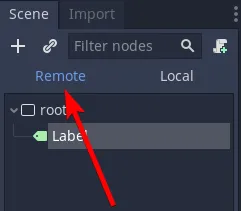
- If you make changes to the workspace or a particular node while the game is running, then it’ll persist those changes even after the game has stopped. If you don’t want this behavior, then you’ll need to click “Remote” when the game is running and make the changes through the inspector, not the workspace (the workspace always seems to make changes locally).

If modifying the documentation, make sure to build it first (reference).
For top-down, 2D games, you may want to enable Y-sorting, which will change the rendering order of objects based on their Y coordinate. This is better than using Z-index assuming that you want, say, a character to conditionally show in front of or behind another object (e.g. a tree). For a picture example, see this: 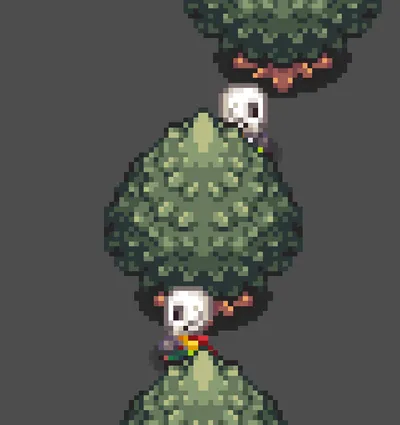
If Y-sorting doesn’t look like it’s working:
- Nodes can still be Y-sorted anywhere in the scene tree, but their common ancestors need Y-sorting enabled. In general, you want Y-sorting enabled on the container of all of your nodes to be Y-sorted, not the nodes themselves.
- The origin points of the nodes are not where you would expect (are they top-left-aligned? Are they centered?)
- The Z-index of two the two nodes may be different. Y-sorting is only considered when the Z-indexes are the same.
- You’re using a tile map and didn’t set up Y-sorting on the
TileMapLayercorrectly- Enable Y-sorting on the
TileMapLayeritself. - In the
TileSet, you can select a tile and changey_sort_originso that the specific point at which it considers Y-sorting that tile is lower or higher.
- Enable Y-sorting on the
- Perhaps you just need collision on the objects to stop them from overlapping. E.g. in the picture above, a skeleton would never look correct when standing on the stump itself, so that should just be prevented via collision.
Accommodating different resolutions
Section titled Accommodating different resolutionsThe official documentation is a really good resource for this. Here are some things I learned:
- HiDPI support is pretty awkward because
screen_get_scaleis only implemented on macOS (proposal to implement on other platforms here). What this means is that if you’re on macOS with a retina display, even if you use the macOS settings to set your resolution to1920x1080, the viewport in Godot will be3840x2160.
Building for macOS
Section titled Building for macOSThere are preview versions released on the official Godot site, but if you need a nightly version, you’ll have to dip in to their GitHub Actions (scroll down to “Artifacts” on a page like this). However, you can’t just double-click those artifacts to run them; you still have to go through a bunch of build steps. And if you want C# support, then you can’t even use those artifacts. 😢
Instead, here are the full steps I ran to build a Mono version for macOS (adapted from here):
- Get the Godot source
- Clone the repo
- Make sure it has whatever fix you’re trying to incorporate by searching through the code on your machine.
- Get the Vulkan SDK. This is needed if you’re building from the
masterbranch.- I just got the SDK installer. I didn’t check any additional options during installation. I also didn’t need to reboot, start a new terminal, or otherwise write down any paths after the installation.
brew install sconsscons platform=macos arch=arm64 module_mono_enabled=yes(themodule_mono_enabledcomes from these instructions)- This took about two minutes to run. I only built for ARM64 because that’s my computer architecture. I could still export non-ARM builds from an ARM version of the editor.
- This will produce
bin/godot.macos.editor.arm64.mono, but it lacks “glue” (reference)../bin/godot.macos.editor.arm64.mono --headless --generate-mono-glue modules/mono/glue- Build the managed libraries:
./modules/mono/build_scripts/build_assemblies.py --godot-output-dir=./bin
- At this point, you should be able to run
./bin/godot.macos.editor.arm64.monoand develop your game.- (if you get a build error about the Godot SDK, then read on for how to fix it)
- To export using this custom-built version of Godot, you need to build export templates (reference). For this, even though I’m only exporting from ARM, I want to export a universal build, so I had to run all of the commands on the page. Each
sconscommand took about 90 seconds. thelipoones are practically instantaneous.scons platform=macos target=template_release arch=x86_64 module_mono_enabled=yesscons platform=macos target=template_debug arch=x86_64 module_mono_enabled=yesscons platform=macos target=template_release arch=arm64 module_mono_enabled=yesscons platform=macos target=template_debug arch=arm64 module_mono_enabled=yeslipo -create bin/godot.macos.template_release.x86_64 bin/godot.macos.template_release.arm64 -output bin/godot.macos.template_release.universallipo -create bin/godot.macos.template_debug.x86_64 bin/godot.macos.template_debug.arm64 -output bin/godot.macos.template_debug.universal
- You should now have
bin/godot.macos.template_release.universalandbin/godot.macos.template_debug.universal. Run these commands:Terminal window cp -r misc/dist/macos_template.app .mkdir -p macos_template.app/Contents/MacOScp bin/godot.macos.template_release.universal macos_template.app/Contents/MacOS/godot_macos_release.universalcp bin/godot.macos.template_debug.universal macos_template.app/Contents/MacOS/godot_macos_debug.universalchmod +x macos_template.app/Contents/MacOS/godot_macos*zip -q -9 -r macos.zip macos_template.app - Now, if you try to export from Godot, it’ll tell you the path where it’s trying to find export templates. For me, it was
~/Library/Application Support/Godot/export_templates/4.3.rc.mono/macos.zip, so I just created that directory and movedmacos.zipthere. Then, in Godot, “refresh” the UI by clicking a different preset and then clicking “macOS” again, and you should be able to export. - I then got a build error:
The SDK 'Godot.NET.Sdk/4.3.0-rc' specified could not be found.. This means we need to rerunbuild_assemblies.pywith a local NuGet source (reference).Terminal window mkdir ~/MyLocalNugetSourceForGodotdotnet nuget add source ~/MyLocalNugetSourceForGodot --name MyLocalNugetSourceForGodot./modules/mono/build_scripts/build_assemblies.py --godot-output-dir=./bin --push-nupkgs-local ~/MyLocalNugetSourceForGodot- These steps are pretty quick and don’t require running any other steps; you can just click the “build” button in Godot as soon as
build_assembliesis done.
- These steps are pretty quick and don’t require running any other steps; you can just click the “build” button in Godot as soon as
- If you have lots of collisions going on (e.g. a bullet-dodging game) use circles for all collisions since they’re fast. If something is more rectangular in nature, draw many circles for it.
- The collision layer is a bitmask of what an object is considered to be. The collision mask is a bitmask of what an object scans. “A contact is detected if object A is in any of the layers that object B scans, or object B is in any layer scanned by object A.” (reference)
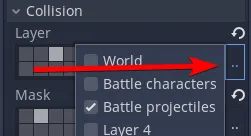
- You can give your collision layers friendly names via Project Settings → General → Layer Names → 2D Physics
- To see if the mouse has clicked an
Area2D(or anything that inherits fromCollisionObject, e.g.CharacterBody2D), you need to make sureinput_pickableistrueand then connect theinput_eventsignal (reference)var area2d: Area2D = $Area2Darea2d.input_event.connect(self._on_input_event)func _on_input_event(viewport: Viewport, event: InputEvent, _shape_idx: int) -> void:if event is InputEventMouseButton:var mouse_event: InputEventMouseButton = eventif mouse_event.pressed and mouse_event.button_index == MOUSE_BUTTON_LEFT:# do something hereviewport.set_input_as_handled() - For a RigidBody2D to be able to collide physically and also have a function to detect collision, both
contact_monitorandcontacts_reportedmust be set correctly (trueand>0respectively).thesbros: On the rigidbody. <https://docs.godotengine.org/en/3.1/classes/class_rigidbody2d.html> "contact_monitor must be true and contacts_reported greater than 0."
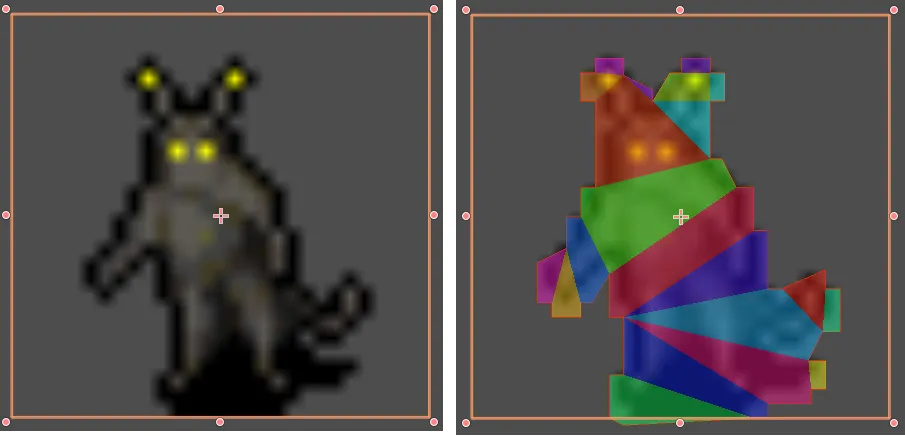
- You can generate a CollisionPolygon2D from a sprite automatically (reference)
- Select a sprite in the scene tree
- Click “Sprite” toward the top of the editor
- The result is something like this:
- These may not be performant unless you have very few of them.
- Always, always, always make your collision-handling “parent” like Area2D/KinematicBody2D contain your sprites. The reason why is because the body is what’s detecting collisions, so if it’s a child of a sprite, then you’ll need extra code to move the sprite as the body gets adjusted.
- You can more easily edit the layers by clicking the triple dots so that you don’t have to hover over the graphical representation:
Using with Visual Studio Code
Section titled Using with Visual Studio Code- Some features are a little rough around the edges here, so get used to using the internal editor to fill in any gaps (i.e. become friendly with the F3 shortcut).
- The Visual Studio Code extension that I installed was this one.
- At least on macOS, Godot’s language server uses port 6005 by default, so I changed the corresponding VSCode setting:
"godot_tools.gdscript_lsp_server_port": 6005 - I made a setting for specifying Godot’s executable:
- macOS:
"godot_tools.editor_path": "/Applications/Godot.app/Contents/MacOS/Godot", - Windows:
"godot_tools.editor_path": "C:\tools\Godot\Godot_v3.2.1-stable_win64.exe",
- macOS:
- At least on macOS, Godot’s language server uses port 6005 by default, so I changed the corresponding VSCode setting:
- In Godot → Editor → Editor Settings… → General → Text Editor → External, choose “Use external editor”. I also set the editor’s path:

- The path is
/Applications/Visual Studio Code.appon macOS. - Set the Exec Flags based on your editor as mentioned here, that way it’ll open to the right line/column.
- The path is
- After setting this up, you should just be able to click the “script” button to open in Visual Studio Code
- If you want to ignore any linting issues, you’ll need to do something like this on the line above the erroneous code:
# warning-ignore:return_value_discarded
- Godot’s editor can add this line for you automatically.
- To debug GDScript, follow these instructions. To debug C#, look at my C# notes for Godot.
- If you’re using an external editor but trying to run through Godot itself, then the breakpoints that you set in the external editor won’t work. Also, Godot itself doesn’t seem to get your updated scripts all that often, so the scripts it does show may be out-of-date.
Navigation (AKA pathfinding)
Section titled Navigation (AKA pathfinding)- This page has some helpful troubleshooting information, e.g. if your agent is jittering or can’t reach its destination.
- You shouldn’t set the
TargetPositionevery single frame. I’m not totally sure how you should make an enemy chase the player if the player is constantly moving. Maybe just request a new path every 0.5 seconds? - If you’re getting stuck on a corner, consider setting PathDesiredDistance and TargetDesiredDistance higher. It’s possible that your agent’s velocity is higher than the desired distance.
- You shouldn’t set the
- Navigation with meshes works by making polygonal regions that indicate walkability. If you want an obstacle, you actually have to cut out a portion of that region. Godot can handle this for you, but it’s not super obvious how, and it’s apparently changing from 4.2 → 4.3, so I’ll just write some quick notes:
- To add an obstacle to a tilemap, you need a
NavigationRegion2Dwith its Source Geometry Mode set to something like Group Explicit. By doing this, you can add meshes and static colliders to a named group and they’ll be removed from the nav mesh (that way you don’t need the meshes and colliders to be children of the navigation region). Just keep in mind that the colliders need to beStaticBody2Dinstances, notRigidBody2D; the point is that they’re not allowed to move since moving them would require rebaking the mesh. TheStaticBody2Dcan be anywhere in the scene tree, but it needs a global group added to it. The parents of theStaticBody2Ddon’t need that label.
- To add an obstacle to a tilemap, you need a
- Keep in mind that navigation is not the same as collision. This means that if your character is too close to walls, for example, that collision shapes won’t change anything.
Scene inheritance
Section titled Scene inheritanceSometimes, you’ll have a scenario like this:
- You have a scene that has the structure that you want
- You want to derive children based on that scene that have different scripts
There are a few techniques you can use here (see sub-headers). Note that there is no such thing as an abstract scene. If you want this in practice, you can make a script called Abstract.cs and just throw an Exception from its _Ready function (you may potentially need to check the class name at runtime if the base class needs its _Ready function for initialization).
Scene inheritance
Section titled Scene inheritanceMake a new scene and instantiate a scene into it without having a root node:
As you can see, the nodes in the derived scene turn yellow (to indicate that they come from the base scene)’, and hovering over the root shows what the scene inherits from.
Use the same scene but different scripts
Section titled Use the same scene but different scripts- If instantiating scenes through the editor, just assign a different script in the editor.
- If instantiating scenes through code, you can call
SetScript.
Changing base scenes
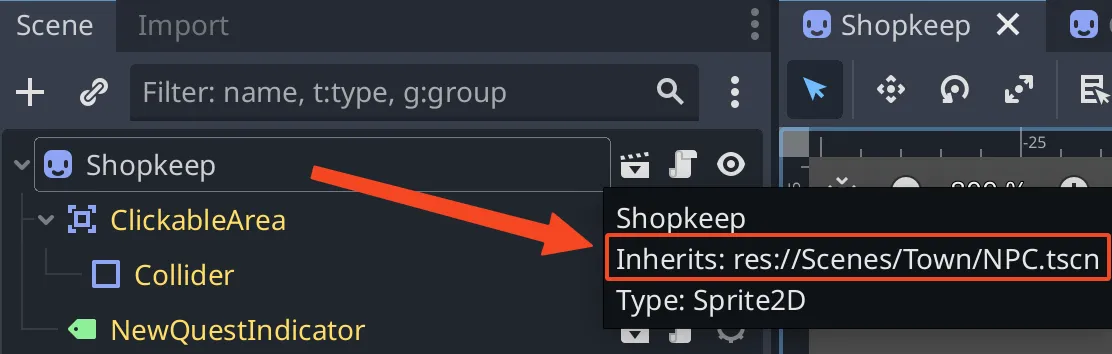
Section titled Changing base scenesFor example, I have a base scene, NPC.tscn, and Guildmaster.tscn inherits from it. Guildmaster.tscn looks like this:
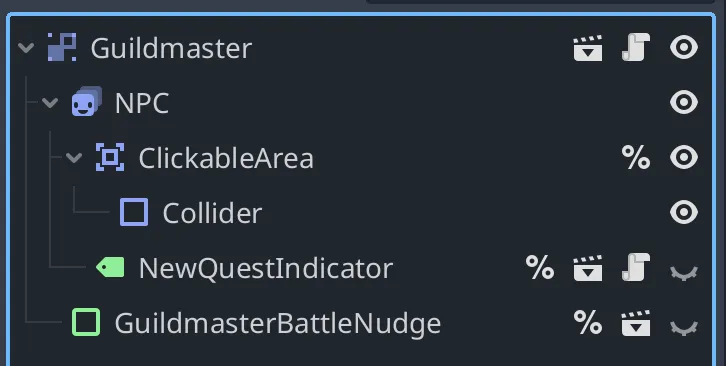
You can see from the % sign on ClickableArea that it’s accessed via a unique name. However, that’s not currently true in the base scene. When I change NPC’s ClickableArea to be accessed via a unique name, too, this happens to Guildmaster:

That one change ended up duplicating ClickableArea and NewQuestIndicator. In my case, I wanted to clean up the nodes with white names so that I could match the hierarchy from the base scene, but Godot doesn’t know that I want that, so it can’t make this change automatically.
In other cases (like in this issue I filed), Godot may produce a warning about Node './Label' was modified from inside an instance, but it has vanished.
Basic tilemap usage
Section titled Basic tilemap usage- Pro-tip: use “Distraction Free Mode” when working with tilemaps so that you can see more! It’s the “expand” icon at the upper right of the editor.
- To set one-way (i.e. directional) collision on a tile map, see these instructions.
- As of Godot 4, you can use one tilemap with many layers, e.g. for background, foreground, etc. (reference). Just modify the “Layers” property of the TileMap in the Inspector, then choose the layer you want to draw to using the TileMap tool at the bottom of the editor.
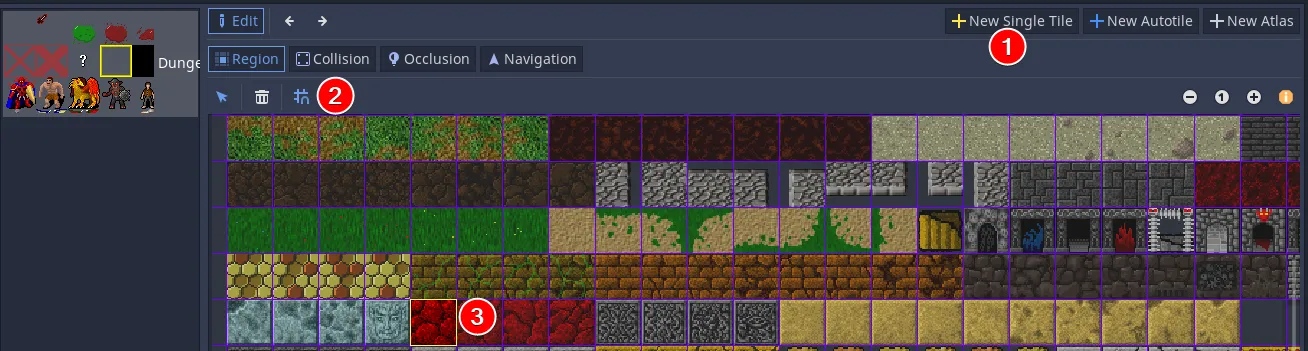
- Tilemap steps (reference)
- Make a new scene
- Ctrl+A → TileMap
- In the Inspector for the TileMap
- Set cell properties to the tilesize
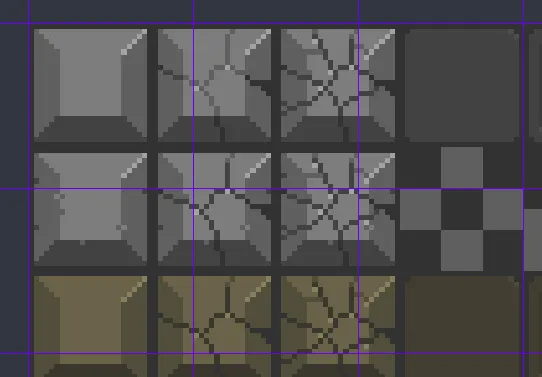
- Note: this does not customize the grid itself that shows in purple-ish in the picture below:
- Set cell properties to the tilesize
-
As you can see, the tiles don’t align with the grid itself. To configure that, you first have to select a tile (click “new single tile”, click the magnet to enable snapping, then drag any selection). At that point, the inspector will show you the snap options where you can configure the step size (reference).
-
Make a new TileSet
-
Edit the TileSet. You’ll see the bottom panel change.
-
Drag your spritesheet into the left side of the bottom panel
-
Click “New Single Tile” and the magnet to snap to the grid, then click a tile.
-
Name your tile in the right side if you want. This is really important because at least at the time of writing, it’s really hard to tell what you’re editing.
-
At this point, if you click your TileMap node in the scene view and then start drawing tiles using the panel on the right
- “New Atlas” is how you can use the whole spritesheet as tiles.
-
Note: you can only set a collision layer at the level of a whole TileMap, not for individual tiles.
- Click “New Autotile” and drag a contiguous region around your tiles
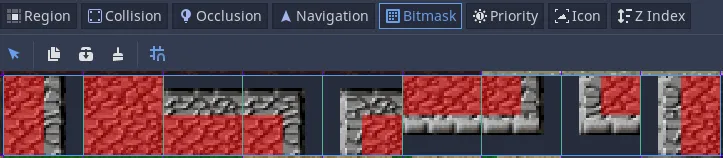
- Click “Bitmask” and indicate which quadrants are “filled” (see “bitmask explanation” for an explanation):
- It’s possible to use a 3x3 grid for more control. You’ll find it in the Inspector → Selected Tile → Autotile Bitmask (reference):

- Here’s an example of a 3x3 (minimal), although I probably didn’t fill everything in correctly:

If you need to “expand” your input graphic so that all of the connections are covered (e.g. you only have ~16 tiles and need ~48), you can use Webtyler.
Bitmask explanation
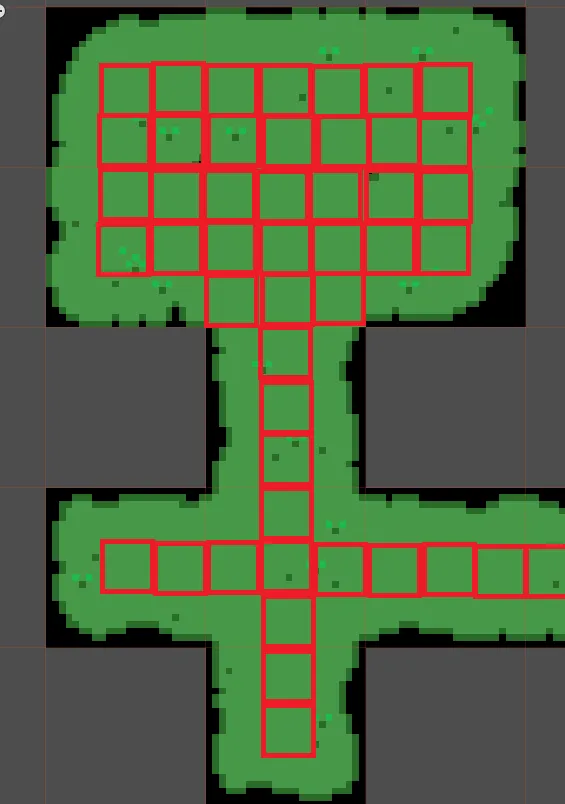
Section titled Bitmask explanationRemember, they’re not magic! Godot is just connecting shapes that it can match from the bitmasks that you set up. I hastily annotated a small map with red squares to represent the bitmasks:
Suppose we never set up a bitmask for this ”+” shape that you see in the bottom middle:
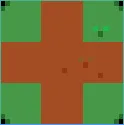
The map would go from this:
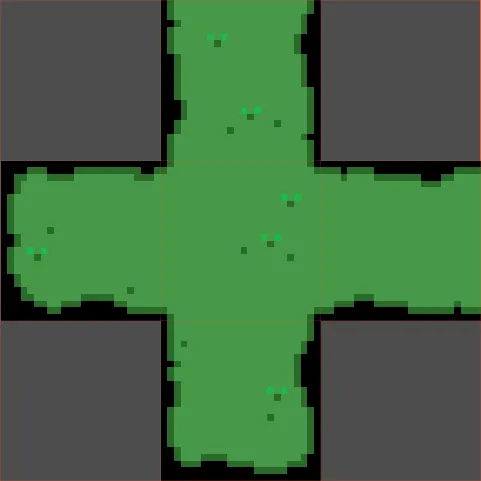
…to this:
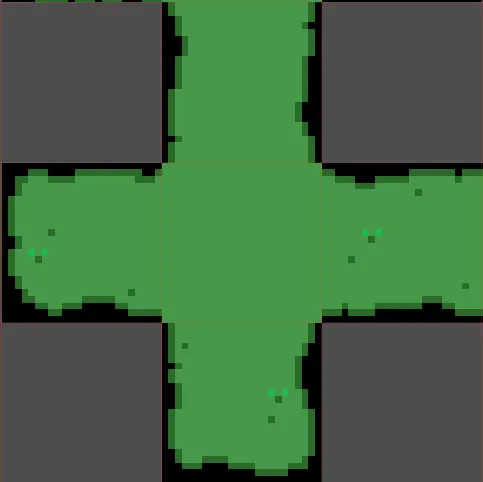
(it’s subtle, but you can see the black pixels at the corners of the middle tile have disappeared since Godot no longer found a ”+” connector)
Comparison to other game engines (reference)
Section titled Comparison to other game engines (reference)- Godot is…
- Free
- Open-source
- Godot’s design philosophy from a coding standpoint is different from other editors (reference)
Camera zooming to the mouse
Section titled Camera zooming to the mouseGoal: get zooming to work like it does in Google Maps where the camera zooms on the mouse cursor. Normally, cameras in Godot zoom on their center, not some target’s center.
The theory behind this is that you want to perform the following steps:
- Center the camera on the mouse, that way the mouse’s position and the camera’s center are the same.
- Zoom in.
- Move the camera so that it’s centered on the mouse’s screen coordinates. Remember: the mouse won’t have moved during this time.
# (this code all goes in a Camera2D node. Make sure you set anchor = Camera2D.ANCHOR_MODE_DRAG_CENTER)
# Center camera on mouseglobal_position += get_local_mouse_position()
# Zoom now that we have our new centerzoom = new_zoom_value
# Move the camera back to where the mouse used to beglobal_position -= get_local_mouse_position()
Gotchas:
- Make sure you’re not binding this to both the key up and down of an input, or this won’t work. E.g. I had code just checking for
MOUSE_BUTTON_WHEEL_UP, which caused two events to be fired per frame. Presumably Godot didn’t run its own internal update of a transform somewhere, so the correct zoom/positioning code on my end led to incorrect results. - This method used to work in Godot 3, but it doesn’t work in Godot 4 and I can’t figure out why. Godot inverted how zooming works (in Godot 3, bigger numbers meant you were zooming out), but I still couldn’t get it to work even with that in mind.
Sprites / spritesheets
Section titled Sprites / spritesheets- Spritesheets can be done by just loading a particular region of a sprite. This can be done through the “Region” section of the Inspector or via code.
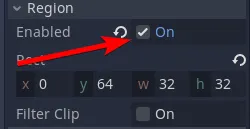
func _ready():set_region(true)set_region_rect(Rect2(0,64,32,32))There’s been an issue open since 2020 about testing in Godot (at least for C#). In general, these are true as of today:
- If you want to test something that involves only C#, just use any unit-testing library
- If you want to test something that involves any Godot-specific code, you need Godot to be running.
- There are lots of options for this sort of thing—some that run in Godot itself as a plugin (e.g. gdUnit4), some that run outside of Godot or in VSCode.
- I decided to use the Chickensoft stuff from here for my C# game.
- On macOS, I hit this issue where the engine crashes after running the code from the command line:
/Applications/Godot_mono.app/Contents/MacOS/Godot --run-tests --quit-on-finish --path /Users/adam/tmp/test_chickens/godotgame/MyGameName- I can work around that by getting rid of
--quit-on-finishand just manually quitting. - It may be a screen-recording issue? I only noticed that a dialog had popped up when I went to reboot my machine, so I didn’t get to test this out.
- I can work around that by getting rid of
- F1-F3: select different workspaces (2D, 3D, Script)
- Shift+F1: access documentation directly in the game
- Ctrl+A: add node
- After adding the node, pressing Enter on it will rename it.
- F5: play game (this starts with the default scene, which is configured in Project settings → Application → Run → Main scene)
- F6: play scene
- F8: stop scene
- Ctrl+D: duplicate node
- Ctrl+click (a line in a script): bring up references in the editor directly
- Ctrl+shift+O: quick-open scene
- Ctrl+alt+O: quick-open script
An object is not clickable
Section titled An object is not clickableIf it’s a UI element that you’re trying to make clickable, see the Godot UI note. For non-UI objects, it’s very simple:
- Make sure
input_pickableis set. - Make sure the object has a layer set (just having a mask isn’t enough) (reference).
public override void _Ready(){    GetNode<Area2D>("%Area2D").InputEvent += ClickableAreaInputEvent;}
private void ClickableAreaInputEvent(Node viewport, InputEvent @event, long shapeIdx){    if (@event is not InputEventMouseButton mouseButton)    {        return;    }
    if (mouseButton.Pressed && mouseButton.ButtonIndex == MouseButton.Left)    {        // clicky    }}
Finding orphaned nodes
Section titled Finding orphaned nodesOrphaned nodes are just nodes that were created but do not exist in the scene tree, meaning Godot won’t know when to free them (even in C# when their last reference is removed). Orphans on their own aren’t a problem; maybe you want a pool of nodes in memory that you can reuse. However, when you don’t want them, you can use PrintOrphanNodes() to find them. This will print something like this, so make sure to name your nodes!
266925514845 - Stray Node: @Node2D@314/@Node2D@428 (Type: Node2D)255231795314 - Stray Node: @Node2D@376/Components (Type: Node)262630547576 - Stray Node: @Node2D@410/Bonepile (Type: Sprite2D)To even know whether you have orphans, you can look at the monitor: 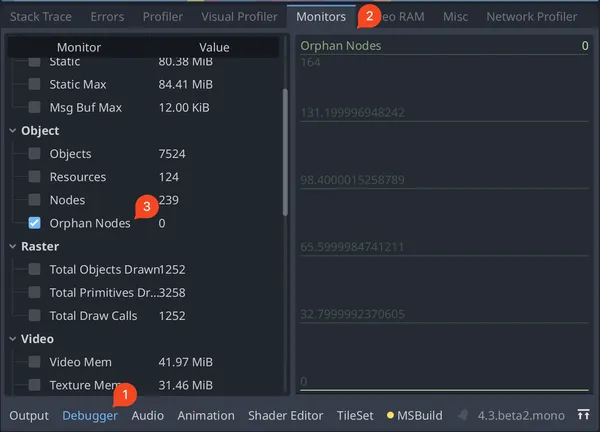
Jittery camera movement when hitting boundaries
Section titled Jittery camera movement when hitting boundariesI ran into an issue when making Skeleseller where I put camera-update code in _PhysicsProcess instead of _Process. As a result, people with high-refresh-rate monitors ran into issues with panning to the sides of the map or zooming in and out to the maximum extents.
I just needed to use the correct _Process method to accommodate refresh rates.
Printing stops working (reference, reference2)
Section titled Printing stops working (reference, reference2)I don’t know what caused this, but I had to restart the editor to fix it. Don’t just assume that print(“hit this code”) isn’t being hit just because you don’t see the log.
The reference links suggest that you may have disabled stdout through the project settings.
ViewportContainer not rendering children until manually modifying a property
Section titled ViewportContainer not rendering children until manually modifying a propertyThis happened to me when I had this code:
add_child(viewport_container)viewport_container.add_child(viewport)viewport.add_child(gameplay_scene)The problem is that I was adding the children to the ViewportContainer after adding the ViewportContainer to the scene tree. I just put the first line at the end and it worked.
Lines are appearing between tiles in a tilemap (reference)
Section titled Lines are appearing between tiles in a tilemap (reference)E.g. this:
Just enable “Use Pixel Snap” in the Project Settings to fix this.
Note that if you’re only seeing this for an HTML export, then you likely have to use GLES 3.0 instead of 2.0.
Sprites bleed outside of their boundaries in a spritesheet (reference)
Section titled Sprites bleed outside of their boundaries in a spritesheet (reference)E.g. this:
To fix this, click your spritesheet in the FileSystem tab, then at the upper left next to “Scene”, you’ll see “Import”. Click “Import”, turn “Filter” off, then click “Reimport”. UPDATE: it’s now in Project Settings → Default Texture Filter
It’s also possible that you have a SubViewport that needs snap_2d_transforms_to_pixel set to true (for whatever reason, it doesn’t seem to respect the project-wide setting). At least in my case, that particular issue was caused by resizing the game window on macOS despite not having any scaling involved. It’s possible that it’s this known issue.
Text within a SubViewport looks bad
Section titled Text within a SubViewport looks badI never found a good solution for this. A solution is to put any text into a viewport that does look good, but this is quite unwieldy. For example, imagine you have a character whose name should float above their head in world space. You would need to move that label to another viewport entirely, which means putting it in a different scene and then somehow linking the character scene with its name scene.
Especially when trying to export builds, I get a lot of lag. It seems like the Mobile renderer may help with that (reference).
peer > 0 && !connected_peers.has(peer) (reference)
Section titled peer > 0 && !connected_peers.has(peer) (reference)Full error:
E 0:01:19:0818 _process_sys: Condition "peer > 0 && !connected_peers.has(peer)" is true. <C++ Source> modules/multiplayer/scene_multiplayer.cpp:317 @ _process_sys()This apparently isn’t an error; it’s just a warning saying that we got an update for an object that no longer exists (or something like that).
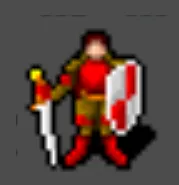
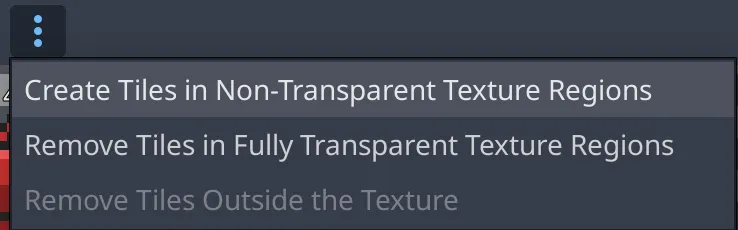
Tileset has unusable, darkened tiles
Section titled Tileset has unusable, darkened tilesIn this screenshot below, see how some of the bones are darkened? They can’t actually be placed as tiles because they’re not tiles. 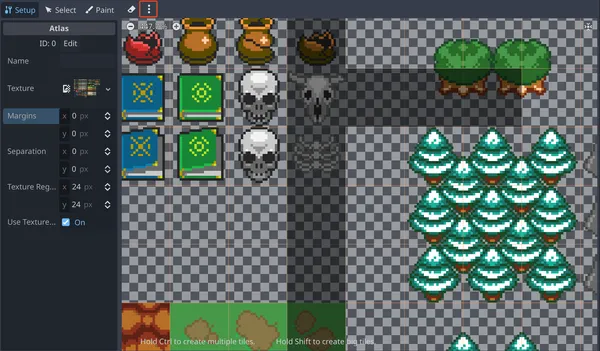
The solution is to click the three dots highlighted above in red and select “Create Tiles in Non-Transparent Texture Regions”
Tileset has tiles outside of the texture area
Section titled Tileset has tiles outside of the texture areaThe problem looks something like this: 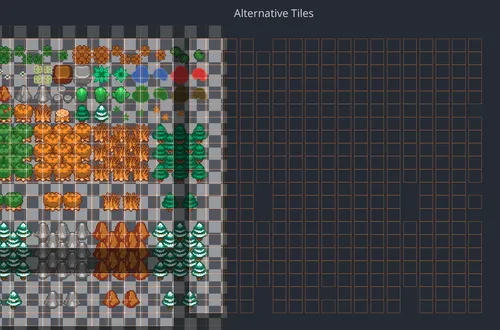
…where you have orange squares indicating tiles and they’re outside of the texture region. This can happen when you set a TileSet texture, have Godot automatically create tiles (see below): 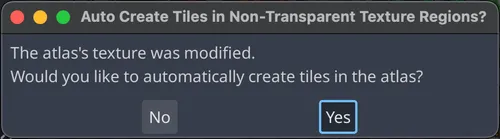
…and then enlarge the Texture Region Size, which will bump the automatically created tiles off of the texture.
To fix this, you could either manually erase tiles or choose this option:
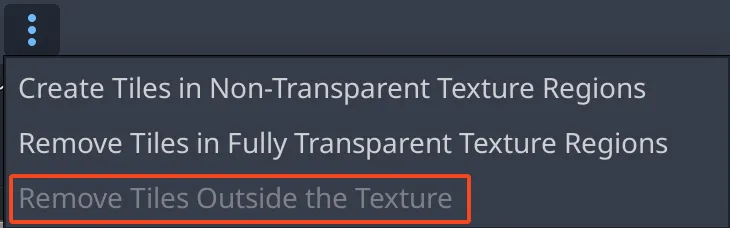
The problem is that the option above isn’t enabled by default. To fix this, reload the scene (Scene → Reload Saved Scene).
GetCamera2D (kw: get_camera_2d) returns null
Section titled GetCamera2D (kw: get_camera_2d) returns nullE.g.
When this happened to me, I was doing GetTree().Root.GetCamera2D(), and it was returning null. It turns out that it’s because I had a scene tree like this:
- Root
- SubViewportContainer
- SubViewport
- Camera2D
- ElementWithAScriptTryingToGetTheCamera
- SubViewport
- SubViewportContainer
The problem is that my active camera is in a SubViewport, but GetTree().Root will return the rootmost node, not your SubViewport. To fix this, just call GetViewport().GetCamera2D(), and it’ll get the nearest viewport ancestor.
UIDs are pointing at the wrong thing
Section titled UIDs are pointing at the wrong thingThis is a known issue in Godot (reference), but it wasn’t obvious to me until using Godot for a very long time how to automatically fix it. Simply open the scene with the warning and then run your project from Godot. Opening the scene alone, running from VSCode, or running from Godot without the scene open will not fix it.
As of ~v4.4, there’s now a built-in way to fix all UIDs across your project! 🎉
- First, back everything up (i.e. commit your code so that you have a clean slate)
- Go to Project → Tools → Upgrade UIDs…
- Click Restart & Upgrade
- Run the exact same tool again. It seems like it sometimes requires two runs to “settle” and become idempotent.
- Check in any changes it made (typically to
.tscnand.uidfiles). The.uidfiles should indeed appear in souce control.