Exporting builds from Godot
Adding flags or custom parameters to exported builds
Section titled “Adding flags or custom parameters to exported builds”(see notes on this stuff in sub-sections)
- Feature tags: basically just boolean values (you either have the tag or you don’t)
- Project settings: these can be any
Variant
Feature tags
Section titled “Feature tags”(reference)
Set them through Project → Export → <Choose a target> → Features: 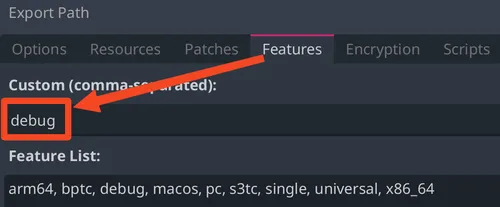
Then, check their existence with code like OS.has_feature("debug"). Note that exporting with the debug feature is not the same as exporting such that C#‘s #if DEBUG will work.
The main use of this is to tag a build with something like demo, has_cheats, etc.
Project settings
Section titled “Project settings”Set these through Project → Project Settings… 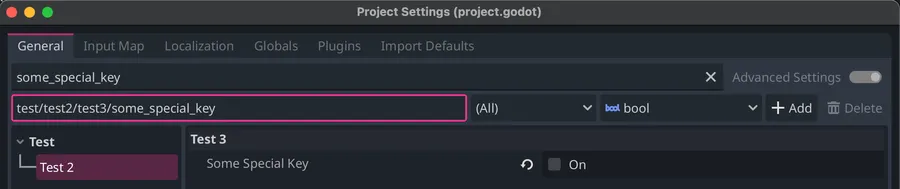 (make sure to click ”➕ Add” after typing out a path/key)
The key above will show up like this in project.godot:
[test]
test2/test3/some_special_key=false
Fetch it from code with ProjectSettings.get_setting("application/config/version").
The best part of project settings is that you can change them based on feature tags (reference). For example, you can separate your leaderboard URLs by modifying your project.godot like this:
[leaderboard]url="https://example.com/main_leaderboard"url.demo="https://example.com/demo_leaderboard"⚠️ Keep in mind that if you do this, you need to read the setting with ProjectSettings.get_setting_with_override. E.g.:
ProjectSettings.get_setting("leaderboard/url") # URL will always be "https://example.com/main_leaderboard"ProjectSettings.get_setting("leaderboard/url.demo") # URL will always be "https://example.com/demo_leaderboard"ProjectSettings.get_setting_with_override("leaderboard/url") # URL chosen will be based on whether you have the "demo" tag or notInstalling export templates
Section titled “Installing export templates”This needs to be done before any kind of export:
- Make sure you’ve downloaded Godot export templates from Editor → Manage Export Templates…:

- Make sure to install export templates (reference)
- All you need to do is:
- Set the export path (e.g.
./output.app) - Fill out the bundle identifier (e.g.
com.example.game) - If you’re not going to sign/notarize the app, then you should also enable Codesign → Entitlements → Disable Library Validation (it says to enable that option if you’re using ad-hoc signing, which should be the case, and you can verify that by reading the yellow warning text at the bottom of the export window).
- Click “Export All…”
- Set the export path (e.g.
- To run it, just do
open ./output.appon the command line
Exporting Windows builds using a Mac
Section titled “Exporting Windows builds using a Mac”
If you get that warning about needing rcedit, you can just uncheck Application → Modify Resources, which means you won’t have a custom icon on Windows. If you do want a custom icon, then install rcedit (and apparently WINE) following these instructions. If you don’t want to use rcedit, they have instructions farther down that page saying that you can compile Windows export templates yourself with godot.ico replaced by your icon. I assume you can also replace any of the other metadata by modifying this file, but I didn’t test this.
Update: you shouldn’t even need rcedit as of Godot 4.5 (reference).
To use WINE for this through the Godot UI (reference):
- Get Wine. I already had it as part of Whisky, and mine was located here:
~/Library/Application Support/com.isaacmarovitz.Whisky/Libraries/Wine/bin - Fill out Godot → Editor Settings → Export → Windows →
winewith that path. Don’t include quotation marks. - Fill out the sibling option,
rcedit, with the path torceditthat you download from GitHub - Export as you normally would with “Modify Resources” checked, meaning it will inject this information using
rcedit.
To use WINE through the command line, just run rcedit according to their instructions. E.g. this changes the icon: ./wine64 ./rcedit-x64.exe ./my-game.exe --set-icon ./my-icon.ico
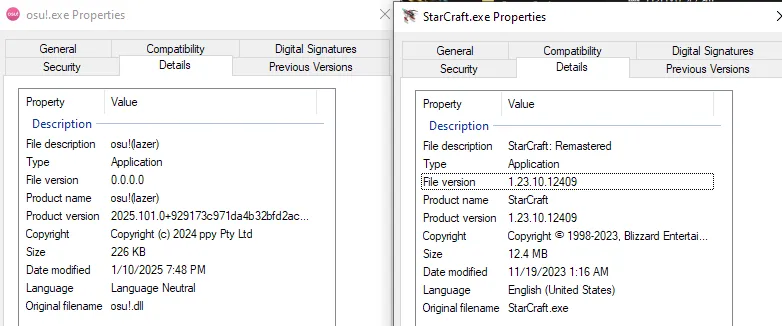
For some examples of how this looks for other games on Windows:
Web export
Section titled “Web export”Note that as of 02/14/2024, you cannot do a web export from the .NET version of Godot, so make sure you open the non-Mono version; it says so right in the export dialog: 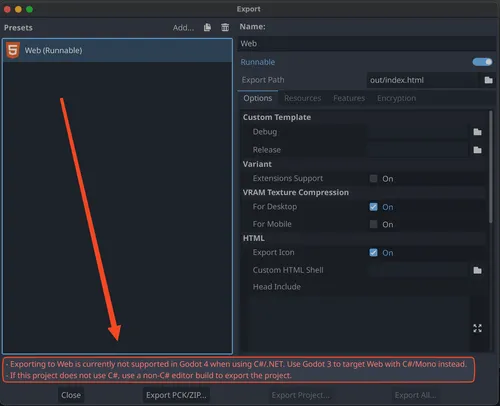
How to export
Section titled “How to export”- Make sure to install export templates (reference)
- Set the export path (e.g.
./out/web/index.html)- Note: the
out/webfolder needs to exist for this to work - It’s a good idea to make an intermediate folder like
htmloroutsince you’ll get more files than just the HTML file.
- Note: the
- Click “Export Project…” or do it through the command line
Hosting the web export
Section titled “Hosting the web export”With any means of hosting on the web, you may eventually see an error like this:
ErrorThe following features required to run Godot projects on the Web are missing:Cross Origin Isolation - Check web server configuration (send correct headers)SharedArrayBuffer - Check web server configuration (send correct headers)This means that the headers haven’t been set correctly by the web server. Sub-sections below talk about how to fix this.
Hosting locally
Section titled “Hosting locally”- Note: regardless of how you do this, you’ll need to do a new web export every time you want to update the game for people playing it. Also, you probably need to restart the server unless you only made client-side changes.
- The easiest way to do this is to use the Python script that they link from this page (here’s a direct link to the Python script, but maybe this’ll change eventually).
- The concrete steps are very simple:
- Download that page as
host.py - Run
python3 host.py -r path_to_the_folder_containing_your_html_file
- Download that page as
- If you don’t do this and instead try to host with something like
http-server ., you’ll get an error like this:
- The concrete steps are very simple:
- If you want to easily share this with people without having to upload this anywhere, just use Cloudflare Tunnels.
- When setting up the tunnel, you can choose “HTTP” and Cloudflare will automatically set up a certificate for you so that it works over HTTPS, which is apparently required by Godot for the secure-context stuff.
Hosting on a shared web host
Section titled “Hosting on a shared web host”If the host is based on Apache (e.g. it can be LiteSpeed Web Server), then it supports .htaccess files, which means you can upload an .htaccess file alongside your .html file that looks like this:
<IfModule mod_headers.c> Header add Cross-Origin-Opener-Policy "same-origin" Header add Cross-Origin-Embedder-Policy "require-corp"</IfModule>Hosting on itch.io
Section titled “Hosting on itch.io”This should be straightforward. There’s some additional context around the header stuff here. I hosted a game on Itch a while ago, so I didn’t think there was much to write notes about this time around.
Accessing files from exported builds
Section titled “Accessing files from exported builds”Godot has two main ways of accessing files:
These do slightly different things and have some quirks to them:
DirAccesswill only list files on-disk. This means that if you have an.svgfile in your project and you’re running a build through Godot, then you’ll see that.svgfile on-disk. However, after exporting a build from Godot and running, the.svgfile will no longer exist. Instead, this file is imported into Godot (hence the existence of a.importfile).ResourceLoader.ListDirectorywill list only resources and directories.- Resources are any of these, e.g. a scene, an asset that had an
.importfile, a.tresfile, etc.- The way that imported resources work is that Godot will consult the
.importfile to find the underlying data inside the.godotfolder. This folder isn’t checked in to source control, so it’s possible that you have an.importfile with no corresponding data. This can happen if you delete, say,foo.svgfrom outside of Godot without also deleting itsfoo.svg.import(which Godot would have done for you if you’d deleted through the editor).- In this case, attempting to use
ResourceLoader.Load("res://foo.svg")will fail on an unexported build, but the exported build is apparently smart enough to know that the.importfile has no underlying data.
- In this case, attempting to use
- The way that imported resources work is that Godot will consult the
- Directories will end in a slash, e.g.
Builds/orSrc/.
- Resources are any of these, e.g. a scene, an asset that had an
The conclusion is that if you’re trying to load resources that have .import files, you must use ResourceLoader.ListDirectory or else you’ll see empty directories on exported builds. For example, for Skeleseller, I wanted to preload all SVG files, so I needed ResourceLoader.ListDirectory because DirAccess.GetFiles couldn’t find .svg files since they were imported.
The final quirk here is that file names can be changed during export. This is what the [remap] property is at the top of any .import file. ResourceLoader.ListDirectory is aware of these, so you wouldn’t need to do anything special. But DirAccess.GetFiles will only find foo.tscn.remap instead of foo.tscn. However, you can’t load a resource via foo.tscn.remap. This is yet another reason to use ResourceLoader over DirAccess for fetching resources.
Cutting files out of exported builds
Section titled “Cutting files out of exported builds”By default, Godot will export all resources in the project. Exported resources go into the .pck file. This means that anything in your game folder will be accessible at runtime on a player’s machine (via res://). For files like scripts, assets, etc., you want this behavior. For files like Docs, Secrets, etc., you almost certainly don’t want this behavior. Keep in mind that no matter what, this only attempts to find resources, e.g. .json, .png, .tscn, etc.
To see what will make it onto a player’s machine, you can select “Export all resources in the project except resources checked below” and simply browse the list to see what will end up there:
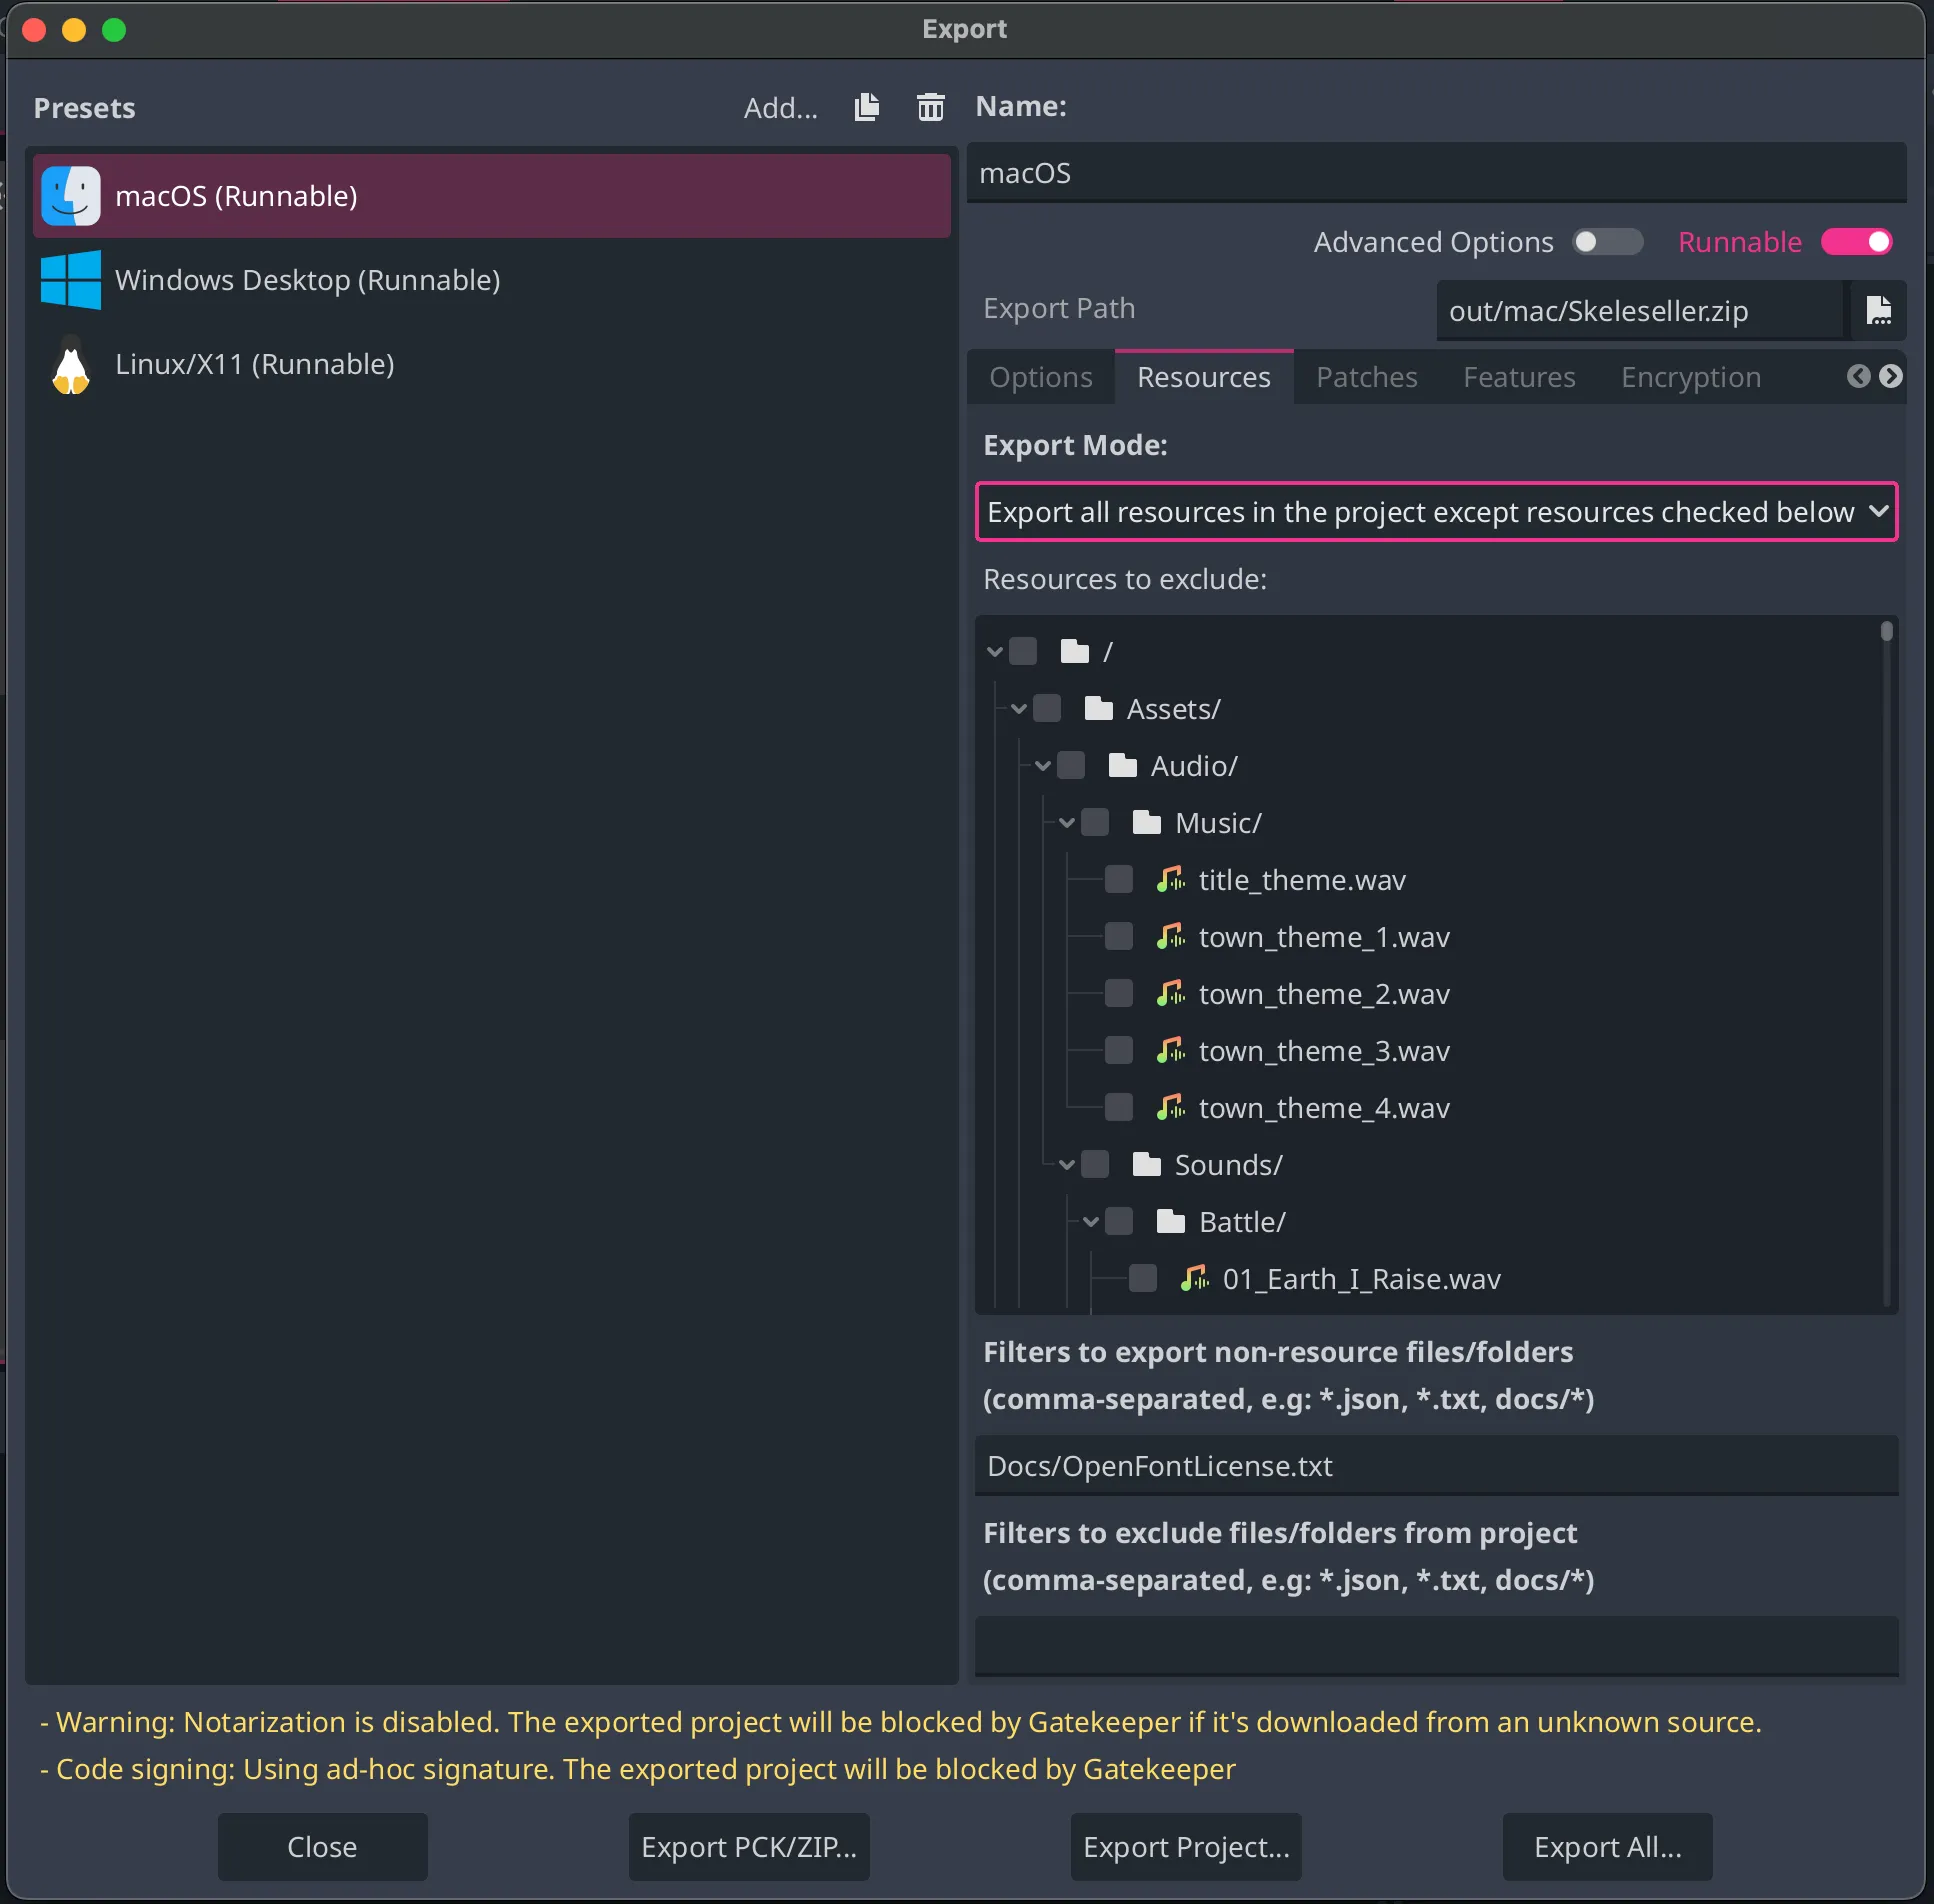
Then, you can simply exclude those files or type them in the filter to exclude them.
Alternatively, you can open .pck files with GodotPCKExplorer. I couldn’t get it working on macOS, but the Linux version worked as I would expect; I ran ./GodotPCKExplorer.Console -l MyGame.pck.
Including license files
Section titled “Including license files”Godot exports everything to a .pck file, and some licenses (like the Open Font License) stipulate that the file must be included in an easily viewable way. Most users would not consider opening a .pck file easy, so you would need it to show as a plaintext file. This means you need to add the file to the exported folder/.zip after exporting through Godot but before distributing it. In other words, Godot does not provide a method for exporting files outside of a .pck. However, an add-on could provide this functionality, e.g. this one (which I haven’t tried).
Troubleshooting
Section titled “Troubleshooting”Export buttons are disabled
Section titled “Export buttons are disabled”This could be due to not having export templates installed. See Exporting builds from Godot#Installing export templates.
Exported game crashes on macOS
Section titled “Exported game crashes on macOS”Instead of doing open YourGame.app, do cd YourGame.app/Contents/MacOS → ./YourGame. That should show errors that won’t show when you use open.
In my specific case, I saw ERROR: Can't load dependency: res://Src/SceneScripts/Main.cs., which seemed could have been a Godot issue but turned out to be my issue 🤦♂️.
Exported game has the wrong executable name
Section titled “Exported game has the wrong executable name”I was exporting to out/windows.zip, so my executable was named windows.exe. It’s better to just output to something like out/windows/YOUR_GAME_NAME.zip so that it gets the correct name.
Build failures don’t change the exit code from 0
Section titled “Build failures don’t change the exit code from 0”This is a known bug. The problem is that a command like Godot --headless --export-release PLATFORM_NAME --path PATH_TO_GAME can fail to build a C# project but not change the exit code from 0.
My workaround for now is going to be to grep for lines like this:
ERROR: Export .NET Project: Failed to build project.WARNING: Project export for preset "Linux/X11" completed with warnings.