Weblate
Overview
Section titled “Overview”Weblate is a self-hostable localization tool. It’s most commonly used for crowd-sourcing the translation of strings.
Features
Section titled “Features”- Checks exist to catch mistakes. E.g. if I have a C# string in English like “Your total is 0”, then it will make sure that the Spanish string also includes "0" and not higher numbers like "1", since both would imply mistakes.
- Note that this particular check only works if the source string has the
csharp-formatflag. In other words, if you have a string with no formatting parameters and you translate it to use{0}, it will not detect this as an error.
- Note that this particular check only works if the source string has the
- Comments, screenshots, etc. to add helpful context for translator. Note that these are all stored within Weblate, not in your Git repo or
.pofiles, hence why back-ups are helpful.- Note: screenshots can be found through a component under Operations → Screenshots
- By default, components will automatically commit after a certain amount of time (configurable via the component’s settings → Version control → “Age of changes to commit” (reference)). They’ll also automatically push to Git by default (“Push on commit”).
Real-world usage tips
Section titled “Real-world usage tips”- It’s not always best to add a screenshot! For example, I had a string saying “Increase the duration of 0” and wanted to indicate what
{0}would be. A screenshot can do that, but if there’s no additional context provided and the text formatting doesn’t matter (e.g. it doesn’t have to fit in some tiny space in the UI), then it’s probably better to add an explanation saying{0} will always be "Blessing of Haste"and maybe even link to “Blessing of Haste” directly on Weblate. - I cannot stress enough that if you’re early on in your project, treat your source language (English in my case) as just another language and manifest all of your string IDs as unique identifiers (like
button.acceptinstead of “Done”). If you use English text as your identifiers, you’re signing yourself up for an incredibly hard time with Weblate since a change to the English text means losing all history, comments, explanations, etc. See this section.
- I installed it through Docker following these steps.
- I don’t trust that Weblate is bulletproof, so I set Weblate up with its own GitHub repo and email address.
- The GitHub repo should only have translation files. Your main application’s repo should use the translation repo as a submodule.
- The email address just needs to be anything that lets you use SMTP. Gmail will suffice.
- You need an app password to send emails through Gmail, which requires that 2-step verification is on.
- If you need to make changes to your
docker-compose.override.ymlwhile setting up, just ctrl+C the currently runningdocker compose upand start it again. The YAML I used for setting everything up:
services:  weblate:    image: weblate/weblate:latest    environment:      # Only allow registration on the whole Weblate instance through invitation      WEBLATE_REGISTRATION_OPEN: 0
      # No real need for captchas if I'm only adding people via invitation      WEBLATE_REGISTRATION_CAPTCHA: 0
      WEBLATE_EMAIL_HOST: smtp.gmail.com      WEBLATE_EMAIL_PORT: 465      WEBLATE_EMAIL_USE_TLS: 0      WEBLATE_EMAIL_USE_SSL: 1      WEBLATE_EMAIL_HOST_USER: this_is_your_gmail_name      WEBLATE_EMAIL_HOST_PASSWORD: 'your-app-password-with-no-spaces'
      # Your users will see emails from this address when they sign up      WEBLATE_DEFAULT_FROM_EMAIL: you@example.com      WEBLATE_SERVER_EMAIL: you@example.com      WEBLATE_SITE_DOMAIN: weblate.example.com
      # You will sign in to Weblate using this email (or "admin" as your username)      WEBLATE_ADMIN_EMAIL: you@example.com
      # This is specifically for use with reverse proxies (like Cloudflare tunnels)      # where THEY provide HTTPS even though we only ever expose Weblate over HTTP.      WEBLATE_SECURE_PROXY_SSL_HEADER: HTTP_X_FORWARDED_PROTO,https
      # Prevent logging 127.0.0.1 when behind a Cloudflare tunnel. If you're using      # a different reverse proxy, then you can drop the WEBLATE_IP_PROXY_HEADER      # bit since it defaults to HTTP_X_FORWARDED_FOR.      #      # Note: this is NOT just cosmetic; the IP address is used for rate-limiting.      WEBLATE_IP_PROXY_HEADER: HTTP_CF_CONNECTING_IP      WEBLATE_IP_BEHIND_REVERSE_PROXY: 1
      # I suggest deleting this immediately after setting Weblate up since this      # will otherwise keep overwriting your password. This is purposely      # insecure to get you to change the password when you sign in (then delete      # this line).      WEBLATE_ADMIN_PASSWORD: hunter2
    ports:    # I'm running on a machine with other services, and this'll be exposed    # through Cloudflare tunnel, hence why I don't want to use port 80.    - 3010:8080
Note: EMAIL_* (as opposed to WEBLATE_EMAIL_*) is the underlying Django configuration and shouldn’t be needed; you set it through WEBLATE_EMAIL_* variables.
- Add a project on Weblate
- When it comes to adding the GitHub repo (which happens when making a component on Weblate):
- Go to the
/manage/ssh/URL in Weblate. - Add “github.com” into “Add host key” at the bottom and press enter.
- They recommend making a special user on GitHub purely for your Weblate stuff, so I made one with the Gmail account from above.
- Then, add the SSH key from
/manage/sshin Weblate to your new GitHub account. - Add the new GitHub account as a collaborator on your translations repo.
- Finally, make sure your repo URL in Weblate is the SSH address, not the HTTPS address, e.g.
git@github.com:YourGitHubName/your-repo-name.git
- Then, add the SSH key from
- Go to the
- Expose the service through a Cloudflare tunnel (see Cloudflare#Tunnel).
Other setup notes:
- Make sure to go through Insights → Community Localization Checklist for your component. It’ll have you set up a GitHub webhook, which is pretty easy.
- Note: the URL for the localization checklist is
/guide/YOUR_PROJECT_NAME/YOUR_COMPONENT_NAME/.
- Note: the URL for the localization checklist is
- If you ever want to change line wrapping, you can do so for each component. The internal property is
po_line_wrap(reference), but you can find it in the UI through your component → Operations → Settings → Files → File format parameters → click the dropdown next to “Long lines wrapping”.- I mention this because I think it’s best to just get rid of line wrapping altogether, that way
xgettextdoesn’t decide to wrap differently from Weblate, causing huge diffs. Note thatxgettextneeds to receive the--no-wrapoption in that case.- If you change this while Weblate already has strings in it, it doesn’t immediately do anything. It presumably only changes something when you modify a translation.
- Also, Weblate mentions in their FAQ that you may need to use a pre-commit hook for formatting in some cases.
- I mention this because I think it’s best to just get rid of line wrapping altogether, that way
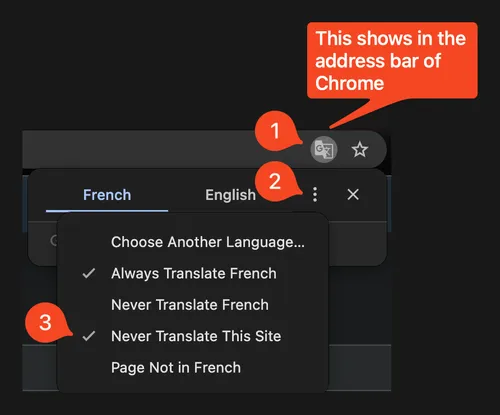
- Make sure your browser doesn’t automatically translate content on your Weblate site for you; it’ll be very confusing.
-
Plural forms
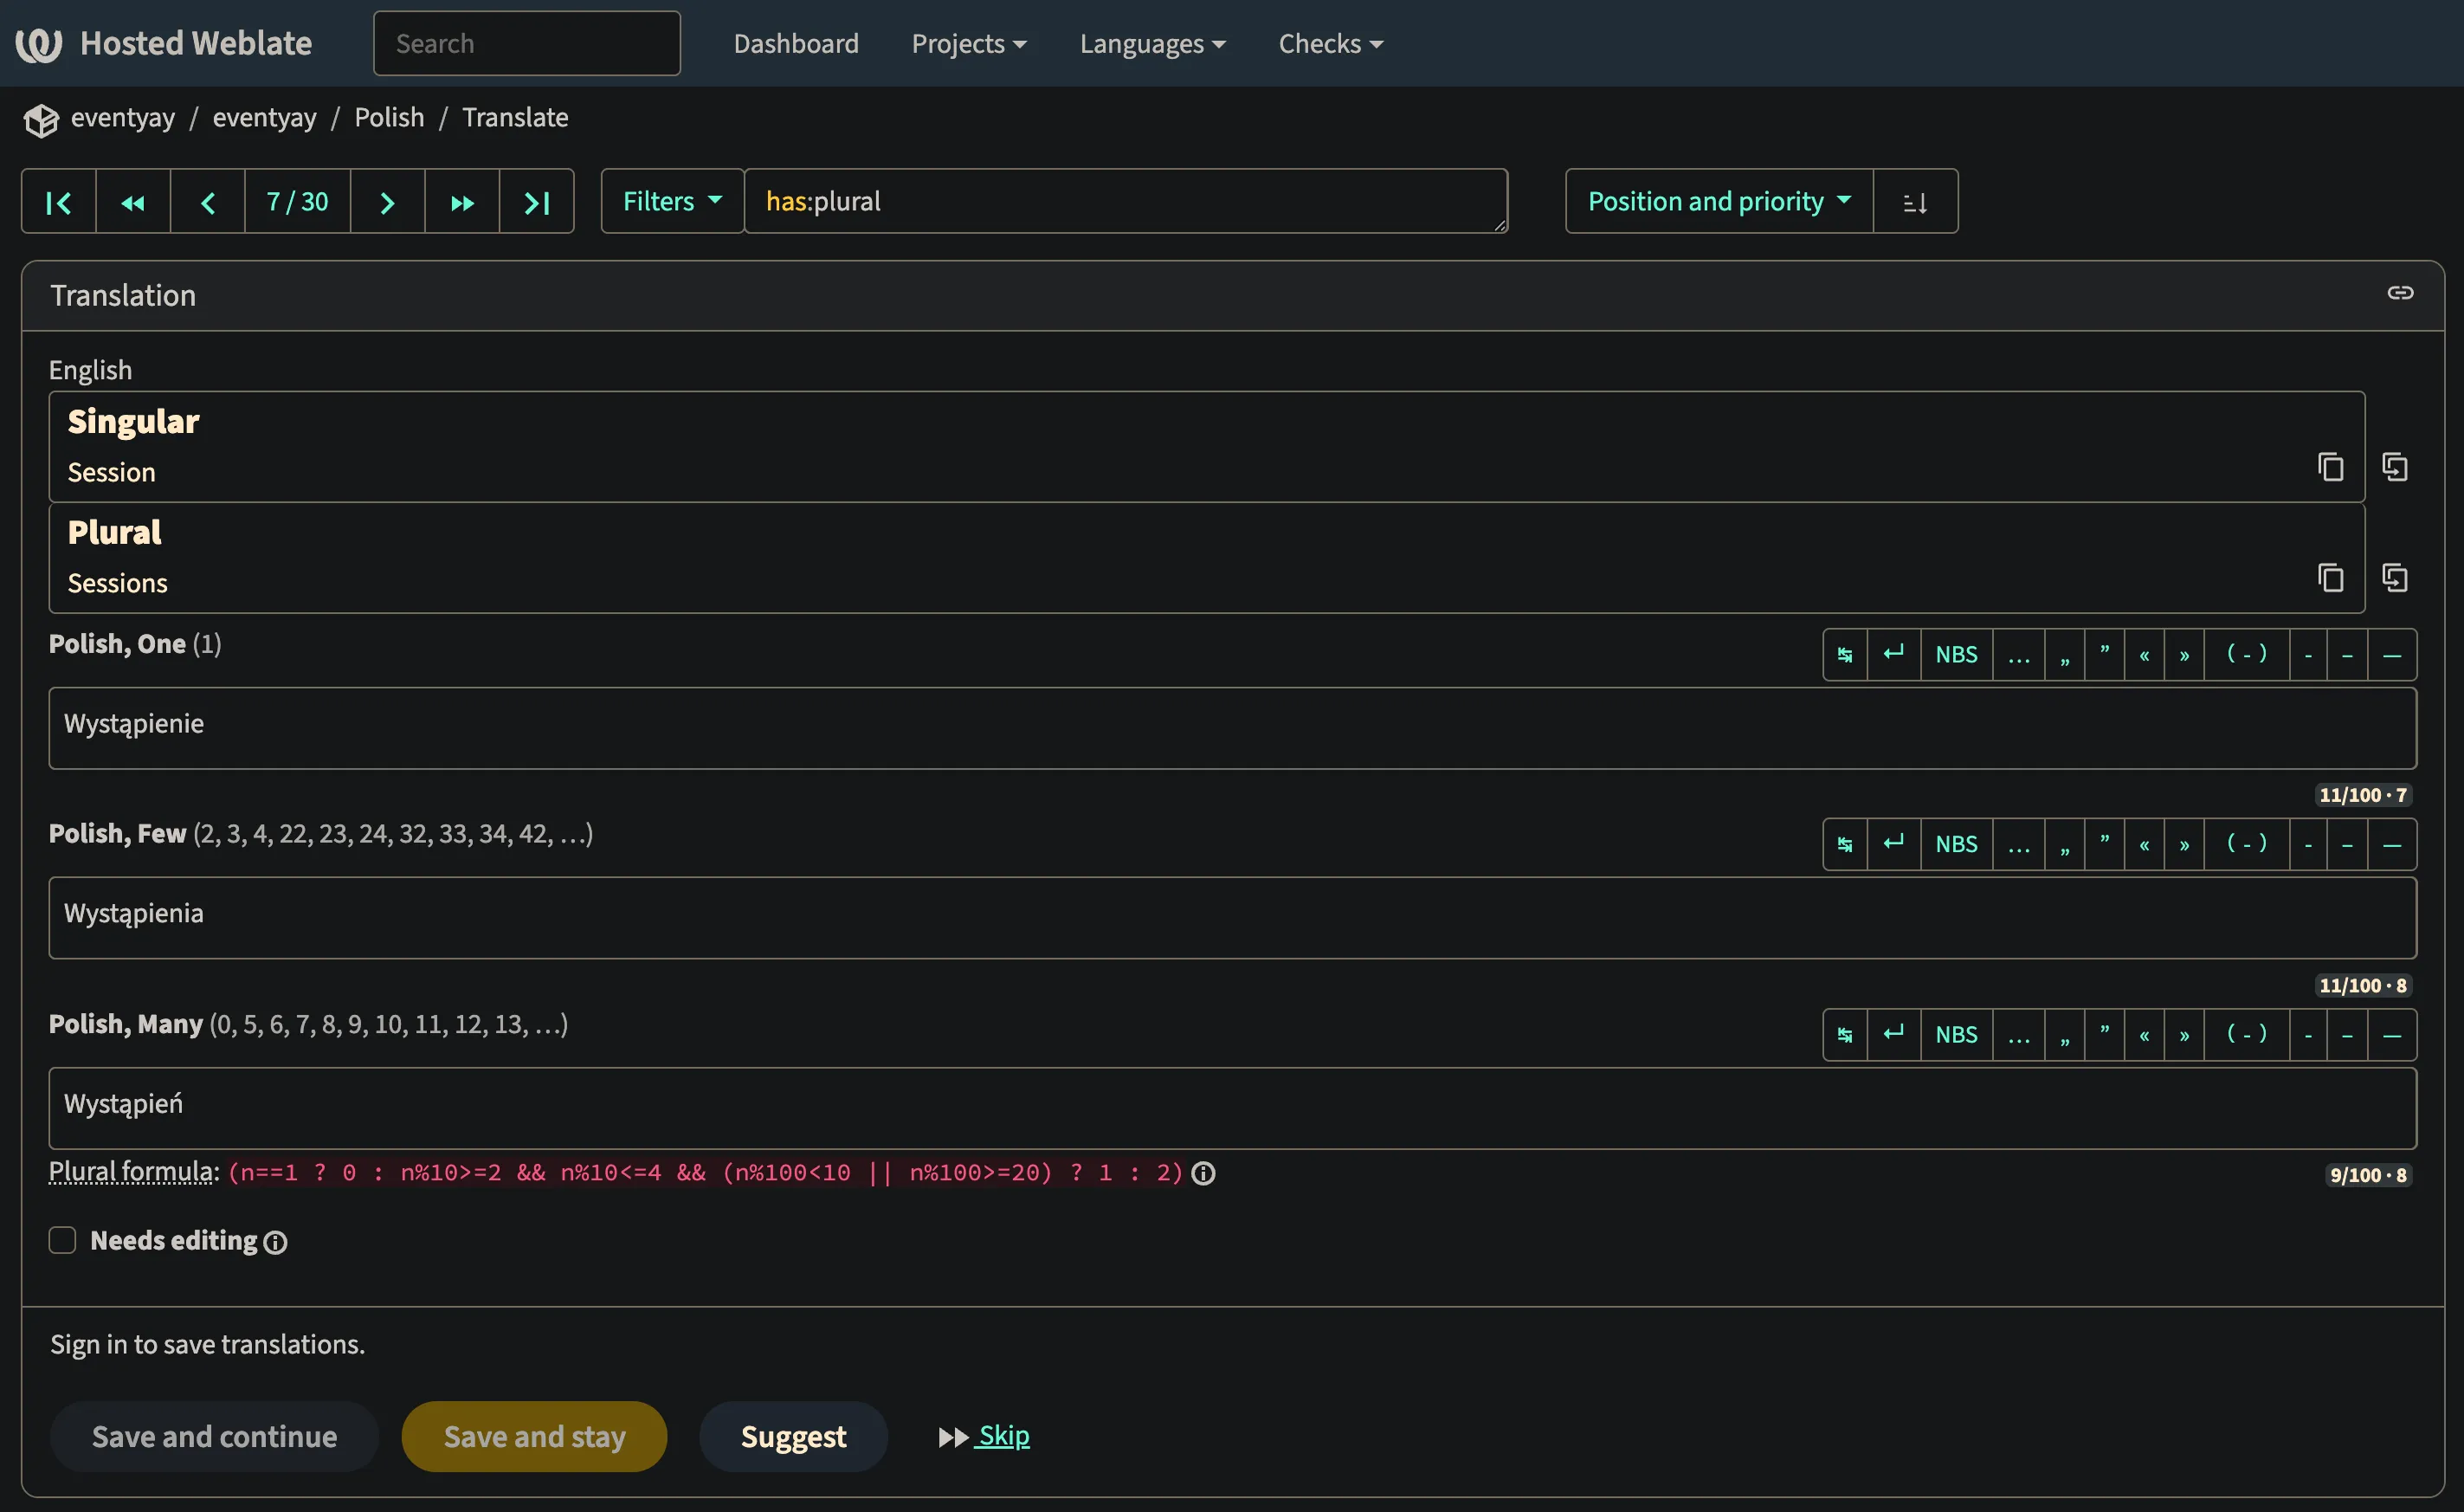
Section titled “Plural forms”English just has “single” and “many”, but some languages have no need to change wording based on the plural form, and some languages have more than two such forms.
Weblate handles this all for you based on the .po file’s Plural-Forms. For example, I looked through hosted.weblate.org for a project that had a Polish plural defined, and here’s what the UI looks like:
Administration
Section titled “Administration”- Basics
- Add new users via 🔧 → Users → scroll to “Add new user”. Add them to the “Users” team, which is a site-wide team.
- You still need to add them to a project team after that, e.g. “Skeleseller” → “Translate”. There are a few ways you can set this up:
- Manually
- Go to your project → Settings → Users → Teams → edit the “Translate” role → Members → Add a user
- Automatically for the specific project:
- Go to your project → Settings → Users → Teams → edit the “Translate” role → Automatic assignments → use
^.*$to match all users → Save
- Go to your project → Settings → Users → Teams → edit the “Translate” role → Automatic assignments → use
- Automatically for any project:
- Click the 🔧 → Teams → edit the “Users” team → click “Translate” so that all users are given the “Translate” role. Note that for built-in teams likes “Users”, you’re forced to assign them to “All public projects”, which may not actually do anything for you if your project is protected. You would need to make a new team with the right roles that apply only to a particular project.
- Manually
- You still need to add them to a project team after that, e.g. “Skeleseller” → “Translate”. There are a few ways you can set this up:
- Commit/push your repo via your project’s page → Operations → Repository Maintenance.
- You can see the output of
git statusby scrolling down on that page.
- You can see the output of
- Viewing logs:
docker compose logs --follow(from the directory with the compose file)- If you want proper error collection and logging, self-host Sentry and point Weblate at it (I haven’t done this yet at the time of writing)
- Backups:
- Manual: go to your project → Operations → Backups → click Trigger backup → wait a bit → refresh the page → click the
.zipfile it created to download it.
- Manual: go to your project → Operations → Backups → click Trigger backup → wait a bit → refresh the page → click the
- Add new users via 🔧 → Users → scroll to “Add new user”. Add them to the “Users” team, which is a site-wide team.
- Git
- ⭐️ Your workflow should generally be:
- Lock components on Weblate (reference)
- Note: if you’re curious whether this will affect someone right now, you can click your project → Insights → History to see when the last edit was. If it was very recent and you don’t have a lot of translators on your project, it may be worth pinging them to say that you’re locking things temporarily.
- Commit/push on Weblate (if they weren’t automatically done already)
- Pull from your dev machine (make sure you’re on the right branch—
git switch main && git pull) - Make a new branch (
git checkout -b update-translations) - Make changes (generate
.poand.potfiles, modify translations, etc.) - PR them through GitHub
- Switch back to
main(git switch main && git pull && git branch -d update-translations) - Unlock components on Weblate
- Lock components on Weblate (reference)
- Connect to the Docker container,
cd /app/data/vcs, find your repo, and rungitcommands directly if you want.
- ⭐️ Your workflow should generally be:
- Let Kevin know priorities: game settings getting tabs, maybe some controller follow-ups, and Spanish
- Mark all strings untranslated (reference)
- Click a component → Operations → Bulk edit
- Click “Filters” to see a list of suggestions. I went with
state:>=translatedjust to get every string since I had provided machine translations so far. - Change “State to set” to “Needs editing”.
- If installed with Docker, you can run some commands directly in the container:
- Get the container ID of weblate/weblate via
docker ps -a docker exec -it DOCKER_CONTAINER_ID bash- Once inside, run
weblateto see all possible commands. E.g.weblate shellwill give a Django shell that you could use to, say, directly create a user (see how the official code callscreate_userhere):weblate shell -c "from django.contrib.auth import get_user_model; User = get_user_model(); u = User.objects.create_user(username='toto', email='toto@example.com', full_name='Toto'); u.set_password('toto'); u.is_active = True; u.save()"
- E.g. you can change a password via
weblate changepassword --help
- Get the container ID of weblate/weblate via
Fixing merge issues
Section titled “Fixing merge issues”In general, they suggest merging Weblate translations first, then doing anything outside of Weblate second (although keep in mind that you should lock Weblate after merging it so that people can’t keep making changes (reference)). But if you’re already in a state where Weblate says something like Could not rebase local branch onto remote branch, then you should follow these instructions.
What follows is how I followed those instructions. First, my setup:
- I’m self-hosting Weblate from LinuxMachine.
- I develop using my Mac.
Instructions:
- From Mac, clone the translations repo from GitHub.
- Add my self-hosted Weblate as a remote:
- Go to the “Repository maintenance” page and scroll down to find “Weblate repository”, e.g.
https://weblate.skeleseller.com/git/skeleseller/scripts/- Note: make sure to set it to
httpsif you’re using a Cloudflare tunnel, otherwise you may see an issue likefatal: revision walk setup failed.
- Note: make sure to set it to
git remote add weblate https://weblate.skeleseller.com/git/skeleseller/scripts/- Add credentials:
git remote add weblate https://username:APIKEY@weblate.skeleseller.com/git/skeleseller/scripts/- Your username should also show on that page at the bottom (it’s probably
admin). - The API key can be found by logging in to Weblate → click profile icon → Settings → API access
- ⚠️ This will cause
git remote -vto show your username and API key, so be careful! You could bypass this step and it’ll just ask you every time for that information (in which case you just need to typeadminand your API key, not the@weblate.skeleseller.com/git/skeleseller/scripts/).
- Your username should also show on that page at the bottom (it’s probably
- Go to the “Repository maintenance” page and scroll down to find “Weblate repository”, e.g.
git remote update weblategit merge weblate/main- (fix conflicts)
- NOTE: the most common merge conflict I’ve run into so far is one like this:

- Here, you can see that both “fuzzy” and the line number changed. I want the updated line number from the incoming change but for the string to no longer be considered fuzzy from a translator’s change on Weblate. I have to manually fix those cases.
git push origin HEAD:main
Troubleshooting
Section titled “Troubleshooting”Updating a source string can cause Weblate to lose history, comments, screenshots, explanations, and permalinks
Section titled “Updating a source string can cause Weblate to lose history, comments, screenshots, explanations, and permalinks”Note: permalinks are based on checksums (e.g. example.com/weblate/translate/project/component/en/?checksum=b3aaa3460cc887b0), so if the source string changes enough, the checksum will also change. This is especially insidious because you won’t have any idea what the checksum used to point to without reverting your repo, and you may have permalinks from outside of your codebase. E.g. I wrote a translation guide document that I shared with people, and it contained permalinks to strings. I have no workflow to detect if those break.
If the update is due to moving files in your Git repo, then they have a specific process for this (reference).
If the update is just due to changing a source string in English (e.g. “Okay” → “OK”), then you may be out of luck. 😓 For example, this is the scenario that I was in:
- Our source strings have the English text as the
msgidin a.potfile. - We would change those source strings in the code such that
xgettextwould update the.potfile. For example, perhaps the string “Okay” would change to “Done”. - At this point, we would lose all history in Weblate.
msgmerge has a --previous option which will keep contextual information in a file if you already had a translation for that string. For example, if I change “Okay” to “Okay 2” and run msgmerge with --previous, the resulting french.po file looks like this:
#: Src/I18N/Messages/DialogStrings.cs:22#, fuzzy#| msgctxt "Buttons"#| msgid "Okay"msgctxt "Buttons"msgid "Okay 2"msgstr "D’accord"Without --previous, it looks like this:
#: Src/I18N/Messages/DialogStrings.cs:22#, fuzzymsgctxt "Buttons"msgid "Okay 2"msgstr "D’accord"If you don’t see this behavior, it’s likely because you don’t have a translation in your .po file. With no translation, msgmerge sees no reason to keep the old ID since the translator would never have seen the old string.
When #| msgid exists in a .po file (which is what --previous adds), Weblate will render it just for that specific language like this: 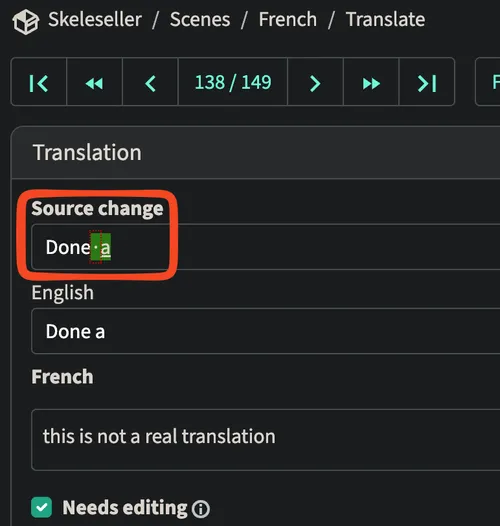
- As you can see, when I changed “Done” to “Done a” while already having a French translation, Weblate marks this as a “Source change” and shows the diff. However, it still does not retain the comments, history, or anything else.
In general, adding --previous to your msgmerge arguments is probably helpful so that translators can see what a string used to be, but that’s the only information they’ll get.
Also, if you ever restore a string such that its checksum matches a string that used to exist, it will still not have the history. Weblate probably just treats it as a brand new string.
The only “sure-fire” solution seems to be using resilient IDs for your msgids rather than English strings, then treating English as just another translation. Weblate calls this “monolingual gettext” (reference). For example, instead of manifesting Translate("Okay") from your code, you would do something like Translate(StringIds.BUTTON_OKAY), then you would never change that ID. As for what to pick for your IDs:
- Opaque IDs like GUIDs: these never have to change, but they’re meaningless on their own. As shown above though, you can manifest them in your code in such a way that the variable name provides meaning, e.g.
BUTTON_OKAY = "1234-56789-...";. - CSS-style IDs: these are something like
Tr("titlescreen.buttons.ok"). While these are somewhat informative, it’s possible that some aspect of the ID needs to change, e.g. you take the button out of your title screen and now want it to be"generic.buttons.ok", or you stop it from being a button altogether and now it’s just"generic.ok".
”Could not lock the repository, another operation is in progress.”
Section titled “”Could not lock the repository, another operation is in progress.””This happened when I tried to commit or push through /projects/PROJECT_NAME/repository. Restarting the Docker container did nothing.
I ran weblate pushgit --all inside the container and got the same issue: [2025-12-04 23:46:00,930: WARNING/774] Command failed: WeblateLockTimeoutError: Lock on skeleseller/scripts (repo) could not be acquired in 120s
I checked weblate celery_queues and didn’t see anything there.
I did try to do a git push myself, but I got this:
The authenticity of host 'github.com (140.82.116.4)' can't be established.<blah blah blah>Are you sure you want to continue connecting (yes/no/[fingerprint])? yesFailed to add the host to the list of known hosts (/home/weblate/.ssh/known_hosts).git@github.com: Permission denied (publickey).fatal: Could not read from remote repository.
Please make sure you have the correct access rightsand the repository exists.
After that (and waiting like 20 minutes), it just magically worked again. In conclusion, I think waiting for ~30 minutes fixes this.