ESPHome
Created: 2023-12-17 18:09:57 -0800 Modified: 2023-12-17 18:27:05 -0800
Quick start
Section titled “Quick start”These are just notes for myself for how to start from scratch:
- Note: I saved all of this in my secrets folder, so I can just run from there.
- Save
config.yamlthat I have below. Don’t modify anything in it (unless the URLs are wrong). - Save
secrets.yamlthat I have below. Modify the Wi-Fi stuff. The device password is saved in my password manager. - Run this from the location of the YAML files:
docker run --rm -p 6052:6052 -e ESPHOME_DASHBOARD_USE_PING=true -v "${PWD}":/config -it ghcr.io/esphome/esphome- Click the URL that it spits out
- Update
config.yaml(i.e. with a text editor) and click “Update all”.
It’s a system to control microcontrollers. I went from never even having heard of it to having my microcontroller up and running in <90 minutes (that was while streaming, so times are generally inflated).
Background
Section titled “Background”I got this microcontroller (“Wireless Module CH340 CP2102 NodeMcu V3 V2 Lua WIFI Internet of Things Development Board Based ESP8266 ESP-12E”) for 1.
Its pinout is (reference):
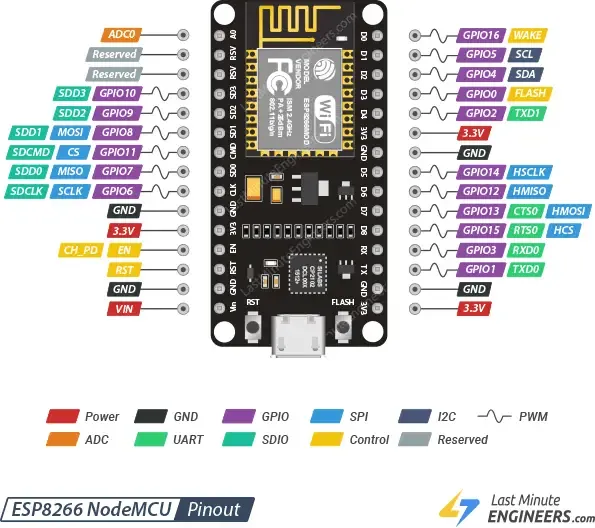
Note: I used the 3.3V-out pin for the capacitive button.
Getting started
Section titled “Getting started”- Note: you need to flash the microcontroller with it connected directly to your computer the first time. After that’s done, you can use the Docker container and do everything over Wi-Fi.
- I installed via pip3 (just needed “pip3 install esphome”)
- Given the microcontroller that I bought (ESP8266 ESP-12E NodeMcu), I needed to use the NodeMCU 1.0 (ESP-12E Module) configuration.
- I went through the wizard and the documentation and got the device flashed. This is somewhat of a “now draw the rest of the owl” step because I had to hide a lot of what I was doing off-screen for this and didn’t take notes. 😢
- After that, I disconnected it from my computer and plugged it in to a USB-to-wall adapter.
- To launch the web interface through Docker:
cd <directory containing the YAML files elsewhere in this note>docker run --rm -p 6052:6052 -e ESPHOME_DASHBOARD_USE_PING=true -v "${PWD}":/config -it ghcr.io/esphome/esphome- Navigate to http://localhost:6052
- You can edit the secrets using the button at the upper right.
- You can edit the YAML for a particular device and then update it over Wi-Fi.
My final config
Section titled “My final config”Here’s my config.yaml for my microcontroller. When you touch the button, it hits a URL, and when you hold it, it hits a different URL:
esphome:  name: testeroni
esp8266:  board: nodemcuv2
# Enable logginglogger:
# Enable Home Assistant APIapi:  password: !secret device_password
ota:  password: !secret device_password
wifi:  ssid: !secret wifi_ssid  password: !secret wifi_password
  # Enable fallback hotspot (captive portal) in case wifi connection fails  ap:    ssid: "Testeroni Fallback Hotspot"    password: !secret fallback_wifi_password
http_request:  useragent: esphome/device  timeout: 10s
binary_sensor:  - platform: gpio    pin: 5    name: "Lights"    on_multi_click:    - timing:        - ON for at least 1s      then:        - http_request.get: http://nfc2.bot.land:3000/bedroomoff    - timing:        - ON for at most 1s      then:        - http_request.get: http://nfc2.bot.land:3000/bedroomon

captive_portal:
Then, my secrets.yaml (saved alongside config.yaml) looks like this:
device_password: hunter2wifi_ssid: my_wifiwifi_password: hunter2butonlinefallback_wifi_password: somerandomlygeneratedthingthatIneverneeded